Tuesday, 31 December 2019
What open-source projects have I contributed to Github in 2019?
Today is the last day of 2019. I wonder what I have done throughout this year. I decide to take a look at my Github page and have my 2019 Github Rewind. I found that I've 1,775 contributions on Github this year.

The most used programming language is JavaScript. In 2020, I would write more code in Python and Go.

Compared with the last year, the number of contributions decreased by 4.6%. This year I've worked on several projects and let's go through them one by one.
# pyramid
[pyramid](https://github.com/wingkwong/pyramid) is a JSON-based Business Rules Engine. I created it just because I was bored and I was working on Red Hat Decision Manager at that time. It is nothing special and I was trying to explore the power of the Rete algorithm.
# react-quiz-component

[react-quiz-component](https://github.com/wingkwong/react-quiz-component) is a ReactJS component allowing users to attempt a quiz. Once again, I created it just for fun and I didn't expect the downloads now go to 7.3K. I kept adding features constantly. Here's the [demo](https://wingkwong.github.io/react-quiz-component/).
# Ourland Searching

[Ourland Searching](https://github.com/OurLandHK/WebApp) was my first contribution project written in ReactJS with Firebase. It is a Neighbour Media Web Application where neighbors could browse community events within 1 - 3 kilometers based on the current location, filter their interesting posts and participate in some events related to public facilities, community activities or social issues.
# Ourland Bigpost

[Ourland BigPost](https://www.collaction.hk/s/wall/) is Ourland Searching's Native IOS/Android version written in Flutter with Firebase. It is my first Dart language project. Basically it is a location-based chat app and you can download it on [Google Play Store](https://play.google.com/store/apps/details?id=hk.ourland.wall&hl=en_US) or [App Store](https://apps.apple.com/us/app/bigpost/id1483312010).
When I was working on this project, we needed some other Dart plugins. Therefore, I created [dart_tel_input](https://github.com/wingkwong/dart_tel_input) which is a Dart widget for entering international telephone numbers with dropdown searching input countries, [geodesy](https://github.com/wingkwong/geodesy) which is a Dart library for geodesic and trigonometric calculations working with points and paths, and [rich_link_preview](https://github.com/wingkwong/rich_link_preview) which is a rich link preview widget written generating a rich presentation of the given link from social meta tags. Dart syntax is similar to Java. By working on these projects, I got hang of it. For those plugins, you can download them on Pub.
# Hong Kong Address Parser

[HKAddressParser](https://github.com/g0vhk-io/HKAddressParser) was one of the projects I found interesting in the [g0vhk.io hackathon](https://www.collaction.hk/h/g0vhk). I tried to contribute and became a part of the team. I met the team members in person on the day we soft-launched the application. This application is used to parse a great number of addresses utilizing open data from OGCIO and the Hong Kong Government. It aims to help convert the addresses to the coordinates, translate addresses and standardize the address format. Here's the [link](https://g0vhk-io.github.io/HKAddressParser/) and you can see one of the use cases [here](https://medium.com/@howawong/%E9%9D%9E%E7%A7%91%E6%8A%80%E4%BA%BA%E5%A6%82%E4%BD%95-%E9%9B%B6code-%E4%BB%A4%E5%88%B0%E8%B3%87%E8%A8%8A%E9%80%8F%E6%98%8E%E5%8C%96-%E9%97%9C%E6%84%9B%E5%85%B1%E4%BA%AB%E8%A8%88%E5%8A%83%E6%8A%95%E9%81%9E%E7%AE%B1%E5%9C%B0%E5%9C%96%E8%A3%BD%E4%BD%9C%E6%95%99%E5%AD%B8-31e2cf521aa1).
I am also writing a python library for it. The link is [hk-address-parser](https://github.com/wingkwong/hk-address-parser).
# Hong Kong ATM Locator

[hk-atm-locator](https://github.com/wingkwong/hk-atm-locator) was the first project I purposed in the next hackathon as a project owner. During that time, the Hong Kong Monetary Authority published the Open Application Programming Interface (API) Framework for the Hong Kong banking sector. However, the interoperability was frustrating as the API was implemented at different standard levels. This project was meant to centralize Hong Kong ATM data in a well-defined yet standardized format and display in a web portal for public use. I needed to register an Open API account and provided company registration evidence in order to use it. Later on, some staff from different banks called me asking me what the purpose was to use their API. At the end, I was only able to collect 10 bank API portal endpoints. The worst-case was to create corresponding Python scapers to scape the data from each bank official website. However, those data might not be up-to-date and it was too time-consuming. I decided to archive this project. Thanks to some contributors, we've made a [web application](https://wingkwong.github.io/hk-atm-locator) showing a number of the ATMs in Hong Kong.
# Vote4.hk

[district-councils-dashboard](https://github.com/cswbrian/district-councils-dashboard) was another large project that I've worked on. Later on, the team registered the domain and decided to change the name to [Vote4.hk](https://vote4.hk/). What it does is to provide 2019 District Council Election information such as voting instructions, constituencies, nominated candidates(stance, media coverage, meeting attendance and electoral history), the past election result, etc.
At the early stage, I was focus on performing data cleansing using Excel and Talend Data Preparation because we collected lots of data online with different formats. I was also working on the frontend part written in ReactJS as well as the backend part. As the Election was approaching, there were more people joining the team and making contributions. Collaboration is the beauty of working on an open-source project.
Starting from mid-Aug, I was way busy preparing for my AWS certification exams and my health condition was getting worse. Hence, there was a period of time I stopped coding as shown in my GitHub activity graph.
After the break, I continued to contribute Vote4.hk. This time I was focused on i18next to deliver the data to the English audience. In the end, this application gained more attention and was able to deliver what we wanted to show to the public.
# Amazon Web Services Open Source Community

After the Election, I got more time and started to contribute [aws-cdk-examples](https://github.com/aws-samples/aws-cdk-examples). I made a pull request to demonstrate how to use AWS CDK to provision a MySQL RDS database inside its dedicated VPC in Python and it got merged after 1 week.

I also made a pull request to [aws-sam-cli](https://github.com/awslabs/aws-sam-cli) to handle dot notations in the path_prop_name variables. Working on such a world-class project was definitely a great experience and I got chances to discuss the code with AWS employees.
# Gorsk
[Gorsk](https://github.com/ribice/gorsk) is a Golang starter kit for developing RESTful services. It is designed to help you kickstart your project, skipping the 'setting-up part' and jumping straight to writing business logic.
I created a Taskfile for relocating the boilerplate package. I wrote a post about it. If you are interested, check out [Relocate Golang Boilerplate Packages using Taskfile](https://dev.to/wingkwong/relocate-golang-boilerplate-packages-using-taskfile-35ae)
# Go Serverless

Recently I wanted to work in a Go project because the best way to learn is to get your hands dirty. Hence, I created [go-serverless](https://github.com/go-serverless) so that I could explore more in both fields. One of the projects is [serverless-iam-dynamodb](https://github.com/go-serverless/serverless-iam-dynamodb) which provides serverless CRUD services in Go with DynamoDB. While working on this project, I've encountered tons of errors. I've resolved them one by one and documented them so that I could share them later on to others.
Like I said before, working on open-source projects definitely gives you lots of benefits. It is not only for the project itself but also for the people and the impact that you create. That's it. How was your 2019? What interesting projects have you done this year? What would you do in 2020? Let me know.
Follow me on [DevTo](https://dev.to/wingkwong) for more blog posts.
Happy New Year 🎉
Deploying an Application with AWS OpsWorks
AWS OpsWorks is a configuration management service providing managed instances of Chef and Puppet which allow you to use code to automate the configurations of your servers. It can be seen as a Platform as a Service (PaaS). However, the difference is that you can have full control over the OS, instance count and make changes directly to the deployment mechanisms.
Before getting started, here are some OpsWorks anatomy.
**Stacks** — A top level AWS Stacks entity. It represents a set of instances that you want to manage collectively, typically because they have a common purpose such as serving PHP applications. In addition to serving as a container, a stack handles tasks that apply to the group of instances as a whole, such as managing applications and cookbooks.
**Layers** — Every stack contains one or more layers, each of which represents a stack component, such as a load balancer or a set of application servers.
**Instances** —An instance represents a computing resource, such as an Amazon EC2 instance, which handles the work of serving applications, balancing traffic, and so on.
**Apps** — It represents code that you want to run on an application server. The code itself resides in a repository such as an Amazon S3 archive; the app contains the information required to deploy the code to the appropriate application server instances.
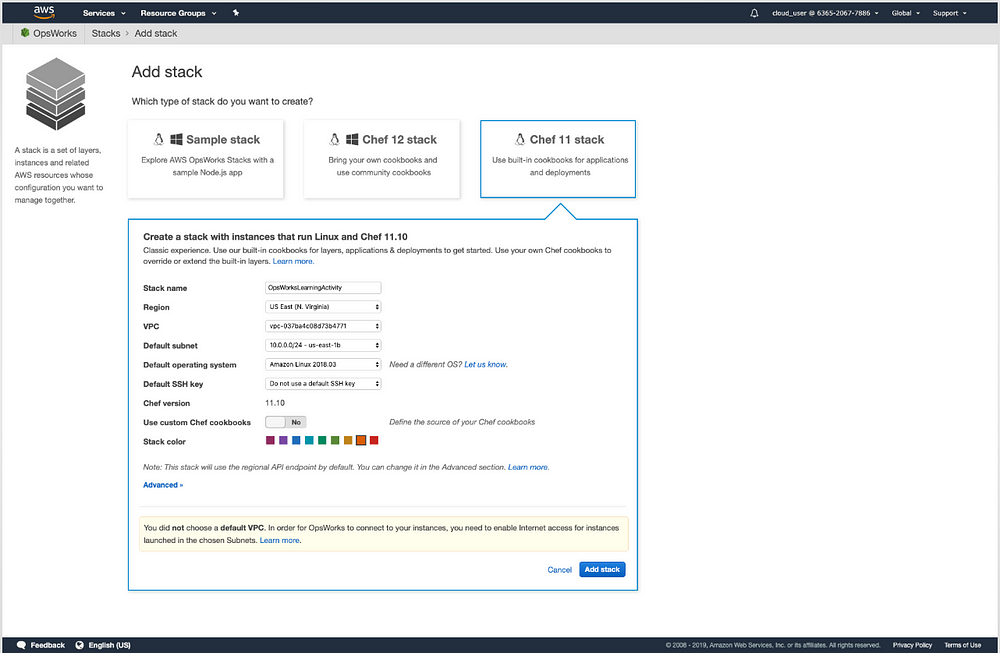
Now we are going to deploy a PHP application using AWS OpsWorks step by step. First of all, go to your AWS OpsWorks console at https://console.aws.amazon.com/opsworks to choose a chef stack and fill in some basic info.
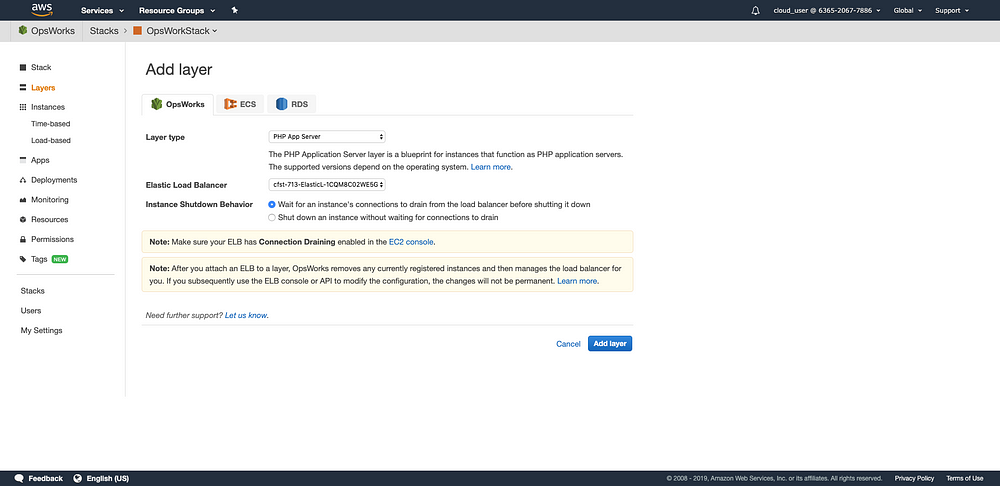
Then, on the left navigation bar, click ‘Layers’. We are going to add a PHP App Server and choose an Elastic Load Balancer (ELB). We also need to wait for an instance’s connections to drain from the load balancer before shutting down.
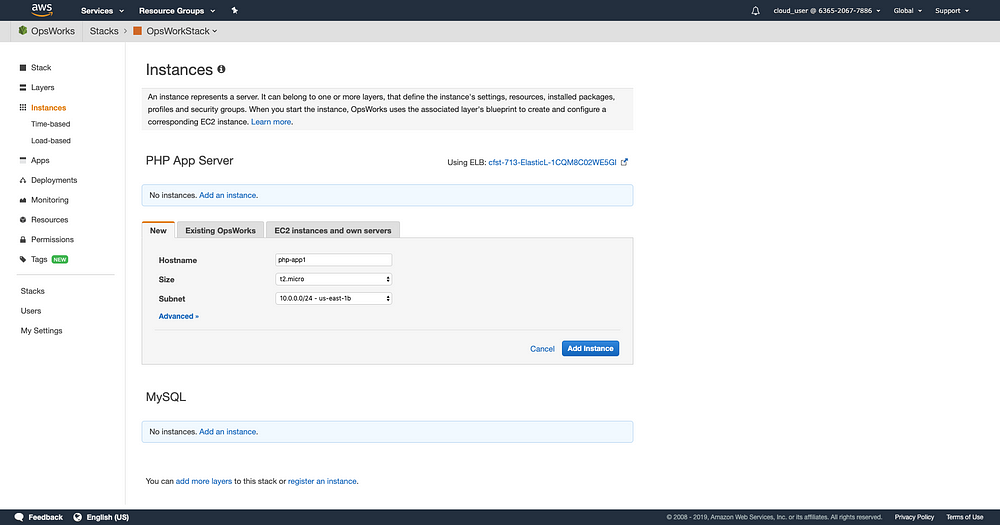
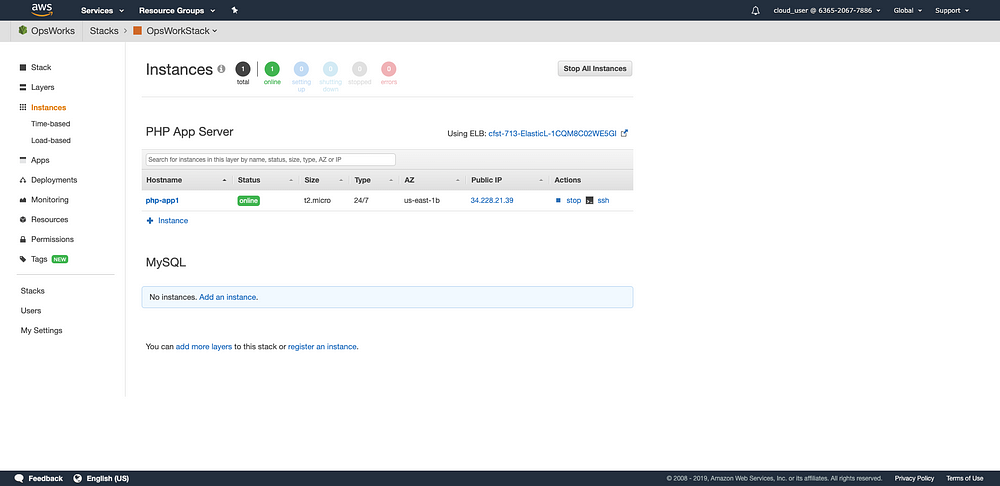
Once we have a layer, the next step is to create an instance. Let’s click ‘Instances’ and add an instance.
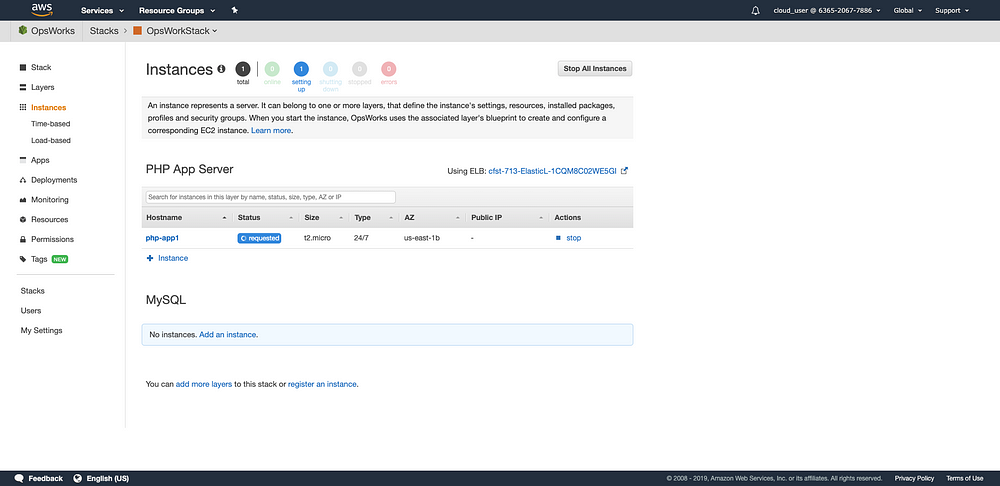
Click ‘start’ and the server is being requested.
The server is now online.
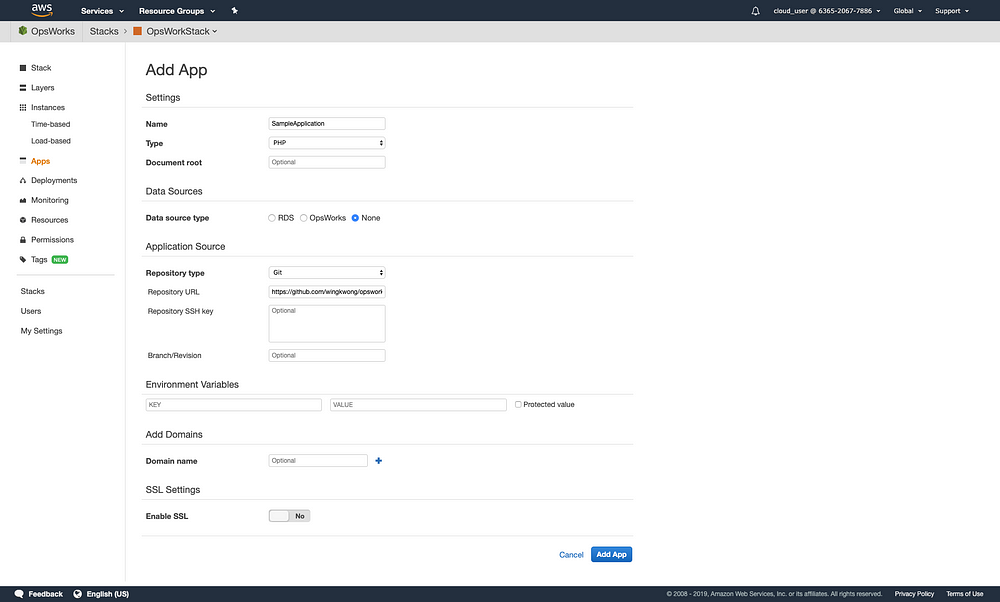
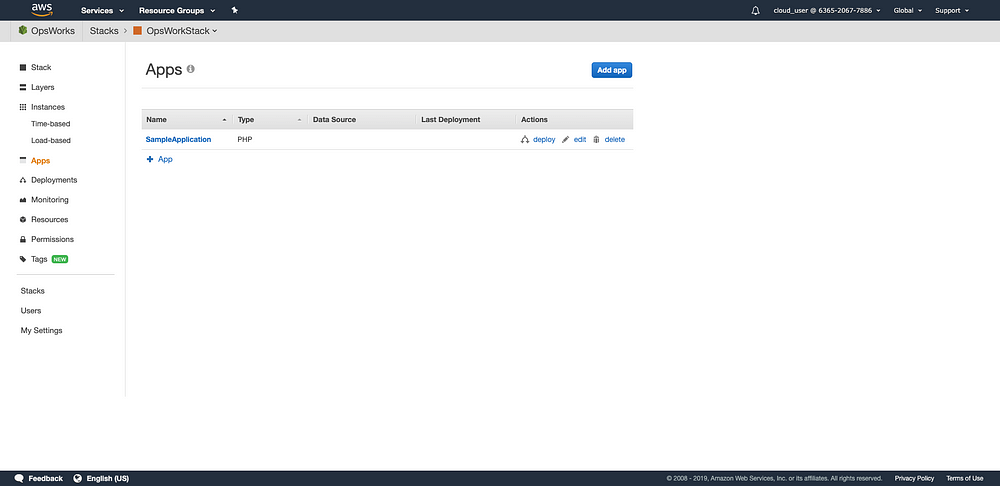
Then, we need to add an App. Click ‘Apps’ and click ‘Add an app’

Let’s fill in the name and choose PHP type. Since this demonstration does not include data source so ‘None’ is selected. Then, you have to specify the source. Click ‘Add App’ after defining the repository URL.
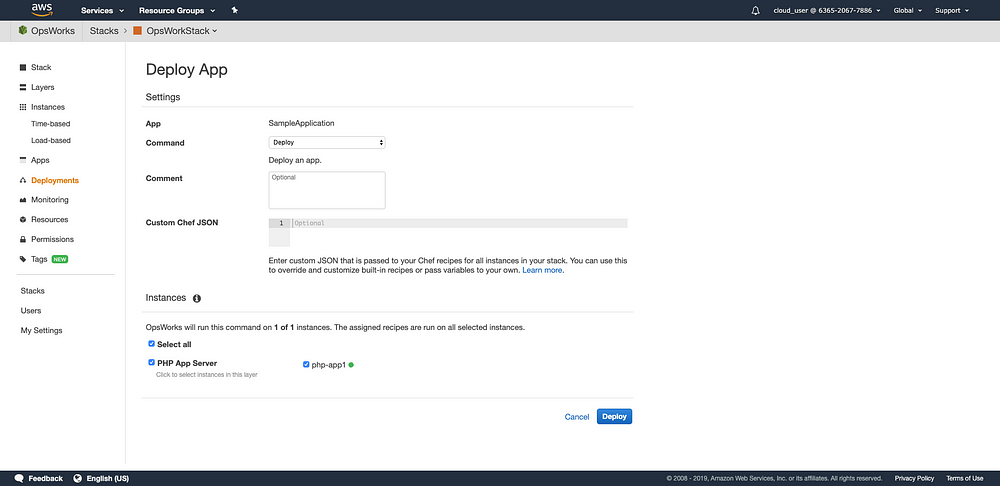
Under ‘Actions’ tab, click ‘deploy’
Under Instances, choose the instance you just created.
The application is now up and running.
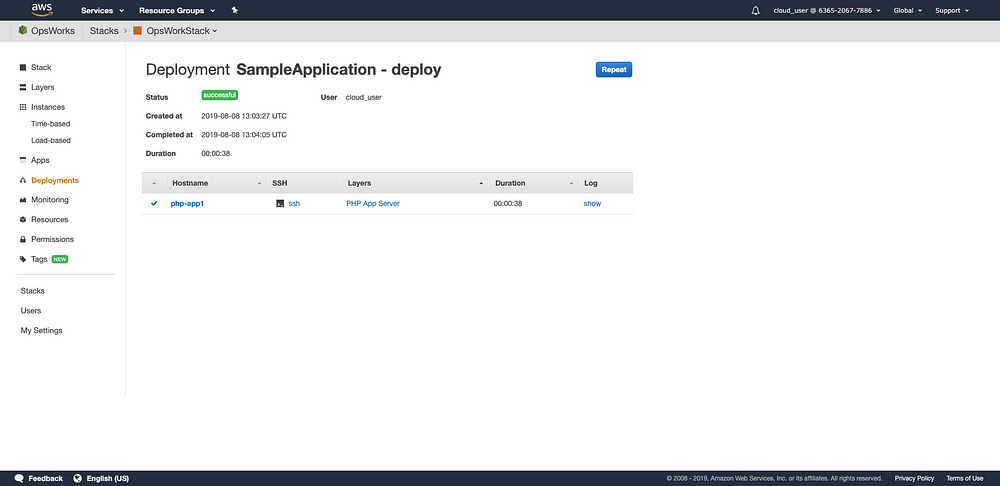
Go to EC2, you will see a new instance. Copy the public IP address and browser it to verify.

Now that you have completed this walkthrough. This article only gives you some basic ideas and steps on deploying an application using AWS OpsWorks. For details, please go to [AWS Documentation](https://docs.aws.amazon.com/opsworks/latest/userguide/welcome.html).
Avoid infinite callbacks in Material-UI Avatar Component
Recently I found an issue on my localhost while working on [this open source project](https://github.com/cswbrian/district-councils-dashboard). The page was actually loading extremely slow and I found that there were tons of images being requested again and again.

The original code is shown as below. It requests ``${homeUrl}/static/images/avatar/${person.uuid}.jpg`` at the beginning, ``${homeUrl}/static/images/avatar/default.png`` is only requested if the main source fails.

```javascript
 {
            e.target.src = `${homeUrl}/static/images/avatar/default.png`
        },
    }}
/>
```

However, if the fallback image source also fails, it will cause infinite callbacks.

To resolve this issue, it is pretty simple. We just need a state to check if it fails or not.

First, make sure ``useState`` is being imported
```javascript
import { useState } from 'react'
```

Then, define the state with a default value and its setter
```javascript
const [imageLoadError, setImageLoadError] = useState(true)
```

For the first time, we set ``imageLoadError`` to false so that it won't execute again.
```javascript
if (imageLoadError) {
    setImageLoadError(false)
    e.target.src = IMAGE_HOST_URI + '/static/images/avatar/default.png'
}
```

That's it. Then resources won't be requested again and again slowing down your webpage.
```javascript
import { useState } from 'react'
...
const [imageLoadError, setImageLoadError] = useState(true)
...
 {
            e.target.src = `${homeUrl}/static/images/avatar/default.png`
            if (imageLoadError) {
                setImageLoadError(false)
                e.target.src = IMAGE_HOST_URI + '/static/images/avatar/default.png'
            }
        },
    }}
/>
```

For the demo purpose, I simplified the code. If you are interested, you can see my pull request [here](https://github.com/cswbrian/district-councils-dashboard/pull/99/files).
Monday, 30 December 2019
A Simple Amazon API Gateway Lambda Authoriser in Go
When you are building your application APIs, you may need to think how to protect those APIs. A simple way to do so is to protect them with Amazon API Gateway and Amazon Lambda authorisers.
Before diving it, you should know that Amazon API Gateway helps us to take the requests and re-route to corresponding backend service. It is a gate keeper providing security. To provide access control to our APIs, we can use Amazon Lambda authorisers which authorise our requests before reaching to our endpoints.
We can use it if we want to implement our custom authorisation scheme. For example, if our authentication strategy is to use bearer token like JWT.
Here's a general auth workflow.
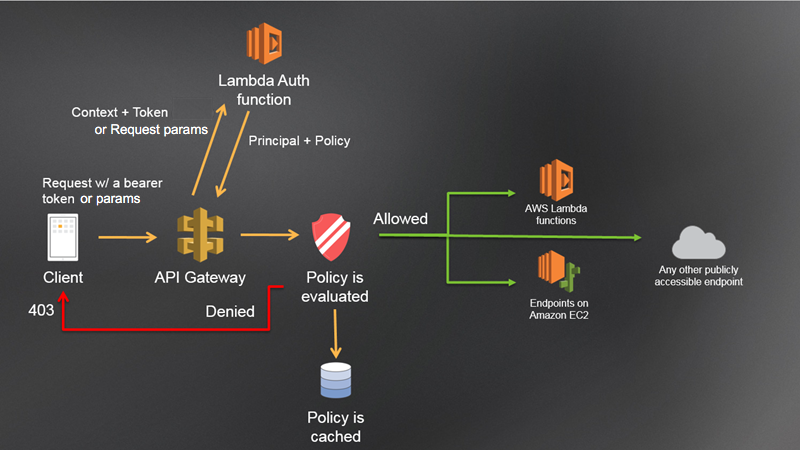
We can authorise the request to see if the bearer token is valid or not to verify the caller's identity. If it's valid, a corresponding permission will be granted and allow the caller to perform different actions.
This example will be written in Go.
The general idea is to create a lambda function to authorise the caller identity. First, we start with the below code.
```
package main
import (
"errors"
"strings"
"github.com/aws/aws-lambda-go/events"
"github.com/aws/aws-lambda-go/lambda"
jwt "github.com/dgrijalva/jwt-go"
"os"
)
func Auth(request events.APIGatewayCustomAuthorizerRequest) (events.APIGatewayCustomAuthorizerResponse, error) {
// TODO
}
func main() {
lambda.Start(Auth)
}
```
Our Auth function takes the input ``APIGatewayCustomAuthorizerRequest`` and returns ``APIGatewayCustomAuthorizerResponse`` and ``error``.
``APIGatewayCustomAuthorizerRequest`` contains data coming in to a custom API Gateway authorizer function such as type, authorisation token and method Arn.
``APIGatewayCustomAuthorizerResponse`` shows the expected format of an API Gateway authorisation response. We have to include principal ID and policy Document.
In our Auth function, we need to extract the token from the request.
```
token := request.AuthorizationToken
```
A simple token should look like
```
Bearer
eyJ0eXAiOiJKV1QiLCJhbGciOiJIUzI1NiJ9.eyJpc3MiOiJPbmxpbmUgSldUIEJ1aWxkZXIiLCJpYXQiOjE1Nzc2ODA5NzEsImV4cCI6MTYwOTIxNjk3MSwiYXVkIjoid3d3LmV4YW1wbGUuY29tIiwic3ViIjoianJvY2tldEBleGFtcGxlLmNvbSIsIkdpdmVuTmFtZSI6IkpvaG5ueSIsIlN1cm5hbWUiOiJSb2NrZXQiLCJFbWFpbCI6Impyb2NrZXRAZXhhbXBsZS5jb20iLCJSb2xlIjpbIk1hbmFnZXIiLCJQcm9qZWN0IEFkbWluaXN0cmF0b3IiXX0.S5yVf1U33yrZPLHh6e9xLkOrexo_78sd9Sl6ItBczzg
```
However, what we need is just the second part. Therefore, we take out the string ``Bearer ``
```
tokenSlice := strings.Split(token, " ")
var tokenString string
if len(tokenSlice) > 1 {
tokenString = tokenSlice[len(tokenSlice)-1]
}
```
Then, we need a key used to sign this JWT to verify the signature.
```
k := os.Getenv("JWT_SECRET_KEY")
```
We can use ``github.com/dgrijalva/jwt-go`` this library to perform the parsing action. We should also validate the expected algo.
If it is successful, we have to return the secret key in a []byte format or else you will get ``Invalid Signature``.
```
var jwtToken, _ = jwt.Parse(tokenString, func(jwtToken *jwt.Token) (interface{}, error) {
if _, ok := token.Method.(*jwt.SigningMethodHMAC); !ok {
return nil, fmt.Errorf("Unexpected signing method: %v", token.Header["alg"])
}
return []byte(k), nil
})
```
Check if the jwtToken is valid or not. If not, return an empty response with error Unauthorized.
```go
if jwtToken != nil && !jwtToken.Valid {
return events.APIGatewayCustomAuthorizerResponse{}, errors.New("Unauthorized")
}
```
If it is valid, we can generate our policy to the caller.
```
return generatePolicy("user", "Allow", request.MethodArn), nil
```
We can create another function called ``generatePolicy``. It takes three parameters - principalID, effect and resource in string type and returns events.APIGatewayCustomAuthorizerResponse at the end.
As I mention before, we need to return principal ID. Let's create a new response struct.
```
authResponse := events.APIGatewayCustomAuthorizerResponse{PrincipalID: principalID}
```
Also, we need to define our PolicyDocument for this response. What we are doing here is to allow the role to perform action ``execute-api:Invoke`` on the request method Arn.
```
if effect != "" && resource != "" {
authResponse.PolicyDocument = events.APIGatewayCustomAuthorizerPolicy{
Version: "2012-10-17",
Statement: []events.IAMPolicyStatement{
{
Action: []string{"execute-api:Invoke"},
Effect: effect,
Resource: []string{resource},
},
},
}
}
```
At the end, return the auth response.
```
return authResponse
```
Let's deploy and test it.
Go to API Gateway console, and click Authorisers. We should see our deployed authoriser. Click Test and we don't input any token.
Click Test and we will see it returns 401 which is Unauthorised.
```
Response
Response Code: 401
Latency 344
Execution log for request [HIDDEN]
Mon Dec 30 08:56:58 UTC 2019 : Starting authorizer: [HIDDEN]
Mon Dec 30 08:56:58 UTC 2019 : Incoming identity: [HIDDEN]
Mon Dec 30 08:56:58 UTC 2019 : Endpoint request URI: [HIDDEN]
Mon Dec 30 08:56:58 UTC 2019 : Endpoint request headers: [HIDDEN]
Mon Dec 30 08:56:58 UTC 2019 : Endpoint request body after transformations: [HIDDEN]
Mon Dec 30 08:56:58 UTC 2019 : Sending request to [HIDDEN]
Mon Dec 30 08:56:58 UTC 2019 : Unauthorized request: [HIDDEN]
Mon Dec 30 08:56:58 UTC 2019 : Unauthorized
```
Put the authorisation token and try again.
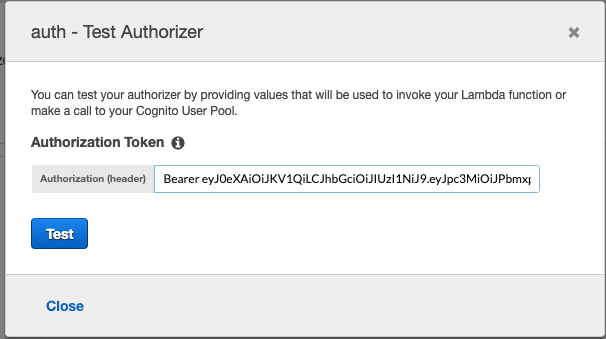
This time it returns 200
```
Response
Response Code: 200
Latency 26
```
and shows the policy statement.
```json
{
"Version": "2012-10-17",
"Statement": [
{
"Action": [
"execute-api:Invoke"
],
"Effect": "Allow",
"Resource": [
"arn:aws:execute-api:ap-southeast-1:*:a123456789/ESTestInvoke-stage/GET/"
]
}
]
}
```
That's it. For the complete code, please check out [here](https://gist.github.com/wingkwong/2bc368c1b5cd116114560d17d4c4de6c).
Implementing i18next to Your React Application
Some of you may know that I've been working on [this open source project](https://github.com/cswbrian/district-councils-dashboard) and some people requested a i18n feature lately.
> i18n: Internationalization (i18n) is the process of developing products in such a way that they can be localized for languages and cultures easily.
Later on, I implementated the feature using react-i18next to assert that needed translations get loaded or that your content gets rendered when the language changes.
The site requires two languages so we need two translation json files, let's say ``en`` and ``zh``, located at ``web/src/locales/en/translation.json`` and ``web/src/locales/zh/translation.json`` respectively. Those two files should look like below
web/src/locales/en/translation.json
```json
{
"candidate.nominateStatus.disqualified": "Disqualified"
}
```
web/src/locales/zh/translation.json
```json
{
"candidate.nominateStatus.disqualified": "取消資格"
}
```
Then, create a js file called ``i18n.js``
```javascript
import i18n from 'i18next'
import { initReactI18next } from 'react-i18next'
import translationEN from 'locales/en/translation.json'
import translationZH from 'locales/zh/translation.json'
i18n.use(initReactI18next).init({
fallbackLng: 'zh',
debug: true,
interpolation: {
escapeValue: false,
},
resources: {
en: {
translation: translationEN,
},
zh: {
translation: translationZH,
},
},
react: {
wait: true,
},
keySeparator: '-',
})
export default i18n
```
> By default, the ``keySeparator`` is ``.`` and we need to change it to other value since our key contains ``.``.
In your ``index.js``, import ``i18n`` you just created
```javascript
import './i18n'
```
The init has been complete. The next step is to replace all the hardcoded values. There are two types of changes - functional componments and class components.
For functional components, we need to use ``useTranslation()``.
```javascript
// Example: CandidatesContainer.js
// ---------------------------------------------
// 1. import useTranslation from react-i18next
import { useTranslation } from 'react-i18next'
// 2. define t from useTranslation()
const { t } = useTranslation()
// 3. use the t function with the key as the parameter
const status = t('candidate.nominateStatus.disqualified')
```
For class components, we need to use ``withTranslation()``.
```javascript
// Example: MainAreas.js
// ---------------------------------------------
// 1. import withTranslation from react-i18next
import { withTranslation } from 'react-i18next'
// 2. define t from the props
const { t } = this.props
// 3. use the t function with the key as the parameter
const text = t('mainAreas.text1')
// 4. wrap the class component with withTranslation HOC
export default withTranslation()(MainAreas)
```
What if we need to show dynamic values based on the selected language? I created a function to handle this case. Our design allows a two-letter locale code in url. We distinguish the lang to select the expected value.
```javascript
export const withLanguage = (name_en, name_zh) => {
var lang = window.location.pathname.match(/^\/([\w]{2})\//)
lang = lang ? lang[1] : 'zh'
return lang === 'en' && name_en ? name_en : name_zh
}
```
The above function is placed in ``utils/helper.js``.
```javascript
// Example: Summary.js
// ---------------------------------------------
// 1. import withLanguage from utils/helper
import { withLanguage } from 'utils/helper'
// 2. withLanguage() takes 2 parameters - value in en and value in zh respectively
// In this example, district.name_en will be used if the lang is en
// if the lang is zh, district.name_zh will be used
// if district.name_en is null, it will fall back to zh
withLanguage(district.name_en, district.name_zh)
// if you are not sure what the field names for both language are, check the query
// which can be found either in the same file or in web/src/queries/gql.js
```
For interpolation, we need to surround the dynamic value by curly brackets in ``translation.json``
```json
{
"districtNewVoterchartContainer.text1": "Voters increased by {{ n }}%"
}
```
and pass an object with the key defined in curly brackets and the dynamic value in the second parameter
```javascript
// Example: DistrictNewVoterChartContainer.js
{
t('districtNewVoterchartContainer.text1', {
n: _.round(meta.increased * 100, 2)
})
}
```
For the links in the menu, we also need to include the current lang in the url. Let's create a function in ``utils/helper.js``
```javascript
export const getCurrentLanguage = () => {
return i18n.language || window.localStorage.i18nextLng || 'zh'
}
```
and use it to retrieve the current language
```javascript
// Example: web/src/components/pages/district/index.js
// ---------------------------------------------
// 1. import getCurrentLanguage from utils/helper
import { getCurrentLanguage } from 'utils/helper'
// 2. call getCurrentLanguage() to retrieve the current language
handleChangeDistrict = (year, code) => {
if (!year || !code) return
const currentLanguage = getCurrentLanguage()
this.props.history.push(`/${currentLanguage}/district/${year}/${code}`)
}
// possible currentLanguage value: en or zh (default)
```
That's it. For more, please check the i18n documentation [here](https://react.i18next.com/).
My journey to open-source projects
Open-source projects provide public source code for everyone to access, use or modification. As a developer, you may use some if they are applicable to be integrated into your projects. It encourages collaboration and participation. Some trending open-source projects include vscode by Microsoft, react-native by FaceBook, tensorflow by TensorFlow™. ## How I started my journey About a year ago, I joined Github, a web-based hosting service for version control and the leading software development platform in the world. During this year, I have contributed a number of projects as well as creating some for people to contribute. My first project I contributed was [OurLand Searching](https://ourland.hk/), a neighbour media web application where you can check out events related to public facilities, community activities or social issues within one to three kilometres based on the current location.  My role in day job during that time was a JavaScript developer. I taught myself ReactJS by watching video tutorials on YouTube or reading some how-to-build-something-using-ReactJS articles in preparation for ReactJS projects some day. This ultimate goal cannot be achieved by learning without practicing. As happened, one of my former colleagues shared a post on Facebook one day. It was from the group Code for Hong Kong and was about looking for ReactJS / Firebase developers to contribute. After understanding the background of this project, I found it meaningful and decided to give it a try even thought I got zero practical experience. First of all, I found the project repository and forked it. The next step was to try to understand the project structure and the code written by other developers. There were dozen of issues listing in Issue page and I left a comment in one of the issues mentioning I was interested in fixing it. My first commit was not purposeful and I was not frustrated as I knew there would be lots of improvement in my code. After several commits, I became a regular contributor. I spent a great deal of time working on this project and I started to revise my goal from preparing myself to making something that matters. Because of this project, I participated my first hackathon hosted by g0v.hk and Station for Open Cultures. A hackathon is a sprint-like event in where different people including developers, UI/UX designers and subject-matter-experts work on their interested projects. Other people are also welcome to join.  In this hackathon, I found another interesting project called [Hong Kong Address Parser](https://g0vhk-io.github.io/HKAddressParser/)(HKAP) by g0vhk.io. It aims to convert unformatted Hong Kong address into standardise tagged address parts with corresponding coordinates. All results are verified by string matching. I decided to contribute it after that day.  I spared some time working on this project and contributed by implementing some new features or fixing existing bugs. I was invited to the first soft launch and it was my first time meeting other two brilliant team members Brain and Nandi in person. And recently HKAP was listed on the showcase of applications on data.gov.hk.  ## Reasons of contributing to open-source projects ### Sharping your coding skills There are a lot of programming languages and you can find a multitude of projects using different programming languages no matter they are trending ones or lesser-known ones. You can dig into the projects, explore the beauty of the coding and learn the knowledge. You can choose the project volume as you wish. If you are the beginner, you may try some projects with less SLOC. If you want to take some challenges, there are still a large number of options. There are a number of developers who do not write clean code, which is code that is readable for other other people and maintainable to minimise the need for misunderstandings. In an open-source project, you will see a lot of clean code which reminds you to get rid of code smells before committing your work. A single function can be written in several ways with the same expected result. There is no best code, only the better one. Sometimes your code may be rewritten by someone else. You may either learn from mistakes or challenge it. ### Working with other people All people, even with non-technical background, are welcome to contribute to open-source projects. You can meet lots of bright people with different roles like programmers, designers, or users and share ideas with them and it does not matter where you are physically. Code is important but not at all. Listening to the ideas from different perspectives can definitely reshape the way you think and how you code. Sometimes it is not only building a software, but also building a connection with people. ### Giving Back to the Community Contributing is for the greater good. I will not say that doing so could create a global impact but something that matters. There is no way to measure the impact realistically. Giving is not about receiving. If someone can achieve some goals using what you made efficiently, it means that your work is valuable. And sometimes you can see something which the government does not care about, people would probably build it instead and make it public. ## What’s Next A few months ago, I started to work on a project called [OurLandGetcha](https://github.com/OurLandHK/OurlandGetcha), which is basically a native iOS/Android version of OurLand Searching written in Flutter with Firebase. In this project, I created some small projects as plugins used in OurLandGetcha such as [Rich Link Preview](https://github.com/wingkwong/rich_link_preview), [geodesy](https://github.com/wingkwong/geodesy) and [Dart Tel Input](https://github.com/wingkwong/dart_tel_input). I made them open-source as well and deployed to Pub, the package manager for the Dart programming language, for other people to use. ## Conclusion Working on open-source projects definitely gives you lots of benefits. It is not only for the project itself, but also for the people and the impact that you create. Have you worked on some open-source projects before? Leave the comment below sharing what you think.
Getting Hands Dirty with AWS CDK in AWS Cloud9
AWS CDK stands for AWS Cloud Development Kit. It allows us to create and provision AWS infrastructure deployments using programming languages. Currently it supports TypeScript, Java, .Net and Python.
It's been a while and I finally got some time to play with AWS CDK.
Go to IAM, create a user called ``cdk-user`` with AWS Management Console access

Grant AdministratorAccess to cdk-user

Go to AWS Cloud 9 and create a new environment
> Note: AWS Cloud9 is a cloud-based integrated development environment (IDE) that lets you write, run, and debug your code with just a browser.

Leave Step 2 as default,

Grab a coffee while waiting for AWS Cloud 9 initialization

Install aws-cdk

Let's init a sample app provided by AWS
```python
cdk init sample-app --language python
```
Oops..Got the first error
```
`cdk init` cannot be run in a non-empty directory!
```
By default, AWS Cloud9 workspace comes with a README.md. Let's remove it
```
rm README.md
```
If you are not using AWS Cloud9, you may need to activate the virtualenv providing a self-contained, isolated environment to run our Python code without polluting your system Python.
```
source .env/bin/activate
```
Install the required python module from a file called ``requirements.txt``
```
pip install -r requirements.txt
```
The project structure should look like this

This sample app will create the following resources
- SQS Queue
- SQS QueuePolicy
- SNS Topic
- SNS Subscription
- S3 Bucket x 4
- IAM User
The entry point is ``app.py``. It creates two stacks, namely ``hello-cdk-1`` and ``hello-cdk-2`` in ``us-east-2`` and ``us-west-2`` respectively.
```python
#!/usr/bin/env python3
from aws_cdk import core
from hello.hello_stack import MyStack
app = core.App()
MyStack(app, "hello-cdk-1", env={'region': 'us-east-2'})
MyStack(app, "hello-cdk-2", env={'region': 'us-west-2'})
app.synth()
```
Import the required packages.
> Note: For more, you can check the latest API doc [here](https://docs.aws.amazon.com/cdk/api/latest/python/)
```python
from aws_cdk import (
aws_iam as iam,
aws_sqs as sqs,
aws_sns as sns,
aws_sns_subscriptions as subs,
core
)
```
Create a SQS Queue
```python
queue = sqs.Queue(
self, "MyFirstQueue",
visibility_timeout=core.Duration.seconds(300),
)
```
Create a SNS Topic
```python
topic = sns.Topic(
self, "MyFirstTopic",
display_name="My First Topic"
)
```
Subscribe the queue to receive any messages published to the topic
```python
topic.add_subscription(subs.SqsSubscription(queue))
```
``HelloConstruct`` is a custom construct that we defined in our app and it creates four buckets in this stack.
```python
hello = HelloConstruct(self, "MyHelloConstruct", num_buckets=4)
```
``hello/hello_stack.py``
```python
from aws_cdk import (
aws_iam as iam,
aws_s3 as s3,
core,
)
class HelloConstruct(core.Construct):
@property
def buckets(self):
return tuple(self._buckets)
def __init__(self, scope: core.Construct, id: str, num_buckets: int) -> None:
super().__init__(scope, id)
self._buckets = []
for i in range(0, num_buckets):
self._buckets.append(s3.Bucket(self, f"Bucket-{i}"))
def grant_read(self, principal: iam.IPrincipal):
for b in self.buckets:
b.grant_read(principal, "*")
```
Create a user and grant the read permission for the user
```python
user = iam.User(self, "MyUser")
hello.grant_read(user)
```
When we run the CDK app, an AWS CloudFormation template for each stack will be generated. It is called **synthesize** in CDK parlance. To synthesize the app, use ``cdk synth`` with the application name.
```python
cdk synth hello-cdk-1
```
A cfn template will be generated
```yaml
Resources:
MyFirstQueueFF09316A:
Type: AWS::SQS::Queue
Properties:
VisibilityTimeout: 300
Metadata:
aws:cdk:path: hello-cdk-1/MyFirstQueue/Resource
MyFirstQueuePolicy596EEC78:
Type: AWS::SQS::QueuePolicy
Properties:
PolicyDocument:
Statement:
- Action: sqs:SendMessage
Condition:
ArnEquals:
aws:SourceArn:
Ref: MyFirstTopic0ED1F8A4
Effect: Allow
Principal:
Service: sns.amazonaws.com
Resource:
Fn::GetAtt:
- MyFirstQueueFF09316A
- Arn
Version: "2012-10-17"
Queues:
- Ref: MyFirstQueueFF09316A
Metadata:
aws:cdk:path: hello-cdk-1/MyFirstQueue/Policy/Resource
MyFirstQueuehellocdk1MyFirstTopicB252874C505090E8:
Type: AWS::SNS::Subscription
Properties:
Protocol: sqs
TopicArn:
Ref: MyFirstTopic0ED1F8A4
Endpoint:
Fn::GetAtt:
- MyFirstQueueFF09316A
- Arn
Metadata:
aws:cdk:path: hello-cdk-1/MyFirstQueue/hellocdk1MyFirstTopicB252874C/Resource
MyFirstTopic0ED1F8A4:
Type: AWS::SNS::Topic
Properties:
DisplayName: My First Topic
Metadata:
aws:cdk:path: hello-cdk-1/MyFirstTopic/Resource
MyHelloConstructBucket0DAEC57E1:
Type: AWS::S3::Bucket
UpdateReplacePolicy: Retain
DeletionPolicy: Retain
Metadata:
aws:cdk:path: hello-cdk-1/MyHelloConstruct/Bucket-0/Resource
MyHelloConstructBucket18D9883BE:
Type: AWS::S3::Bucket
UpdateReplacePolicy: Retain
DeletionPolicy: Retain
Metadata:
aws:cdk:path: hello-cdk-1/MyHelloConstruct/Bucket-1/Resource
MyHelloConstructBucket2C1DA3656:
Type: AWS::S3::Bucket
UpdateReplacePolicy: Retain
DeletionPolicy: Retain
Metadata:
aws:cdk:path: hello-cdk-1/MyHelloConstruct/Bucket-2/Resource
MyHelloConstructBucket398A5DE67:
Type: AWS::S3::Bucket
UpdateReplacePolicy: Retain
DeletionPolicy: Retain
Metadata:
aws:cdk:path: hello-cdk-1/MyHelloConstruct/Bucket-3/Resource
MyUserDC45028B:
Type: AWS::IAM::User
Metadata:
aws:cdk:path: hello-cdk-1/MyUser/Resource
MyUserDefaultPolicy7B897426:
Type: AWS::IAM::Policy
Properties:
PolicyDocument:
Statement:
- Action:
- s3:GetObject*
- s3:GetBucket*
- s3:List*
Effect: Allow
Resource:
- Fn::GetAtt:
- MyHelloConstructBucket0DAEC57E1
- Arn
- Fn::Join:
- ""
- - Fn::GetAtt:
- MyHelloConstructBucket0DAEC57E1
- Arn
- /*
- Action:
- s3:GetObject*
- s3:GetBucket*
- s3:List*
Effect: Allow
Resource:
- Fn::GetAtt:
- MyHelloConstructBucket18D9883BE
- Arn
- Fn::Join:
- ""
- - Fn::GetAtt:
- MyHelloConstructBucket18D9883BE
- Arn
- /*
- Action:
- s3:GetObject*
- s3:GetBucket*
- s3:List*
Effect: Allow
Resource:
- Fn::GetAtt:
- MyHelloConstructBucket2C1DA3656
- Arn
- Fn::Join:
- ""
- - Fn::GetAtt:
- MyHelloConstructBucket2C1DA3656
- Arn
- /*
- Action:
- s3:GetObject*
- s3:GetBucket*
- s3:List*
Effect: Allow
Resource:
- Fn::GetAtt:
- MyHelloConstructBucket398A5DE67
- Arn
- Fn::Join:
- ""
- - Fn::GetAtt:
- MyHelloConstructBucket398A5DE67
- Arn
- /*
Version: "2012-10-17"
PolicyName: MyUserDefaultPolicy7B897426
Users:
- Ref: MyUserDC45028B
Metadata:
aws:cdk:path: hello-cdk-1/MyUser/DefaultPolicy/Resource
CDKMetadata:
Type: AWS::CDK::Metadata
Properties:
Modules: aws-cdk=1.16.3,@aws-cdk/assets=1.16.3,@aws-cdk/aws-cloudwatch=1.16.3,@aws-cdk/aws-ec2=1.16.3,@aws-cdk/aws-events=1.16.3,@aws-cdk/aws-iam=1.16.3,@aws-cdk/aws-kms=1.16.3,@aws-cdk/aws-lambda=1.16.3,@aws-cdk/aws-logs=1.16.3,@aws-cdk/aws-s3=1.16.3,@aws-cdk/aws-s3-assets=1.16.3,@aws-cdk/aws-sns=1.16.3,@aws-cdk/aws-sns-subscriptions=1.16.3,@aws-cdk/aws-sqs=1.16.3,@aws-cdk/aws-ssm=1.16.3,@aws-cdk/core=1.16.3,@aws-cdk/cx-api=1.16.3,@aws-cdk/region-info=1.16.3,jsii-runtime=Python/3.6.8
```
Before the first deployment, we need to bootstrap the stack.
```
cdk bootstrap
```
It will look like this
```
Bootstrapping environment aws://999999999999/us-east-2...
Bootstrapping environment aws://999999999999/us-west-2...
CDKToolkit: creating CloudFormation changeset...
CDKToolkit: creating CloudFormation changeset...
0/2 | 3:37:20 AM | CREATE_IN_PROGRESS | AWS::S3::Bucket | StagingBucket
0/2 | 3:37:21 AM | CREATE_IN_PROGRESS | AWS::S3::Bucket | StagingBucket Resource creation Initiated
0/2 | 3:37:20 AM | CREATE_IN_PROGRESS | AWS::S3::Bucket | StagingBucket
0/2 | 3:37:20 AM | CREATE_IN_PROGRESS | AWS::S3::Bucket | StagingBucket Resource creation Initiated
1/2 | 3:37:42 AM | CREATE_COMPLETE | AWS::S3::Bucket | StagingBucket
2/2 | 3:37:44 AM | CREATE_COMPLETE | AWS::CloudFormation::Stack | CDKToolkit
Environment aws://999999999999/us-west-2 bootstrapped.
1/2 | 3:37:42 AM | CREATE_COMPLETE | AWS::S3::Bucket | StagingBucket
2/2 | 3:37:43 AM | CREATE_COMPLETE | AWS::CloudFormation::Stack | CDKToolkit
Environment aws://999999999999/us-east-2 bootstrapped.
```
Then we can use ``cdk deploy`` to deploy our CDK app

It shows some warnings here. Enter **y** to continue. The output shows the resources have been created.

Let's go to CloudFormation Console. We are able to see the stack we just created

Under the region, the following resources have been provisioned.
1 SQS queue

1 SNS Topic

1 Subscribion

1 User

4 Buckets

Let's try something different. Remove all the code from the simple app.
```python
from aws_cdk import (
core,
)
class MyStack(core.Stack):
def __init__(self, scope: core.Construct, id: str, **kwargs) -> None:
super().__init__(scope, id, **kwargs)
# TODO
```
By running ``cdk diff``, we can see the differences between the current app and the deployed one.

Run ``cdk deploy`` again to delete resources

Add the following to ``requirements.txt``
```
aws-cdk.aws-events
aws-cdk.aws-events-targets
aws-cdk.aws-lambda
aws-cdk.core
```
Install the required packages from ``requirements.txt``
```
pip install -r requirements.txt
```
Create a folder called ``lambda`` and create a file called ``handler.py`` inside this folder
```python
def handler(event, context):
return {
'statusCode': 200,
'headers': {
'Content-Type': 'text/plain'
},
'body': 'Hello World'
}
```
Back to ``hello_stack.py``, let's made a cron job on AWS Lambda with Scheduled Events
First, import the required packages.
> Note: ``lambda`` is a built-in identifier in Python. Normally we use ``lambda_`` instead.
```python
from aws_cdk import (
aws_events as events,
aws_lambda as lambda_,
aws_events_targets as targets,
core,
)
```
Read ``handler.py`` we just created
```python
with open("./lambda/handler.py", encoding="utf-8") as fp:
code_body = fp.read()
```
Define a lambda function
```python
cronFn = lambda_.Function(
self, "cronFn",
code = lambda_.InlineCode(code_body),
handler = "index.handler",
runtime = lambda_.Runtime.PYTHON_3_7,
)
```
Define an event rule. It will run the job every 6 PM.
```python
rule = events.Rule(
self, "cronRule",
schedule = events.Schedule.cron(
minute = '0',
hour = '18',
month = '*',
week_day = 'MON-FRI',
year = '*'
),
)
```
Finally, add the target to the lambda function
```python
rule.add_target(targets.LambdaFunction(cronFn))
```
Here's the complete code
```python
from aws_cdk import (
aws_events as events,
aws_lambda as lambda_,
aws_events_targets as targets,
core,
)
class MyStack(core.Stack):
def __init__(self, scope: core.Construct, id: str, **kwargs) -> None:
super().__init__(scope, id, **kwargs)
with open("./lambda/handler.py", encoding="utf-8") as fp:
code_body = fp.read()
cronFn = lambda_.Function(
self, "cronFn",
code = lambda_.InlineCode(code_body),
handler = "index.handler",
runtime = lambda_.Runtime.PYTHON_3_7,
)
rule = events.Rule(
self, "cronRule",
schedule = events.Schedule.cron(
minute = '0',
hour = '18',
month = '*',
week_day = 'MON-FRI',
year = '*'
),
)
rule.add_target(targets.LambdaFunction(cronFn))
```
Let's run ``cdk diff`` again

After deploying, let's check on the console

Run a simple test

Go to CloudWatch, we can see the event we just created

To clean up the code, we can simply delete the stack by running ``cdk destroy``.
Sunday, 29 December 2019
Building a Quiz with React using react-quiz-component
## Initial Setup
The first step is to install the library. Installing react-quiz-component is pretty simple. You just need to install it via npm:
```
npm i react-quiz-component
```
After that, you have to import Quiz class to your project:
```
import Quiz from 'react-quiz-component';
```
## Defining your quiz source
The next step is to define a quiz source in a JSON format. If you are not familiar with JSON, I have created another project called react-quiz-form to generate the JSON string with some validations.

Once you have submitted, you will get the JSON string like this:
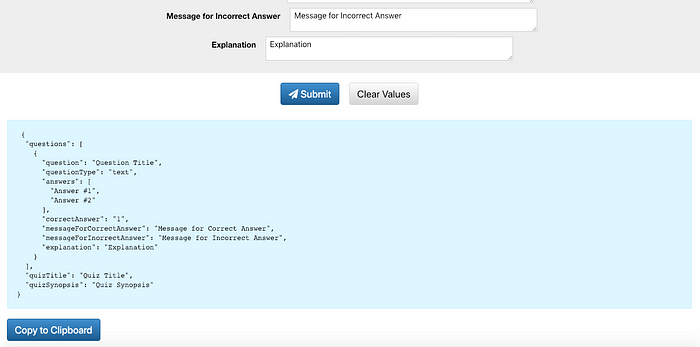
A quiz object may contains three attributes: ``quizTitle`` , ``quizSynopsis`` and ``questions``.
You do not need to include quizSynopsis but it is recommended to include it to let your users to know more about your quiz.
For questions, it may include a single or multiple objects defining the ``question``, ``questionType``, ``answers``, ``correctAnswer``, ``messageForCorrectAnswer``, ``messageForIncorrectAnswer``, and ``explanation``.
### question
The question you want to ask your users.
```
"question": "How can you access the state of a component from inside of a member function?"
```
### questionType
The type of your question. Supported types include text and photo.
```
"questionType": "text"
```
or
```
"questionType": "photo"
```
### answers
The possible answers for users to select.
For ``questionType`` is ``text`` :
```
"answers": [
"this.getState()",
"this.prototype.stateValue",
"this.state",
"this.values"
]
```
For ``questionType`` is ``photo`` :
```
"answers": [
"https://dummyimage.com/600x400/000/fff&text=A",
"https://dummyimage.com/600x400/000/fff&text=B",
"https://dummyimage.com/600x400/000/fff&text=C",
"https://dummyimage.com/600x400/000/fff&text=D"
]
```
### correctAnswer
The index of the correct answer (starting with 1). Current multiple answers are not supported.
```
"correctAnswer": "3"
```
### messageForCorrectAnswer
The message shown when the user answered correctly.
```
"messageForCorrectAnswer": "Correct answer. Good job."
```
### messageForIncorrectAnswer
The message shown when the user answered incorrectly.
```
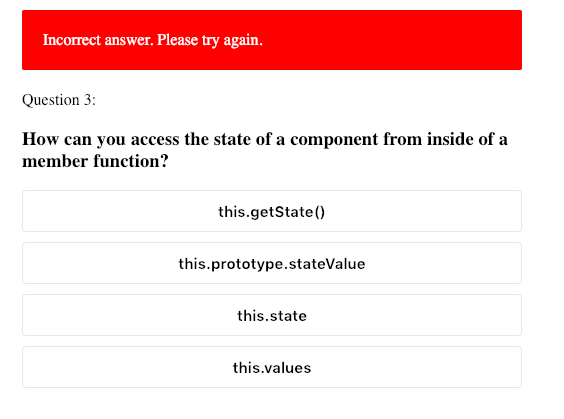
"messageForIncorrectAnswer": "Incorrect answer. Please try again."
```
### explanation
The explanation for this question.
```
"explanation": "Lorem ipsum dolor sit amet, consectetur adipiscing elit, sed do eiusmod tempor incididunt ut labore et dolore magna aliqua. Ut enim ad minim veniam, quis nostrud exercitation ullamco laboris nisi ut aliquip ex ea commodo consequat."
```

You may create a file called quiz.js. A full example is shown as below:
```
export const quiz = {
"quizTitle": "React Quiz Component Demo",
"quizSynopsis": "Lorem ipsum dolor sit amet, consectetuer adipiscing elit. Aenean commodo ligula eget dolor. Aenean massa. Cum sociis natoque penatibus et magnis dis parturient montes, nascetur ridiculus mus. Donec quam felis, ultricies nec, pellentesque eu, pretium quis, sem. Nulla consequat massa quis enim",
"questions": [
{
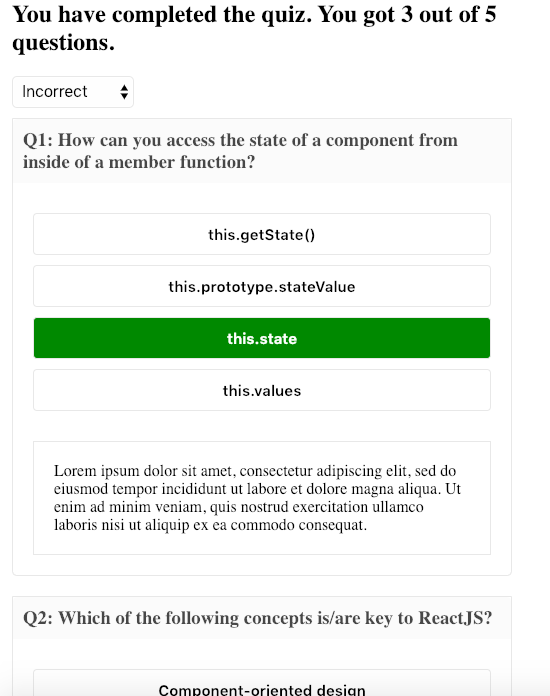
"question": "How can you access the state of a component from inside of a member function?",
"questionType": "text",
"answers": [
"this.getState()",
"this.prototype.stateValue",
"this.state",
"this.values"
],
"correctAnswer": "3",
"messageForCorrectAnswer": "Correct answer. Good job.",
"messageForIncorrectAnswer": "Incorrect answer. Please try again.",
"explanation": "Lorem ipsum dolor sit amet, consectetur adipiscing elit, sed do eiusmod tempor incididunt ut labore et dolore magna aliqua. Ut enim ad minim veniam, quis nostrud exercitation ullamco laboris nisi ut aliquip ex ea commodo consequat."
},
{
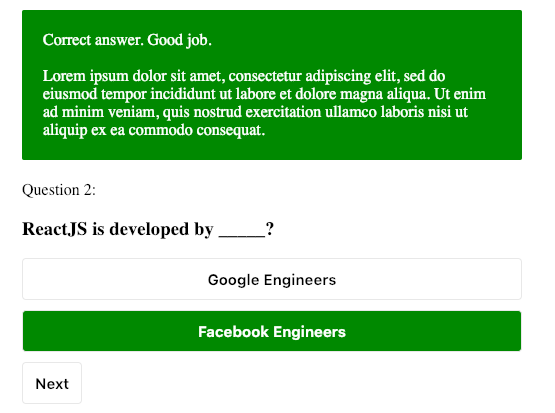
"question": "ReactJS is developed by _____?",
"questionType": "text",
"answers": [
"Google Engineers",
"Facebook Engineers"
],
"correctAnswer": "2",
"messageForCorrectAnswer": "Correct answer. Good job.",
"messageForIncorrectAnswer": "Incorrect answer. Please try again.",
"explanation": "Lorem ipsum dolor sit amet, consectetur adipiscing elit, sed do eiusmod tempor incididunt ut labore et dolore magna aliqua. Ut enim ad minim veniam, quis nostrud exercitation ullamco laboris nisi ut aliquip ex ea commodo consequat."
},
{
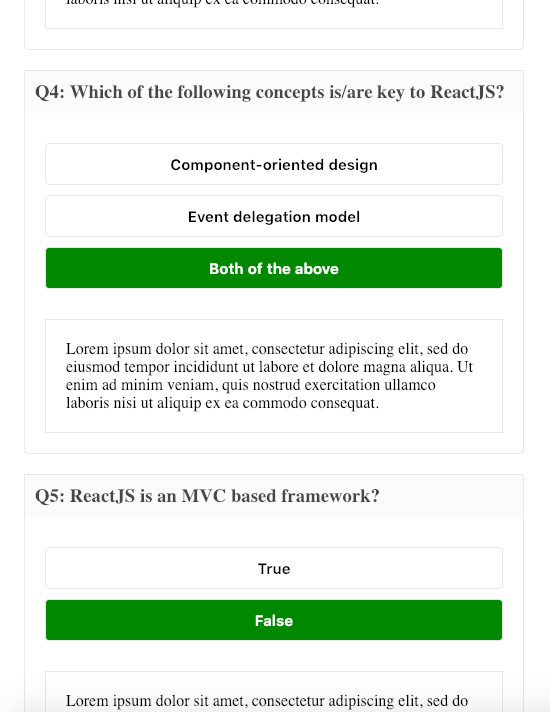
"question": "ReactJS is an MVC based framework?",
"questionType": "text",
"answers": [
"True",
"False"
],
"correctAnswer": "2",
"messageForCorrectAnswer": "Correct answer. Good job.",
"messageForIncorrectAnswer": "Incorrect answer. Please try again.",
"explanation": "Lorem ipsum dolor sit amet, consectetur adipiscing elit, sed do eiusmod tempor incididunt ut labore et dolore magna aliqua. Ut enim ad minim veniam, quis nostrud exercitation ullamco laboris nisi ut aliquip ex ea commodo consequat."
},
{
"question": "Which of the following concepts is/are key to ReactJS?",
"questionType": "text",
"answers": [
"Component-oriented design",
"Event delegation model",
"Both of the above",
],
"correctAnswer": "3",
"messageForCorrectAnswer": "Correct answer. Good job.",
"messageForIncorrectAnswer": "Incorrect answer. Please try again.",
"explanation": "Lorem ipsum dolor sit amet, consectetur adipiscing elit, sed do eiusmod tempor incididunt ut labore et dolore magna aliqua. Ut enim ad minim veniam, quis nostrud exercitation ullamco laboris nisi ut aliquip ex ea commodo consequat."
},
{
"question": "Lorem ipsum dolor sit amet, consectetur adipiscing elit,",
"questionType": "photo",
"answers": [
"https://dummyimage.com/600x400/000/fff&text=A",
"https://dummyimage.com/600x400/000/fff&text=B",
"https://dummyimage.com/600x400/000/fff&text=C",
"https://dummyimage.com/600x400/000/fff&text=D"
],
"correctAnswer": "1",
"messageForCorrectAnswer": "Correct answer. Good job.",
"messageForIncorrectAnswer": "Incorrect answer. Please try again.",
"explanation": "Lorem ipsum dolor sit amet, consectetur adipiscing elit, sed do eiusmod tempor incididunt ut labore et dolore magna aliqua. Ut enim ad minim veniam, quis nostrud exercitation ullamco laboris nisi ut aliquip ex ea commodo consequat."
}
]
}
```
## Passing your quiz object to Quiz container
Once you have defined your quiz object, the next step is to pass it as a prop to Quiz container.
```
import { quiz } from './quiz';
...
```
If you want your questions shuffled every time the component renders, you may simply pass true to the prop shuffle.
```
```
That’s it. With these steps, you have integrated ``react-quiz-component`` to your project.
## Quiz Result
``react-quiz-component`` also provides an overall result at the end of the quiz.

With the dropdown option, you can filter all questions and those that you answered correctly or incorrectly.
## Demonstration
The demonstration is available at [here](https://wingkwong.github.io/react-quiz-component/)
## Conclusion
react-quiz-component is an open source project. You can easily integrate it with your project. If you found any issues or have some new requested features, please feel free to let me know by filing an issue on the repo shown [here](https://github.com/wingkwong/react-quiz-component).
## Update:
react-quiz-component has introduced more features. For the changelog, please check it [here](https://github.com/wingkwong/react-quiz-component/blob/master/CHANGELOG.md).
Removing duplicate records in a CSV file
Recently my colleague was struggling on removing duplicate records based on composite keys in a large csv file before inserting into Oracle database. I wrote a simple python program to address the problem.
Given that python has already been installed in the server. I could install ``pandas`` in virtualenv using pip. The program is pretty short. First we need to import pandas. Pandas is a software library for data manipulation and analysis.
```python
import pandas as pd
```
Then, we use ``read_csv()`` to read a csv file into DataFrame, which is a 2d size-mutatable, potentially heterogeneous tabular data structure with labeled axes. Since our data contains a value of NA, so we need to set `keep_default_na` to False.
```python
d = pd.read_csv('LARGE_CSV_FILE.csv', keep_default_na = False)
```
Once we have the dataframe, we can call ``drop_duplicates()`` to remove duplicate rows. Since we remove them based on composite keys, we can pass those keys to `subset`. Setting `inplace` to True can drop duplicates in place instead of returning a copy. If depulicate records are found, we only keep the first one.
```python
d.drop_duplicates(subset = ['COMPOSITE_KEY1', 'COMPOSITE_KEY2', 'COMPOSITE_KEY3', 'COMPOSITE_KEY4', 'COMPOSITE_KEY5', 'COMPOSITE_KEY6', 'COMPOSITE_KEY7', 'COMPOSITE_KEY8', 'COMPOSITE_KEY9', 'COMPOSITE_KEY10'], inplace = True, keep = 'first')
```
At the end, we would like to save the result to another csv file for verification. By default, it comes with index. We can disable it by setting `index` to False.
```python
d.to_csv('LARGE_CSV_FILE_PROCESSED.csv', index = False)
```
Relocate Golang Boilerplate Packages using Taskfile
Supposing you've found a Go boilerplate and you want to relocate the project under your name. Here's a TaskFile to help you do so.
Task is a task runner / build tool that aims to be simpler and easier to use than, for example, [GNU Make](https://www.gnu.org/software/make/).
TaskFile is a yml file. A simple is shown below
```
version: '2'
tasks:
hello:
cmds:
- echo 'Hello World from Task!'
silent: true
```
Compared with Makefile, it indeed looks simpler.
For running the coverage tests, we just need add our commands under ``cmds`` block
```
test:
cmds:
- echo " *** Running Coverage Tests ***"
- $(pwd)/test.sh
- echo " *** Completed *** "
silent: true
```
What about ``relocate``? That would be a bit different as I need to think about how to inject the variables into it. Thanks to TaskFile development team, I could do something like this.
```
relocate:
cmds:
- echo " *** Relocating packages to {{.TARGET_PATH}} ***"
- task: replace-string
vars: {
SOURCE_STR: "{{.PACKAGE_NAME}}",
TARGET_STG: "{{.TARGET_PATH}}"
}
- task: replace-string
vars: {
SOURCE_STR: "{{.PROJECT_NAME}}",
TARGET_STG: "{{.TARGET_PROJECTNAME}}"
}
- echo " *** Completed *** "
silent: true
```
In Taskfile, a variable is represented like this: ``{{.VAR}}``. We just need to declare all the variables there.
```
vars:
GITHUB: "github.com"
PROJECT_NAME_DIR:
sh: echo $(basename "$(dirname "$(pwd)")")
PROJECT_NAME:
sh: echo $(basename "$(pwd)" | sed -e 's/[\/&]/\\&/g')
PACKAGE_NAME:
sh: echo "{{.GITHUB}}/{{.PROJECT_NAME_DIR}}/{{.PROJECT_NAME}}" | sed -e 's/[\/&]/\\&/g'
TARGET_PATH:
sh: echo "{{.TARGET}}" | sed -e 's/[\/&]/\\&/g'
TARGET_PROJECTNAME:
sh: basename "dirname {{.TARGET_PATH}}" | sed -e 's/[\/&]/\\&/g'
```
Remember ``relocate`` is only triggered if there is a TARGET path? A preconditions block can help in this case. The variable ``TARGET`` is a parameters when calling ``task relocate``.
```
preconditions:
- sh: "[ {{.TARGET}} != '' ]"
```
Wait a minute, then what is replace-string? replace-string is another task used to grep the file and perform the replacement.
```
replace-string:
cmds:
- grep -rlI '{{.SOURCE_STR}}' --include=*.{go,json} ./ | xargs -I@ sed -i '' 's/{{.SOURCE_STR}}/{{.TARGET_STG}}/g' @
silent: true
```
By adding ``silent: true``, we can make the console cleaner. Just like we add ``.SILENT`` in Makefile.
Sample usage: task relocate TARGET=github.com/wingkwong/project
Complete Code:
```
version: '2'
tasks:
relocate:
cmds:
- echo " *** Relocating packages to {{.TARGET_PATH}} ***"
- task: replace-string
vars: {
SOURCE_STR: "{{.PACKAGE_NAME}}",
TARGET_STG: "{{.TARGET_PATH}}"
}
- task: replace-string
vars: {
SOURCE_STR: "{{.PROJECT_NAME}}",
TARGET_STG: "{{.TARGET_PROJECTNAME}}"
}
- echo " *** Completed *** "
silent: true
vars:
GITHUB: "github.com"
PROJECT_NAME_DIR:
sh: echo $(basename "$(dirname "$(pwd)")")
PROJECT_NAME:
sh: echo $(basename "$(pwd)" | sed -e 's/[\/&]/\\&/g')
PACKAGE_NAME:
sh: echo "{{.GITHUB}}/{{.PROJECT_NAME_DIR}}/{{.PROJECT_NAME}}" | sed -e 's/[\/&]/\\&/g'
TARGET_PATH:
sh: echo "{{.TARGET}}" | sed -e 's/[\/&]/\\&/g'
TARGET_PROJECTNAME:
sh: basename "dirname {{.TARGET_PATH}}" | sed -e 's/[\/&]/\\&/g'
preconditions:
- sh: "[ {{.TARGET}} != '' ]"
replace-string:
cmds:
- grep -rlI '{{.SOURCE_STR}}' --include=*.{go,json} ./ | xargs -I@ sed -i '' 's/{{.SOURCE_STR}}/{{.TARGET_STG}}/g' @
silent: true
```
Building a K8s Cluster with Kubeadm
We build a K8s cluster for managing containers and use Kubeadm to simplify the proess of setting up a simple cluster.
# Install Docker on all three nodes
Add the Docker GPG Key:
```
curl -fsSL https://download.docker.com/linux/ubuntu/gpg | sudo apt-key add -
```
Add the Docker Repository
```
sudo add-apt-repository \
"deb [arch=amd64] https://download.docker.com/linux/ubuntu \
$(lsb_release -cs) \
stable"
```
Update packages:
```
sudo apt-get update
```
Install Docker:
```
sudo apt-get install -y docker-ce=18.06.1~ce~3-0~ubuntu
```
Hold Docker at this specific version:
```
sudo apt-mark hold docker-ce
```
Verify that Docker is up and running with:
```
sudo systemctl status docker
```
After running above commands, the Docker service status should be active (running).
```
● docker.service - Docker Application Container Engine
Loaded: loaded (/lib/systemd/system/docker.service; enabled; vendor preset: enabled)
Active: active (running) since Sun 2019-10-20 11:15:32 UTC; 19s ago
Docs: https://docs.docker.com
Main PID: 9869 (dockerd)
Tasks: 21
CGroup: /system.slice/docker.service
├─9869 /usr/bin/dockerd -H fd://
└─9894 docker-containerd --config /var/run/docker/containerd/containerd.toml
```
# Install Kubeadm, Kubelet, and Kubectl
Install the K8s components by running the following commands on all three nodes.
Add the K8s GPG Key
```
curl -s https://packages.cloud.google.com/apt/doc/apt-key.gpg | sudo apt-key add -
```
Add the K8s repo
```
cat << EOF | sudo tee /etc/apt/sources.list.d/kubernetes.list
deb https://apt.kubernetes.io/ kubernetes-xenial main
EOF
```
Update packages
```
sudo apt-get update
```
Install ``kubelet``, ``kubeadm`` and ``kubectl``
```
sudo apt-get install -y kubelet=1.12.7-00 kubeadm=1.12.7-00 kubectl=1.12.7-00
```
Hold the Kubernetes components at this specific version
```
sudo apt-mark hold kubelet kubeadm kubectl
```
# Bootstrap the cluster on the Kube master node
Initialize kubeadm on the master node
```
sudo kubeadm init --pod-network-cidr=10.244.0.0/16
```
After a few minutes, you should see a ``kubeadm join`` command that will be used later
```
kubeadm join 10.0.1.101:6443 --token ioxxtp.zugcxykam7jhmlqe --discovery-token-ca-cert-hash sha256:1feab8ca98d50689b5a524c1271b43a7c712d66dab0d6ab7b68c9fd472921731
```
Set up the local kubeconfig
```
mkdir -p $HOME/.kube
sudo cp -i /etc/kubernetes/admin.conf $HOME/.kube/config
sudo chown $(id -u):$(id -g) $HOME/.kube/config
```
Verify if Kube master node is up and running
```
kubectl version
```
You should see ``Client Version`` and ``Server Version`` as below
```
Client Version: version.Info{Major:"1", Minor:"12", GitVersion:"v1.12.7", GitCommit:"6f482974b76db3f1e0f5d24605a9d1d38fad9a2b", GitTreeState:"clean", BuildDate:"2019-03-25T02:52:13Z", GoVersion:"go1.10.8", Compiler:"gc", Platform:"linux/amd64"}
Server Version: version.Info{Major:"1", Minor:"12", GitVersion:"v1.12.10", GitCommit:"e3c134023df5dea457638b614ee17ef234dc34a6", GitTreeState:"clean", BuildDate:"2019-07-08T03:40:54Z", GoVersion:"go1.10.8", Compiler:"gc", Platform:"linux/amd64"}
```
## Join the two Kube worker nodes to the cluster
Once the Kube master node is ready, then we need to join those two Kube worker nodes to the cluster.
Copy the ``kubeadm join`` command that was printed by ``kubeadm init`` command in the previous step. Make sure you run it with ``sudo``
```
sudo kubeadm join 10.0.1.101:6443 --token ioxxtp.zugcxykam7jhmlqe --discovery-token-ca-cert-hash sha256:1feab8ca98d50689b5a524c1271b43a7c712d66dab0d6ab7b68c9fd472921731
```
Go back to the Kube master node, check if the nodes are joined the cluster successfully or not
```
kubectl get nodes
```
Verify the result. Three of nodes are expected to be here but in the ``NotReady`` state.
```
NAME STATUS ROLES AGE VERSION
ip-10-0-1-101 NotReady master 30s v1.12.2
ip-10-0-1-102 NotReady 8s v1.12.2
ip-10-0-1-103 NotReady 5s v1.12.2
```
# Setu up cluster networking
To get them ready, we need to use flannel because K8s does not provide any defalt network implementation. Flannel is a very simple overlay network that satisfies the Kubernetes requirements. Many people have reported success with Flannel and Kubernetes.
Turn on iptables bridge calls on all three nodes
```
echo "net.bridge.bridge-nf-call-iptables=1" | sudo tee -a /etc/sysctl.conf
sudo sysctl -p
```
Apply flannel on Kube master node
```
kubectl apply -f https://raw.githubusercontent.com/coreos/flannel/bc79dd1505b0c8681ece4de4c0d86c5cd2643275/Documentation/kube-flannel.yml
```
Once flannel is installed. Verifiy the node status.
```
kubectl get nodes
```
After a short time, all three nodes should be in the ``Ready`` state.
```
NAME STATUS ROLES AGE VERSION
ip-10-0-1-101 Ready master 85s v1.12.2
ip-10-0-1-102 Ready 63s v1.12.2
ip-10-0-1-103 Ready 60s v1.12.2
```
Subscribe to:
Comments (Atom)