Thursday, 8 April 2021
Codeforces - 999E. Reachability from the Capital
Problem Link: [https://codeforces.com/contest/999/problem/E](https://codeforces.com/contest/999/problem/E)
## Problem
There are n cities and m roads in Berland. Each road connects a pair of cities. The roads in Berland are one-way.
What is the minimum number of new roads that need to be built to make all the cities reachable from the capital?
New roads will also be one-way.
## Input
The first line of input consists of three integers n, m and s (1≤n≤5000,0≤m≤5000,1≤s≤n) — the number of cities, the number of roads and the index of the capital. Cities are indexed from 1 to n.
The following m lines contain roads: road 𝑖 is given as a pair of cities u𝑖, v𝑖 (1≤u𝑖,v𝑖≤n, u𝑖≠v𝑖). For each pair of cities (u,v), there can be at most one road from u to v. Roads in opposite directions between a pair of cities are allowed (i.e. from u to v and from v to u).
## Output
Print one integer — the minimum number of extra roads needed to make all the cities reachable from city s. If all the cities are already reachable from s, print 0.
## Example
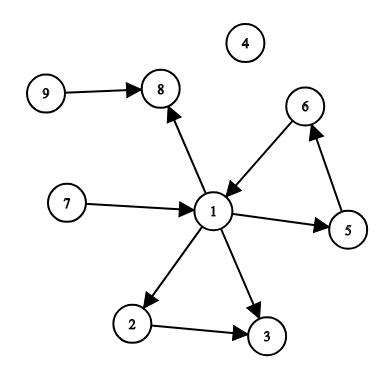
Input
```
9 9 1
1 2
1 3
2 3
1 5
5 6
6 1
1 8
9 8
7 1
```
Output
```
3
```
## Solution 1
Firstly, let's store the possible paths for each city u[i].
```
int N, M, S;
cin >> N >> M >> S;
--S;
while(M--) {
int U, V; cin >> U >> V;
--U, --V;
g[U].push_back(V);
}
```
Secondly, we can perform a DFS function to mark all the reachable nodes from the given source.
```
void dfs(int from) {
reachable[from] = 1;
for(auto to : g[from]) {
if(!reachable[to]) {
dfs(to);
}
}
}
```
Then, for each unreachable node, run a DFS function on it to count how far it can go. Here we only count those nodes that are not reachable and not visited.
```
vector> v;
for(int i = 0; i < n; i++){
if(!reachable[i]) {
cnt = 0;
memset(vis, 0, sizeof(vis));
dfs2(i);
v.push_back({cnt, i});
}
}
```
After that we can sort the vector by ``cnt`` in non-increasing order.
```
sort(v.begin(), v.end());
reverse(v.begin(), v.end());
```
We can greedily mark the unreachable nodes based on this order. If the node A has more to unreachable nodes to reach, then we just need to add one vertex to it to make them all connected, which is the minimum number of paths to be added.
```
int ans = 0;
for(auto x : v) {
if(!reachable[x.second]) {
ans++;
dfs(x.second);
}
}
```
## Solution 2
We can also find all the Strongly Connected Components (SCC) and add a path to those with 0 in-degree. It will be able to reach the maximum number of nodes.
First, let's read the input and prepare G.
```
while(M--) {
int U, V; cin >> U >> V;
--U, --V;
G[U].push_back(V);
}
```
Then we can use Tarjan's algorithm to find all the SCCs.
```
struct SCC : vector {
vector> comps;
vector S;
SCC() {}
SCC(vector>& G) : vector((int)G.size(), -1), S((int)G.size()) {
for(int i = 0; i < (int)G.size(); i++) if(!S[i]) dfs(G, i);
}
int dfs(vector>& G, int v) {
int low = S[v] = (int)S.size();
S.push_back(v);
for(auto e : G[v]) if(at(e) < 0) low = min(low, S[e] ?: dfs(G, e));
if(low == S[v]) {
comps.push_back({});
for(int i = S[v]; i < (int)S.size(); i++) {
at(S[i]) = (int)comps.size() - 1;
comps.back().push_back(S[i]);
}
S.resize(S[v]);
}
return low;
}
};
```
We also need a ``vector`` to store the indegree for each SCC.
```
SCC scc(G);
vector in((int)scc.comps.size());
```
Iterate each node, if the ``i`` and ``j`` belong to different SCC, as they can be reachable each other, we increase the indegree of scc[j]. It is like making a SCC to a DAG.
```
for(int i = 0; i < N; i++) {
for(auto j : G[i]) {
if(scc[i] != scc[j]) {
in[scc[j]]++;
}
}
}
```
For those unreachable SCCs from the source SCC, their indegree must be 0. Hence, the answer is the number of those SCCs as we can add a path to each one to reach all the nodes within the SCC.
```
int ans = 0;
for(int i = 0; i < (int)scc.comps.size(); i++) {
ans += (in[i] == 0 && i != scc[S]);
}
cout << ans << endl;
```
Saturday, 3 April 2021
Integrating AWS Systems Manager Parameter Store with a Spring Boot Application
AWS Systems Manager Parameter Store allows you to store data such as passwords, database strings, AMI IDs, etc as parameter values in plain text or encryped data format. It is similar to AWS Secrets Manager. However, if you need built-in password generator and automated secret rotation, then you should go for AWS Secrets Manager.
Supposing you have a parameter name ``/config/demoapp/backend_dev/welcome.message`` and the value is ``TEST123``, you want to take this value from AWS Systems Manager Parameter Store instead of retrieving from ``application.properties``.
To integrate it with a Spring Boot Application, you need to add the dependency in your ``pom.xml``. Make sure you are using Spring Cloud 2.x (Greenwich).
```
org.springframework.cloud
spring-cloud-starter-aws-parameter-store-config
2.1.3.RELEASE
```
Then we need to modify ``bootstrap.properties`` to configure the bootstrap context.
```
aws.paramstore.prefix=
aws.paramstore.name=
aws.paramstore.enabled=
aws.paramstore.profileSeparator=<[a-zA-Z0-9.\-_/]+>
```
For example,
```
aws.paramstore.prefix=/config/demoapp
aws.paramstore.name=backend
aws.paramstore.enabled=true
aws.paramstore.profileSeparator=_
```
In your application.properties
```
aws.region=ap-east-1
spring.application.name=backend
spring.profiles.active=dev
server.port=8080
```
In your Controller, use ``@Value`` annotation to inject the value.
```
@Value("${welcome.message}")
private String message;
```
Setup your AWS credential
```
[default]
aws_access_key_id = your_access_key_id
aws_secret_access_key = your_secret_access_key
```
Follow the below code and run the application to test it
```
package com.demo;
import org.springframework.beans.factory.annotation.Value;
import org.springframework.boot.CommandLineRunner;
import org.springframework.boot.SpringApplication;
import org.springframework.boot.autoconfigure.SpringBootApplication;
import org.springframework.context.ApplicationContext;
import org.springframework.context.annotation.Bean;
@SpringBootApplication
public class StartWebApplication {
@Value("${welcome.message}")
private String message;
public static void main(String[] args) {
SpringApplication.run(StartWebApplication.class, args);
}
@Bean
public CommandLineRunner commandLineRunner(ApplicationContext ctx) {
return args -> {
System.out.println("Message from AWS Parameter Store: " + message);
};
}
}
```
```
Message from AWS Parameter Store: TEST123
```
Friday, 2 April 2021
Liquibase Demostration with Spring Boot Application
The following demonstration is a Spring Boot application which only exposes a GET endpoint /users/:id. To integrate Liquibase, add a dependency for it in pom.xml.
```
<dependency>
<groupId>org.liquibase</groupId>
<artifactId>liquibase-core</artifactId>
</dependency>
```
The changelog files are located in resources/db/changelog/.
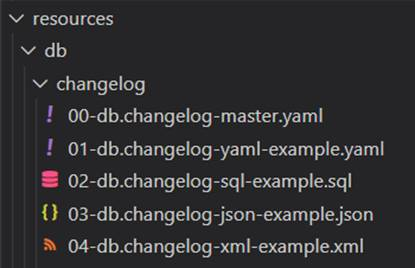
Liquibase supports SQL, XML, JSON and YAML format for storing changelog files. The 00-db.changelog-master.yaml includes the changelog files for the releases in the correct order.
00-db.changelog-master.yaml
```yml
databaseChangeLog:
- include:
file: 01-db.changelog-yaml-example.yaml
relativeToChangelogFile: true
- include:
file: 02-db.changelog-sql-example.sql
relativeToChangelogFile: true
- include:
file: 03-db.changelog-json-example.json
relativeToChangelogFile: true
- include:
file: 04-db.changelog-xml-example.xml
relativeToChangelogFile: true
```
01-db.changelog-yaml-example.yaml
Here's an example of changelog in YAML format. It creates a table called user_details with four fields – id, username, first_name, last_name. A ChangeSet is identified by id and author. For best practice, keep only one change per ChangeSet. Pre-conditions can also be added here.
```yml
databaseChangeLog:
- changeSet:
id: create-table-user
author: liquibase-demo-service
preConditions:
- onFail: MARK_RAN
not:
tableExists:
tableName: user_details
changes:
- createTable:
columns:
- column:
autoIncrement: true
constraints:
nullable: false
primaryKey: true
primaryKeyName: user_pkey
name: id
type: BIGINT
- column:
constraints:
nullable: false
name: username
type: TEXT
- column:
constraints:
nullable: false
name: first_name
type: TEXT
- column:
name: last_name
type: TEXT
tableName: user_details
```
02-db.changelog-sql-example.sql
Here's an example of changelog in SQL format. It must start with the line –liquibase formatted sql to provide liquibase with metadata, followed by arbitrary SQL statements with a comment of the form :
``--changeset author:id attribute1:value1 attribute2:value2 [...]``.
```sql
--liquibase formatted sql
--changeset liquibase-demo-service:add-user-name-constraint
ALTER TABLE user_details ADD CONSTRAINT user_details_username_key UNIQUE (username);
```
03-db.changelog-json-example.json
Here's an example of changelog in JSON format.
```json
{ "databaseChangeLog": [
{
"changeSet": {
"id": "add-last-name-constraint",
"author": "liquibase-demo-service",
"changes": [
{
"addNotNullConstraint": {
"columnName": "last_name",
"constraintName": "user_last_name_key",
"tableName": "user_details"
}
}]
}
}
]
}
```
04-db.changelog-xml-example.xml
Here's an example of changelog in XML format. It utilizes loadUpdateData to loads and update from a CSV file into an existing table.
```
<?xml version="1.1" encoding="UTF-8" standalone="no"?>
<databaseChangeLog xmlns="http://www.liquibase.org/xml/ns/dbchangelog"
xmlns:xsi="http://www.w3.org/2001/XMLSchema-instance"
xsi:schemaLocation="http://www.liquibase.org/xml/ns/dbchangelog http://www.liquibase.org/xml/ns/dbchangelog/dbchangelog-3.8.xsd">
<changeSet author="liquibase-docs" id="loadUpdateData-example" context="!prod">
<loadUpdateData
encoding="UTF-8"
relativeToChangelogFile="true"
file="../data/users.csv"
onlyUpdate="false"
primaryKey="id"
quotchar="'"
separator=","
tableName="user_details">
</loadUpdateData>
</changeSet>
</databaseChangeLog>
```
By default, Liquibase is enabled. Those changelog files will be executed at Spring Boot startup. To disable it, add the following property in src\main\resources\application.yaml.
```
spring:
liquibase:
enabled: false
```
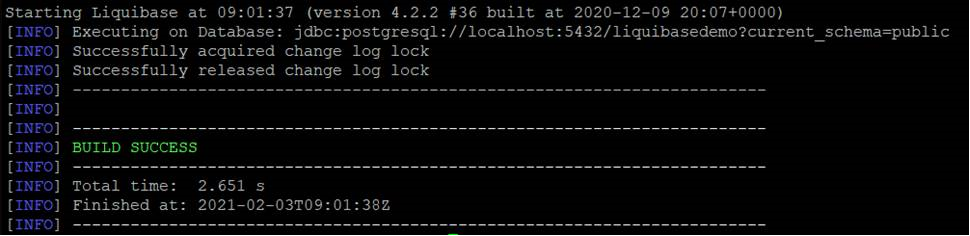
To deploy any changes in the changelog files that have not been deployed to database yet, run the update goal.
```
./mvnw org.liquibase:liquibase-maven-plugin:update \
-Dliquibase.url=jdbc:postgresql://localhost:5432/liquibasedemo?current_schema=public \
-Dliquibase.changeLogFile=src/main/resources/db/changelog/00-db.changelog-master.yaml \
-Dliquibase.username=demouser \
-Dliquibase.password=demopassword
```
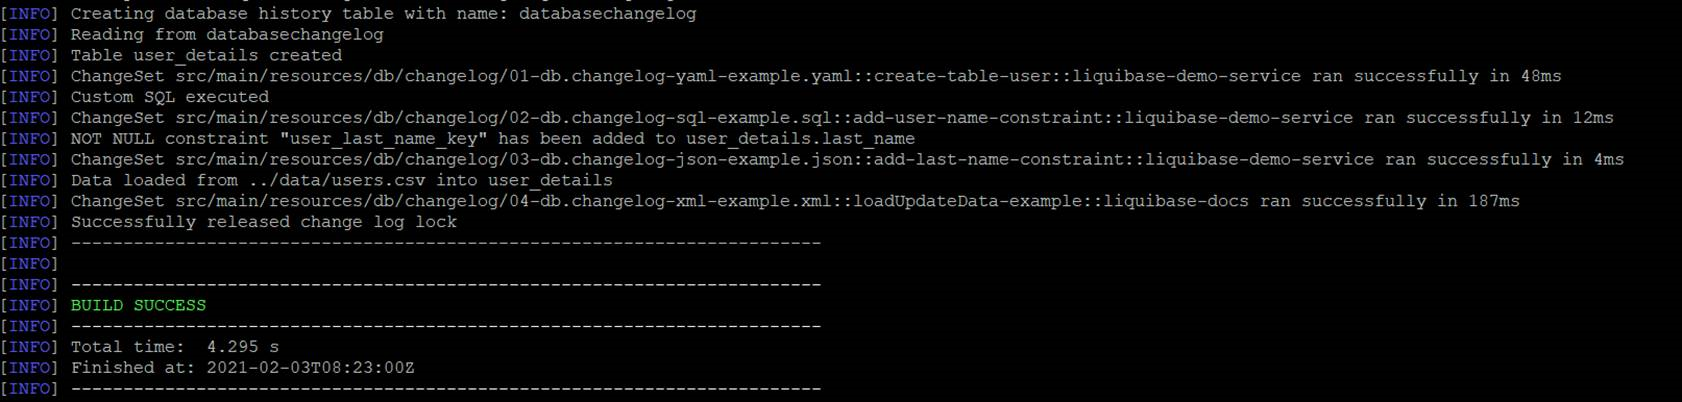
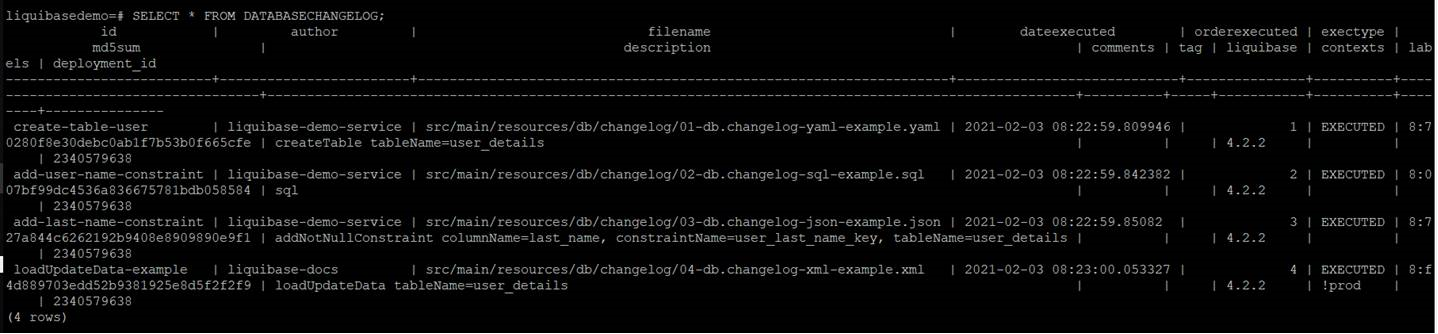
After running update goal, four tables have been created.
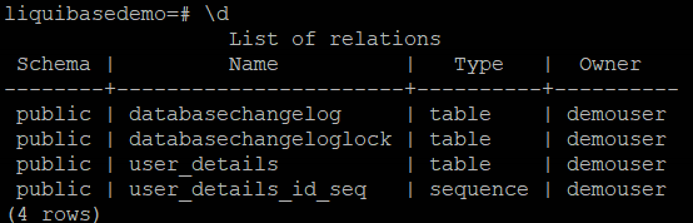
databasechangelog tracks which changeset have been run.
databasechangeloglock ensures there is only one Liquibase is running at one time as multiple instances being executed against the same database concurrently will lead to conflicts.
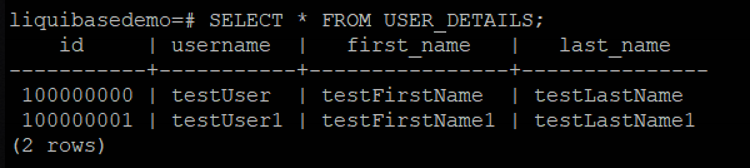
The table user_details is defined in 01-db.changelog-yaml-example.yaml, with constraints defined in 02-db.changelog-sql-example.sql and 03-db.changelog-json-example.json. The data is loaded in 04-db.changelog-xml-example.xml.
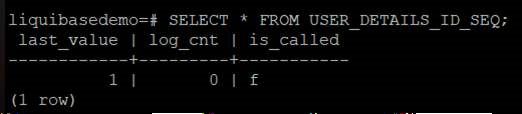
user_details_id_seq is a sequence table for user_details.
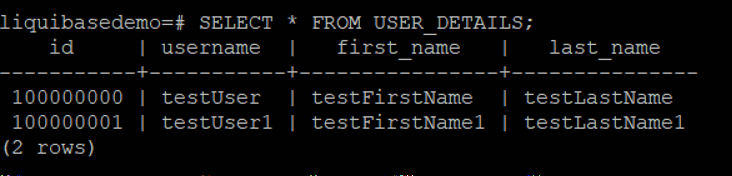
To verify the result, start the Sprint Boot Application.

Get user with id 100000000

Tag can be used to mark the current database state for rollback in the future.
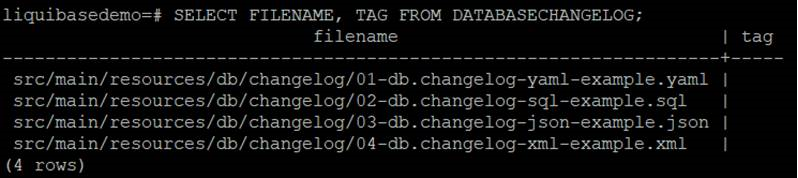
To create a tag, run the following goal
```
./mvnw org.liquibase:liquibase-maven-plugin:tag \
-Dliquibase.tag=version1 \
-Dliquibase.url=jdbc:postgresql://localhost:5432/liquibasedemo?current_schema=public \
-Dliquibase.username=demouser \
-Dliquibase.password=demopassword
```
A tag version has been added.

There are three rollback modes – rollbackByTag, rollbackToDate and rollbackCount.
· RollbackByTag reverts all changes made to the database after the specific tag.
· RollbackToDate reverts all changes made to the database from the current date to the date and time you specify.
· RollbackCount reverts the changes sequentially starting with the most recent changes.
There are another modes such as rollbackOneChangeSet and rollbackOneUpdate but it requires Liquibase Pro.
Take the first one as an example, supposing there is another changelog – adding middle_name in user_details.
05-add-middle-name.json
Here we add the rollback statement to this changeset.
```
{ "databaseChangeLog": [
{
"changeSet": {
"id": "add-middle-name",
"author": "liquibase-demo-service",
"changes":[{
"addColumn":{
"catalogName":"cat",
"columns":[{
"column":{
"name":"middle_name",
"type":"TEXT"
}
}
],
"schemaName":"public",
"tableName":"user_details"
}
}
],
"rollback": [
{
"sql": {
"sql": "ALTER TABLE USER_DETAILS DROP COLUMN middle_name;"
}
}
]
}
}
]}
```
Deploy this changelog
```
./mvnw org.liquibase:liquibase-maven-plugin:update \
-Dliquibase.url=jdbc:postgresql://localhost:5432/liquibasedemo?current_schema=public \
-Dliquibase.changeLogFile=src/main/resources/db/changelog/05-add-middle-name.json \
-Dliquibase.username=demouser \
-Dliquibase.password=demopassword
```
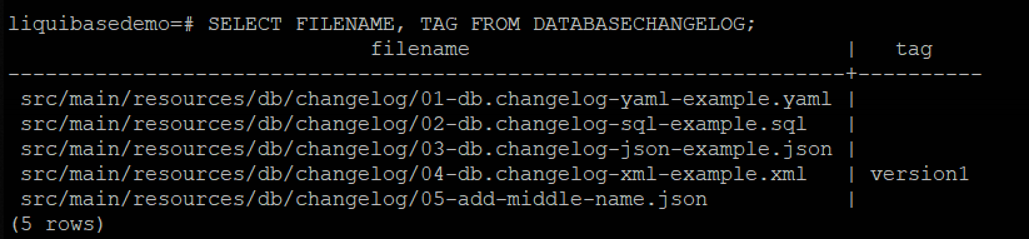
The column "middle_name" has been added.

The latest changelog is after the tag version1.
If we need to revert the changes after it, update 00-db.changelog-master.yaml to include the latest changelog.
```
- include:
file: 05-add-middle-name.json
relativeToChangelogFile: true
```
then run the following goal.
```
./mvnw org.liquibase:liquibase-maven-plugin:tag \
-Dliquibase.tag=version1 \
-Dliquibase.url=jdbc:postgresql://localhost:5432/liquibasedemo?current_schema=public \
-Dliquibase.username=demouser \
-Dliquibase.password=demopassword
```

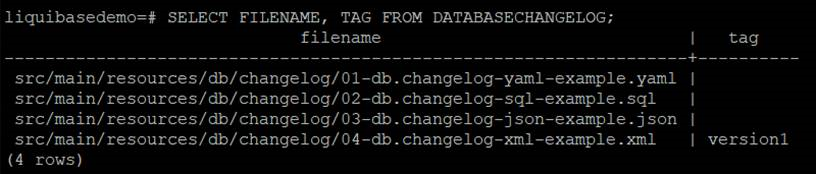
The record for 05-add-middle-name.json has been dropped.
The column middle_name has been dropped.
Similarly, we can use RollbackToDate or RollbackCount to revert the changes.
RollbackToDate
liquibase:rollback -Dliquibase.rollbackCount=1
RollbackCount
liquibase:rollback "-Dliquibase.rollbackDate=Feb 03, 2021"
To conclude, we can define changelogs in 4 possible formats and run the Maven Goals to deploy them to database in the pipeline. We can also create a tag to mark the current state and rollback if necessary.
How to solve RESOURCE:ENI error when creating an ECS task on EC2 server instance?
Supposing there are two ECS services with ``awsvpc`` networking on a ``m5.large`` EC2 instance, each service has two target tasks, and now you are adding a new service with the same settings. It is expected to see the below error under Tasks tab.
service was unable to place a task because no container instance met all of its requirements. The closest matching container-instance XXXXXXXXXXXXXXXXXXXXXXXXXXXXXXXX encountered error "RESOURCE:ENI". For more information, see the Troubleshooting section.
For ``RESOURCE:ENI`` errors, it means that there are not enough elastic network interface (ENI) attachment points in your cluster. By running the below command, you can see that the maximum network interface for each m5 types.
aws ec2 describe-instance-types --filters Name=instance-type,Values=m5.* --query "InstanceTypes[].{Type: InstanceType, MaxENI: NetworkInfo.MaximumNetworkInterfaces, IPv4addr: NetworkInfo.Ipv4AddressesPerInterface}"
For ``m5.large``, the ``maxENI`` is ``3``. From [the official documentation](https://docs.aws.amazon.com/AmazonECS/latest/developerguide/task-networking.html), it states that
Each Amazon ECS task that uses the awsvpc network mode receives its own elastic network interface (ENI), which is attached to the Amazon EC2 instance that hosts it. There is a default limit to the number of network interfaces that can be attached to an Amazon EC2 instance, and the primary network interface counts as one. For example, by default a c5.large instance may have up to three ENIs attached to it. The primary network interface for the instance counts as one, so you can attach an additional two ENIs to the instance. Because each task using the awsvpc network mode requires an ENI, you can typically only run two such tasks on this instance type. For more information on the default ENI limits for each instance type, see IP addresses per network interface per instance type in the Amazon EC2 User Guide for Linux Instances.
Hence, let's do the math.
Since there are two EC2 instances, the maxENI is 3 * 2 = 6 for this ECS cluster. We need 1 primary network interface for each instance, which means now we only have 4 available ENI to use. A service has two target tasks, each task takes 1 ENI. Therefore, two services take 4. Hence, before adding a new service, the available ENI is actually ``6 - 1 - 1 - 2 - 2 = 0``. Therefore, when we try to add a new service, even with one target task, it will still fail as there is no available ENI.
Therer are several solutions.
- You can choose a different instance type. For the number, you can run ``describe-instance-types`` to check it.
- You can change the task count to free some ENI.
- You can raise the limit by using Elastic network interface trunking.
Subscribe to:
Posts (Atom)