Showing posts with label devops. Show all posts
Showing posts with label devops. Show all posts
Wednesday, 2 September 2020
Building a CI/CD pipeline for a SAM application written in Go
This tutorial shows how to build a CI/CD Pipeline for a SAM Application written in Go with CodeCommit, CodeBuild, CodePipeline, CloudFormation and the AWS CDK.
## Prerequisites
You need to have an AWS account and installed and configured AWS CLI and Go.
## Initialize The Hello World SAM project
- Run ``sam init``
- Type 1 to select AWS Quick Start Templates
- Choose ``go1.x`` for runtime
- Leave default ``sam-app`` for project name
- Type 1 to select the Hello World Example
- Verify if ``sam-app`` have been created
When deploying this project, it will create an API Gateway, a Lambda function and a IAM Role. They are defined in ``template.yaml``.
```
HelloWorldAPI:
Description: "API Gateway endpoint URL for Prod environment for First Function"
Value: !Sub "https://${ServerlessRestApi}.execute-api.${AWS::Region}.amazonaws.com/Prod/hello/"
HelloWorldFunction:
Description: "First Lambda Function ARN"
Value: !GetAtt HelloWorldFunction.Arn
HelloWorldFunctionIamRole:
Description: "Implicit IAM Role created for Hello World function"
Value: !GetAtt HelloWorldFunctionRole.Arn
```
The Lambda function simply prints out ``Hello World``.
```
func handler(request events.APIGatewayProxyRequest) (events.APIGatewayProxyResponse, error) {
return events.APIGatewayProxyResponse{
Body: "Hello World!",
StatusCode: 200,
}, nil
}
```
## Run SAM Application Locally
SAM allows your to run your serverless application locally for your development and testing by running the following command. The default local port number is ``3000``. If you are running your app on Cloud9 workspace, you need to override it with ``--port`` as Cloud 9 only support 8080, 8081 or 8082 in the local browser.
```
sam local start-api --port 8080
```
You should see
```
Mounting HelloWorldFunction at http://127.0.0.1:8080/hello [GET]
You can now browse to the above endpoints to invoke your functions. You do not need to restart/reload SAM CLI while working on your functions, changes will be reflected instantly/automatically. You only need to restart SAM CLI if you update your AWS SAM template
* Running on http://127.0.0.1:8080/ (Press CTRL+C to quit)
```
Let's verify it
```
curl http://127.0.0.1:8080/hello
```
You should see
```
Hello World
```
## Deploy to AWS
Run ``sam build`` to build the project.
```
sam build
```
A hidden directory has been created by SAM
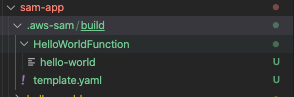
Run ``sam deploy`` to deploy your application. SAM will createa a CloudFormation stack and you can have a guided interactive mode by specifying ``--guided`` parameter.
```
sam deploy --guided
```
Configuring SAM deploy
```
Looking for samconfig.toml : Not found
Setting default arguments for 'sam deploy'
=========================================
Stack Name [sam-app]:
AWS Region [us-east-1]: ap-southeast-1
#Shows you resources changes to be deployed and require a 'Y' to initiate deploy
Confirm changes before deploy [y/N]: y
#SAM needs permission to be able to create roles to connect to the resources in your template
Allow SAM CLI IAM role creation [Y/n]: Y
HelloWorldFunction may not have authorization defined, Is this okay? [y/N]: Y
Save arguments to samconfig.toml [Y/n]: Y
Looking for resources needed for deployment: Not found.
Creating the required resources...
Successfully created!
Managed S3 bucket: aws-sam-cli-managed-default-samclisourcebucket-542w25h26du5
A different default S3 bucket can be set in samconfig.toml
Saved arguments to config file
Running 'sam deploy' for future deployments will use the parameters saved above.
The above parameters can be changed by modifying samconfig.toml
Learn more about samconfig.toml syntax at
https://docs.aws.amazon.com/serverless-application-model/latest/developerguide/serverless-sam-cli-config.html
Uploading to sam-app/9a42d6084bb2aaa2f7eaf7b2201e115a 5094701 / 5094701.0 (100.00%)
```
Deploying with following values
```
Stack name : sam-app
Region : ap-southeast-1
Confirm changeset : True
Deployment s3 bucket : aws-sam-cli-managed-default-samclisourcebucket-542w25h26du5
Capabilities : ["CAPABILITY_IAM"]
Parameter overrides : {}
```
Initiating deployment
```
HelloWorldFunction may not have authorization defined.
Uploading to sam-app/21a49766581b625811536c904121d4ba.template 1154 / 1154.0 (100.00%)
Waiting for changeset to be created..
CloudFormation stack changeset
---------------------------------------------------------------------------------------------------------------------------------------------------------------------------
Operation LogicalResourceId ResourceType
---------------------------------------------------------------------------------------------------------------------------------------------------------------------------
+ Add HelloWorldFunctionCatchAllPermissionProd AWS::Lambda::Permission
+ Add HelloWorldFunctionRole AWS::IAM::Role
+ Add HelloWorldFunction AWS::Lambda::Function
+ Add ServerlessRestApiDeployment47fc2d5f9d AWS::ApiGateway::Deployment
+ Add ServerlessRestApiProdStage AWS::ApiGateway::Stage
+ Add ServerlessRestApi AWS::ApiGateway::RestApi
---------------------------------------------------------------------------------------------------------------------------------------------------------------------------
Changeset created successfully. arn:aws:cloudformation:ap-southeast-1:XXXXXXXXXXX:changeSet/samcli-deploy1598436540/ea868c52-9c9a-4d27-a008-ef6157f65b9b
```
Previewing CloudFormation changeset before deployment
```
Deploy this changeset? [y/N]: y
2020-08-26 18:09:42 - Waiting for stack create/update to complete
CloudFormation events from changeset
-----------------------------------------------------------------------------------------------------------------------------------------------------------------------------
ResourceStatus ResourceType LogicalResourceId ResourceStatusReason
-----------------------------------------------------------------------------------------------------------------------------------------------------------------------------
CREATE_IN_PROGRESS AWS::IAM::Role HelloWorldFunctionRole -
CREATE_IN_PROGRESS AWS::IAM::Role HelloWorldFunctionRole Resource creation Initiated
CREATE_COMPLETE AWS::IAM::Role HelloWorldFunctionRole -
CREATE_IN_PROGRESS AWS::Lambda::Function HelloWorldFunction -
CREATE_IN_PROGRESS AWS::Lambda::Function HelloWorldFunction Resource creation Initiated
CREATE_COMPLETE AWS::Lambda::Function HelloWorldFunction -
CREATE_IN_PROGRESS AWS::ApiGateway::RestApi ServerlessRestApi -
CREATE_IN_PROGRESS AWS::ApiGateway::RestApi ServerlessRestApi Resource creation Initiated
CREATE_COMPLETE AWS::ApiGateway::RestApi ServerlessRestApi -
CREATE_IN_PROGRESS AWS::Lambda::Permission HelloWorldFunctionCatchAllPermissionProd Resource creation Initiated
CREATE_IN_PROGRESS AWS::ApiGateway::Deployment ServerlessRestApiDeployment47fc2d5f9d -
CREATE_IN_PROGRESS AWS::Lambda::Permission HelloWorldFunctionCatchAllPermissionProd -
CREATE_IN_PROGRESS AWS::ApiGateway::Deployment ServerlessRestApiDeployment47fc2d5f9d Resource creation Initiated
CREATE_COMPLETE AWS::ApiGateway::Deployment ServerlessRestApiDeployment47fc2d5f9d -
CREATE_IN_PROGRESS AWS::ApiGateway::Stage ServerlessRestApiProdStage -
CREATE_IN_PROGRESS AWS::ApiGateway::Stage ServerlessRestApiProdStage Resource creation Initiated
CREATE_COMPLETE AWS::ApiGateway::Stage ServerlessRestApiProdStage -
CREATE_COMPLETE AWS::Lambda::Permission HelloWorldFunctionCatchAllPermissionProd -
CREATE_COMPLETE AWS::CloudFormation::Stack sam-app -
-----------------------------------------------------------------------------------------------------------------------------------------------------------------------------
CloudFormation outputs from deployed stack
-----------------------------------------------------------------------------------------------------------------------------------------------------------------------------
Outputs
-----------------------------------------------------------------------------------------------------------------------------------------------------------------------------
Key HelloWorldFunctionIamRole
Description Implicit IAM Role created for Hello World function
Value arn:aws:iam::XXXXXXXXXXX:role/sam-app-HelloWorldFunctionRole-CXSDBGUHPMFS
Key HelloWorldAPI
Description API Gateway endpoint URL for Prod environment for First Function
Value https://yh1q5tcsqg.execute-api.ap-southeast-1.amazonaws.com/Prod/hello/
Key HelloWorldFunction
Description First Lambda Function ARN
Value arn:aws:lambda:ap-southeast-1:XXXXXXXXXXX:function:sam-app-HelloWorldFunction-13LO5HE0Y7BKS
-----------------------------------------------------------------------------------------------------------------------------------------------------------------------------
Successfully created/updated stack - sam-app in ap-southeast-1
```
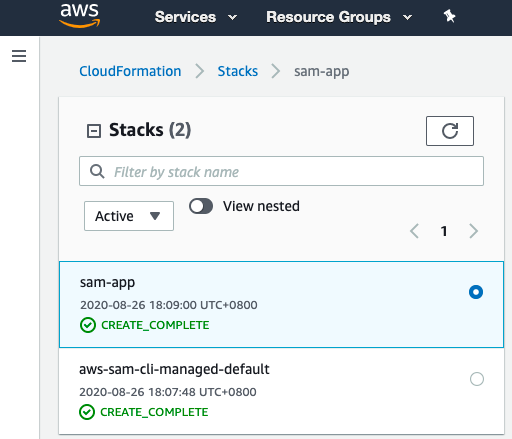
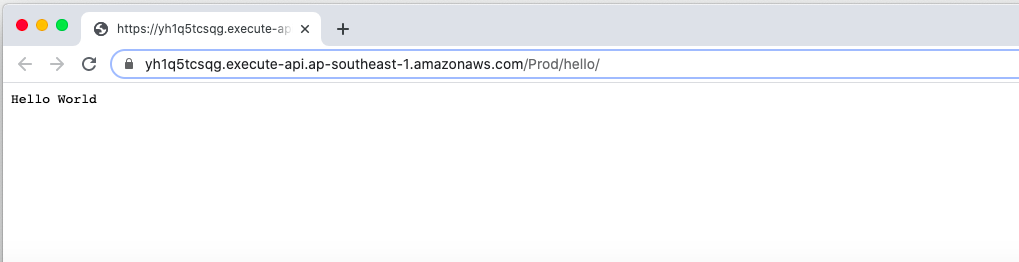
To verifiy it, click the HelloWorldApi Value in sam-app Output.
## Building the pipeline
With a continous delivery pipeline using AWS Code Pipeline, we can automate the build, package, and deploy commands. Other services will be used such as CodeCommit, CloudFormation and the AWS CDK.
The general flow would be like
```
Developer -- pushes changes --> Git Repository -- build --> deploy --> AWS
```
## Setting up CodeCommit
Let's create a CodeCommit repository
```
aws codecommit create-repository --repository-name sam-app
```
You should see the following output
```json
{
"repositoryMetadata": {
"accountId": "XXXXXXXXXXXX",
"repositoryId": "XXXXXXXX-XXXX-XXXX-XXXX-XXXXXXXXXXXX",
"repositoryName": "sam-app",
"lastModifiedDate": "2020-08-26T18:26:36.257000+08:00",
"creationDate": "2020-08-26T18:26:36.257000+08:00",
"cloneUrlHttp": "https://git-codecommit.ap-southeast-1.amazonaws.com/v1/repos/sam-app",
"cloneUrlSsh": "ssh://git-codecommit.ap-southeast-1.amazonaws.com/v1/repos/sam-app",
"Arn": "arn:aws:codecommit:ap-southeast-1:XXXXXXXXXXXX:sam-app"
}
}
```
To configurate git credentials
```
git config --global credential.helper '!aws codecommit credential-helper $@'
git config --global credential.UseHttpPath true
git config --global user.name "wingkwong"
git config --global user.email "wingkwong.code@gmail.com"
```
Go to the root directory of your SAM project and run
```
cd ./sam-app
git init
git add .
git commit -m "Initial commit"
```
Setup Git origin
```
git remote add origin
```
Push the code to origin
```
git push -u origin master
```
You should see
```
Counting objects: 17, done.
Delta compression using up to 4 threads.
Compressing objects: 100% (13/13), done.
Writing objects: 100% (17/17), 4.86 MiB | 1.55 MiB/s, done.
Total 17 (delta 0), reused 0 (delta 0)
To https://git-codecommit.ap-southeast-1.amazonaws.com/v1/repos/sam-app
* [new branch] master -> master
Branch 'master' set up to track remote branch 'master' from 'origin'.
```
## Setting up CodePipline
We will use Amazon CDK to provision the pipeline.
### Install CDK
```
npm install -g aws-cdk
```
### Initialize the project
```
cdk init --language typescript
```
### To bulid and deploy
```
npm run build
cdk deploy
```
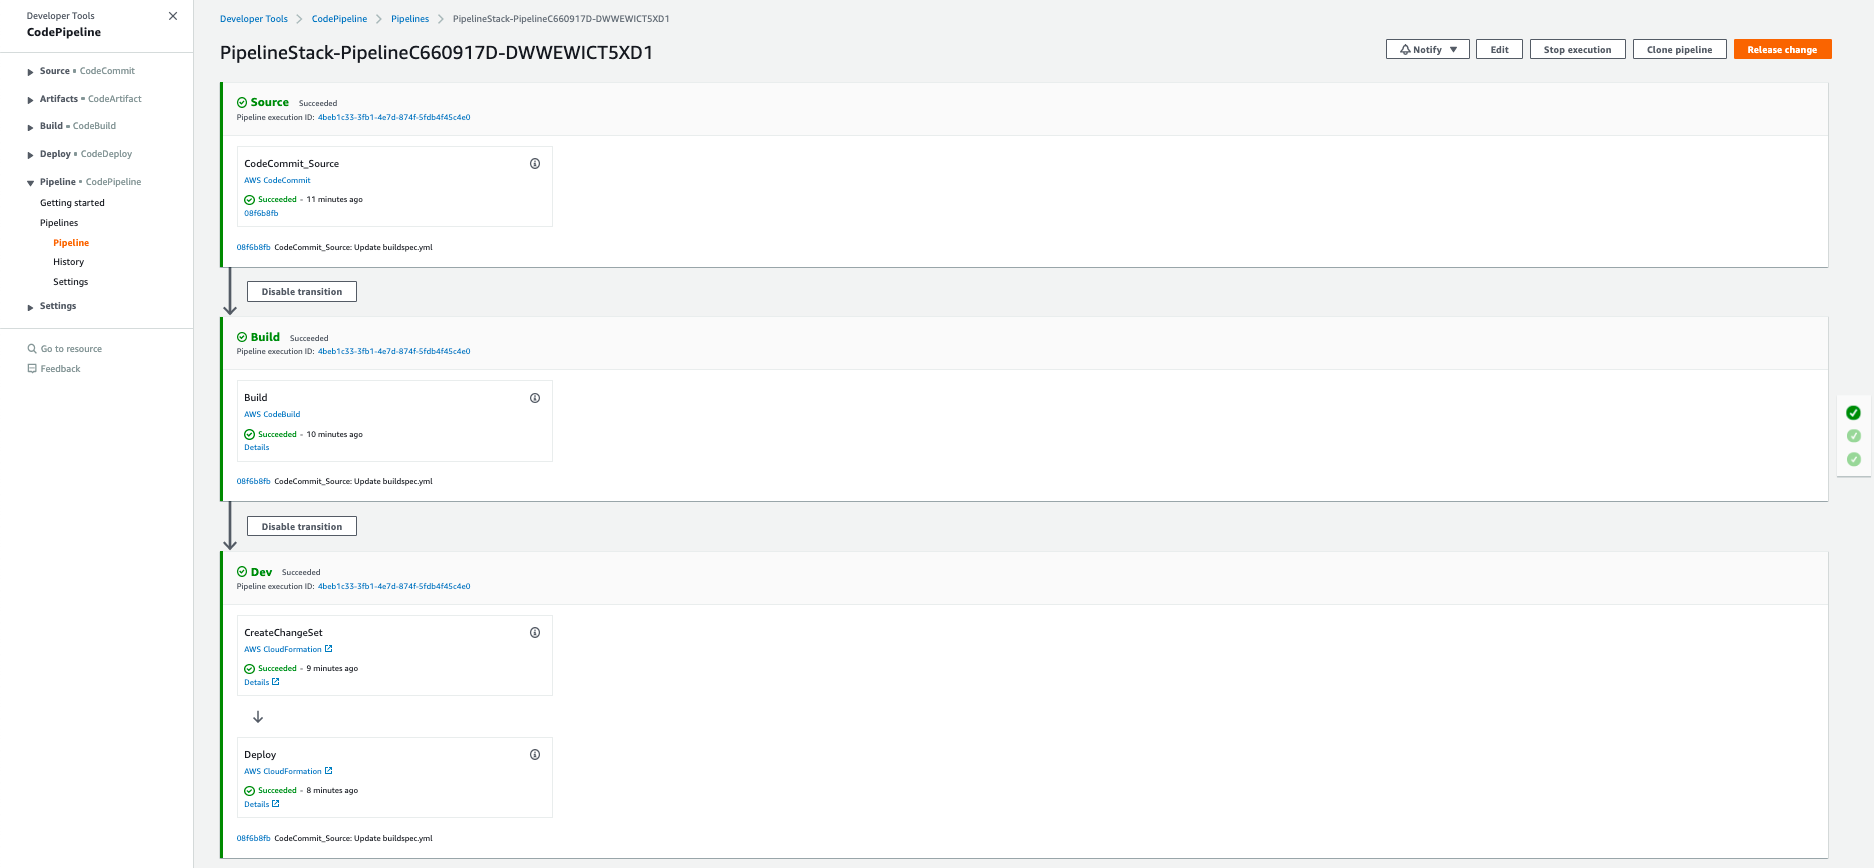
You should see ``PipelineStack`` has been created
Go to AWS Console -> Developer Tools -> CodePipeline -> Pipelines
## Clean up
```
cdk destroy PipelineStack
```
```
Are you sure you want to delete: PipelineStack (y/n)? y
PipelineStack: destroying...
11:21:26 PM | DELETE_IN_PROGRESS | AWS::CloudFormation::Stack | PipelineStack
11:22:34 PM | DELETE_IN_PROGRESS | AWS::IAM::Role | Pipeline/Dev/Creat...PipelineActionRole
11:22:34 PM | DELETE_IN_PROGRESS | AWS::IAM::Role | Pipeline/Build/Bui...PipelineActionRole
11:22:34 PM | DELETE_IN_PROGRESS | AWS::IAM::Role | Build/Role
✅ PipelineStack: destroyed
```

Thursday, 9 April 2020
Jenkins Installation
Some verions of CentOS ship with a java version that is not compatible with Jenkins, so you may have to remove it.
```
sudo yum -y remove java
```
Install java. Jenkins also works on the official Oracle JDK. Using OpenJDK just because it is a bit easier to install.
```
sudo yum -y install java-1.8.0-openjdk
```
Since Jenkins is not part of the default yum repositories, so we need to run the following commmand
```
sudo yum install epel-release
sudo wget -O /etc/yum.repos.d/jenkins.repo http://pkg.jenkins-ci.org/redhat-stable/jenkins.repo
sudo rpm --import https://jenkins-ci.org/redhat/jenkins-ci.org.key
```
Install Jenkins using yum
```
sudo yum -y install jenkins-2.164.2
```
Enable the Jenkins service
```
sudo systemctl enable jenkins
```
Start the Jenkins service
```
sudo systemctl start jenkins
```
You can now access Jenkins on your browswer.
The next step is to unlock Jenkins. run ``cat`` on ``/var/lib/jenkins/secrets/initialAdminPassword`` and copy the password and paste to the browser.
After a few minutes, setup your first admin user. Once finished, Jenkins is fully installed and set up.
Friday, 3 April 2020
Getting started with Argo CD on a k3s cluster using arkade and k3d
This post aims to demonstrate how to setup Argo CD on a k3s cluster using arkade and k3d.
This is just a learning playground
# Prerequisites
You need to install Docker on your machine and you need to register for a Docker Hub account as your Docker images will be stored there
# Install k3d
k3d is a little helper to run k3s in docker, where k3s is the lightweight Kubernetes distribution by Rancher. It actually removes millions of lines of code from k8s. If you just need a learning playground, k3s is definitely your choice.
Check out [k3d Github Page](https://github.com/rancher/k3d#get) to see the installation guide.
When creating a cluster, ``k3d`` utilises ``kubectl`` and ``kubectl`` is not part of ``k3d``. If you don't have ``kubectl``, please install and set up [here](https://kubernetes.io/docs/tasks/tools/install-kubectl/).
Once you've installed ``k3d`` and ``kubectl``, run
```
k3d create -n argocd-playground
```
We need to make ``kubectl`` to use the kubeconfig for that cluster.
```
export KUBECONFIG="$(k3d get-kubeconfig --name='argocd-playground')"
```
# Install arkade
Moving on to [arkade](https://github.com/alexellis/arkade), it provides a simple Golang CLI with strongly-typed flags to install charts and apps to your cluster in one command. Originally, the codebase is derived from [k3sup](https://github.com/alexellis/k3sup) which I've contributed last month.
```
curl -sLS https://dl.get-arkade.dev | sudo sh
```
Once you've installed it, you should see the following
```
New version of arkade installed to /usr/local/bin
_ _
__ _ _ __| | ____ _ __| | ___
/ _` | '__| |/ / _` |/ _` |/ _ \
| (_| | | | < (_| | (_| | __/
\__,_|_| |_|\_\__,_|\__,_|\___|
Get Kubernetes apps the easy way
Version: 0.2.2
Git Commit: 9063b6eb16deae5978805f71b0e749828c815490
```
Install Argo CD via arkade. You can use an alias ``ark`` or ``arkade``.
```
ark install argocd
```
You should see the following info
```
Using kubeconfig: /Users/wingkwong/.config/k3d/argocd-playground/kubeconfig.yaml
Node architecture: "amd64"
=======================================================================
= ArgoCD has been installed =
=======================================================================
# Get the ArgoCD CLI
brew tap argoproj/tap
brew install argoproj/tap/argocd
# Or download via https://github.com/argoproj/argo-cd/releases/latest
# Username is "admin", get the password
kubectl get pods -n argocd -l app.kubernetes.io/name=argocd-server -o name | cut -d'/' -f 2
# Port-forward
kubectl port-forward svc/argocd-server -n argocd 8081:443 &
http://localhost:8081
# Get started with ArgoCD at
# https://argoproj.github.io/argo-cd/#quick-start
Thanks for using arkade!
```
Follow the step to enable port forwarding
```
kubectl port-forward svc/argocd-server -n argocd 8081:443 &
```
```
Forwarding from [::1]:8081 -> 8080
```
Open your browser and browse ``http://localhost:8080/``. You should see the Argo CD UI.
As stated in the console info upon the completion of installation, the username is ``admin`` and you can get hte password by running
```
kubectl get pods -n argocd -l app.kubernetes.io/name=argocd-server -o name | cut -d'/' -f 2
```
> If you want to check out the info, you can run ``ark info argocd``.
After logging in, you should see the application page.
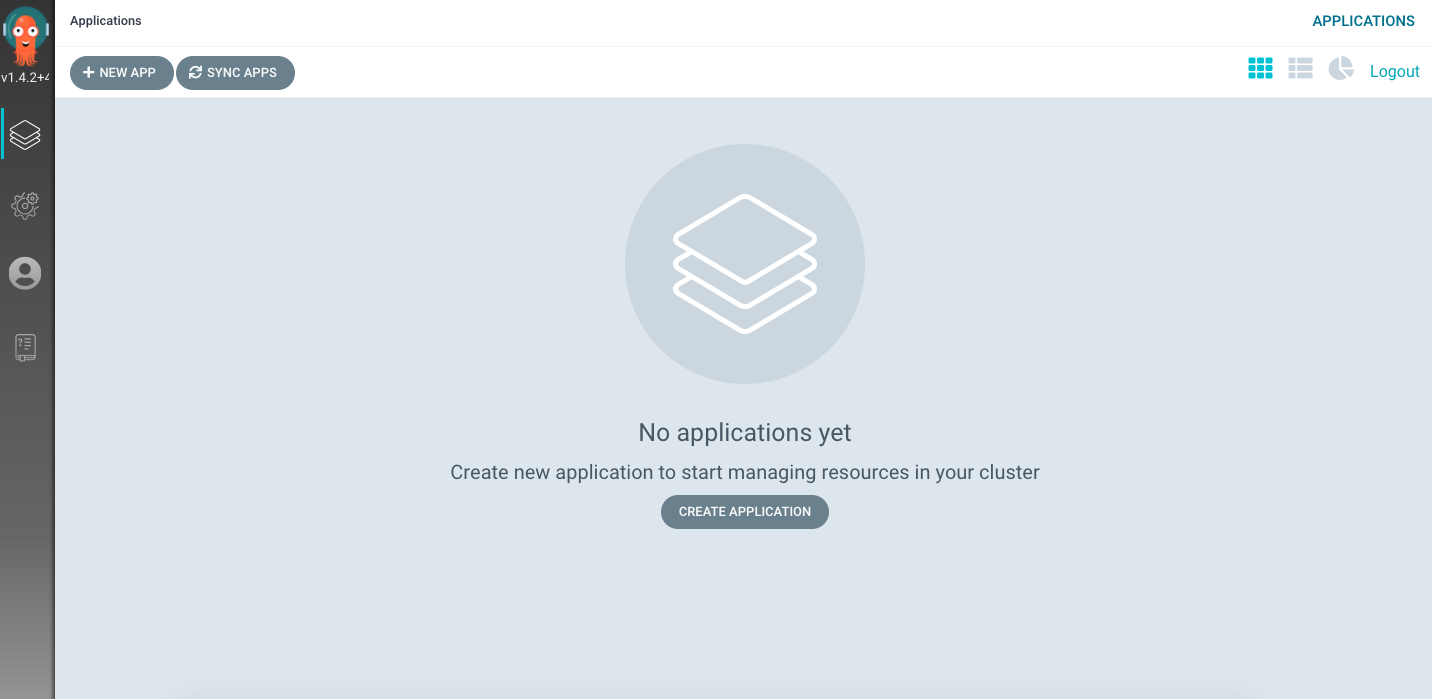
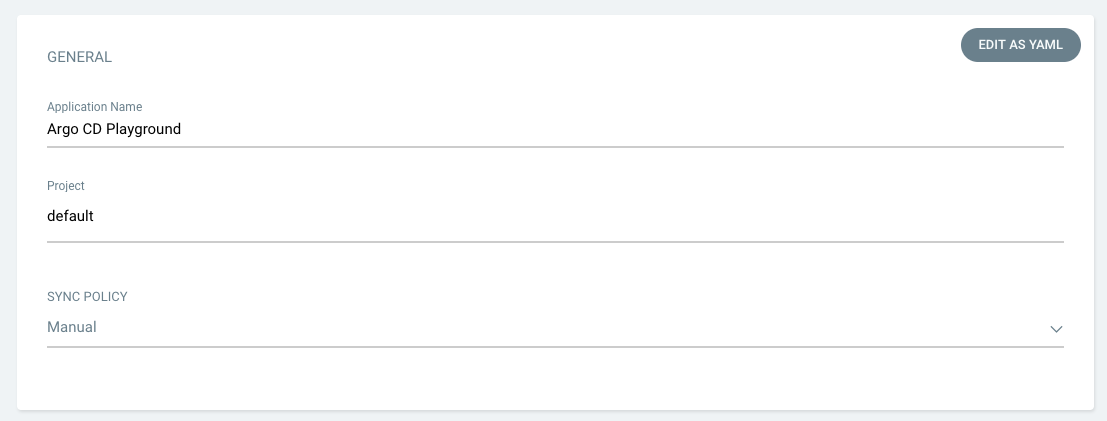
Set your application name. Use the project ``default`` and choose the sync policy to ``Manual``.
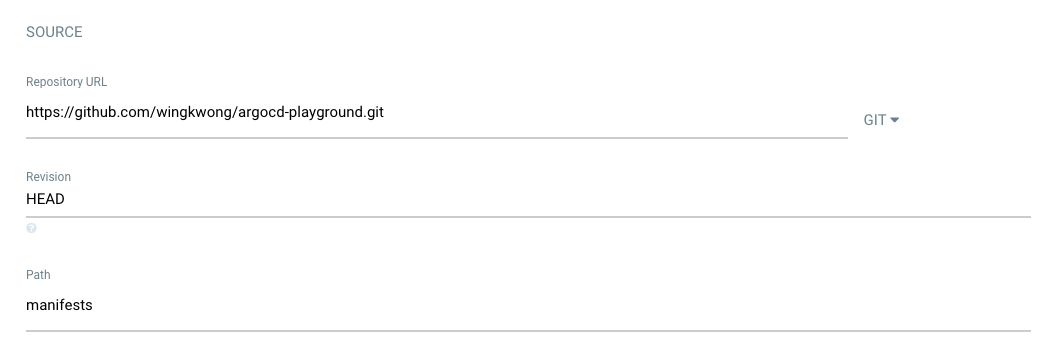
Connect your repository to Argo CD. Select the revision and the path where your manifests files are located.
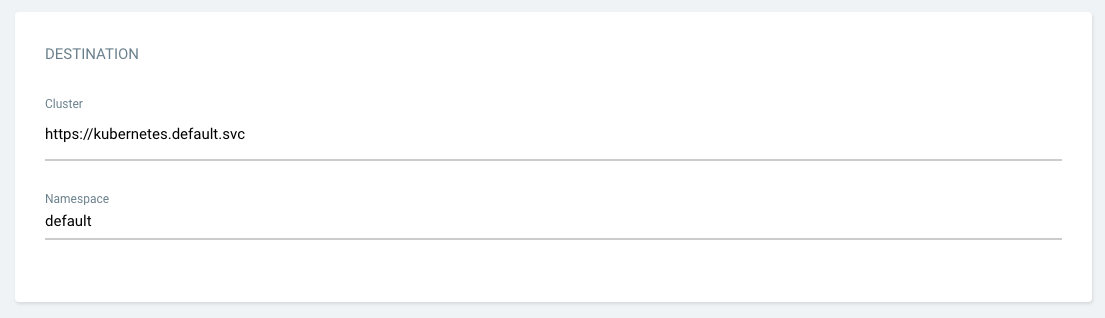
Set the cluster to ``https://kubernetes.default.svc`` with ``default`` namespace.
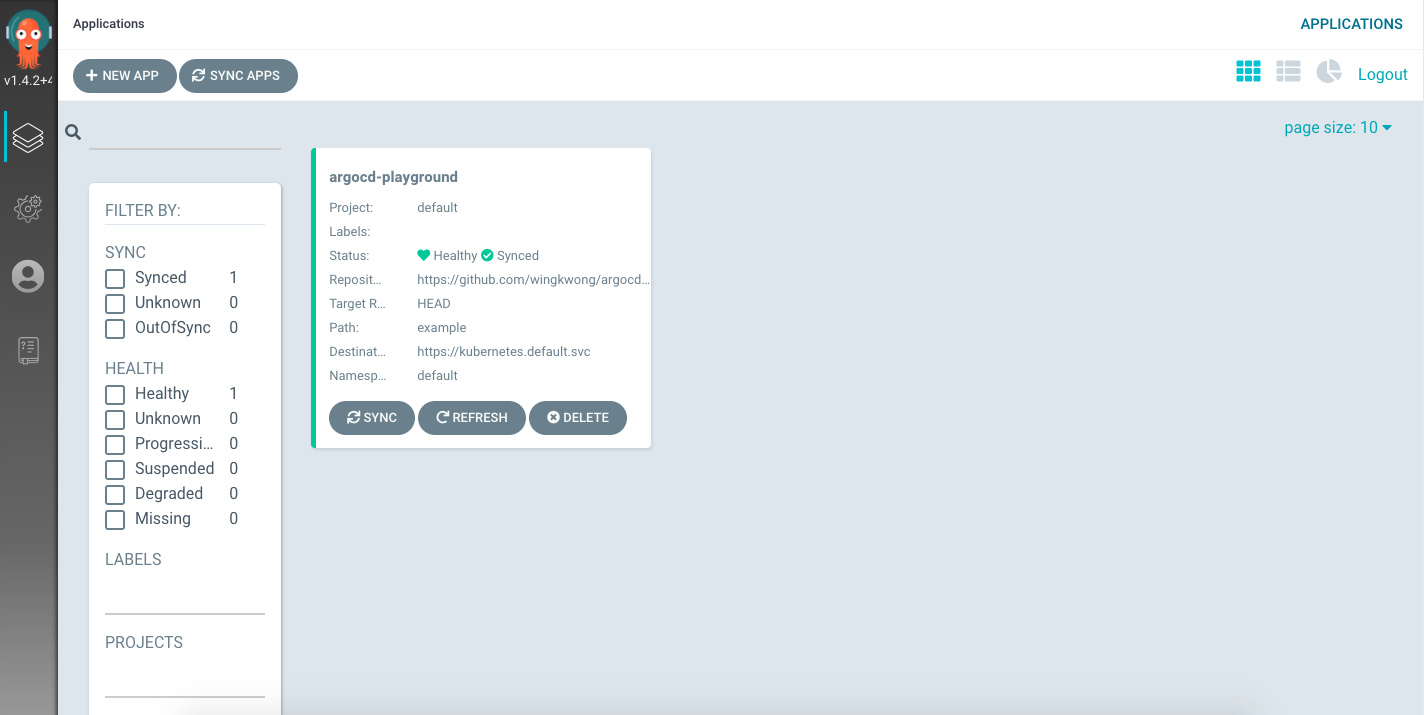
Click ``Create``. Then you should see there is an application on the portal.
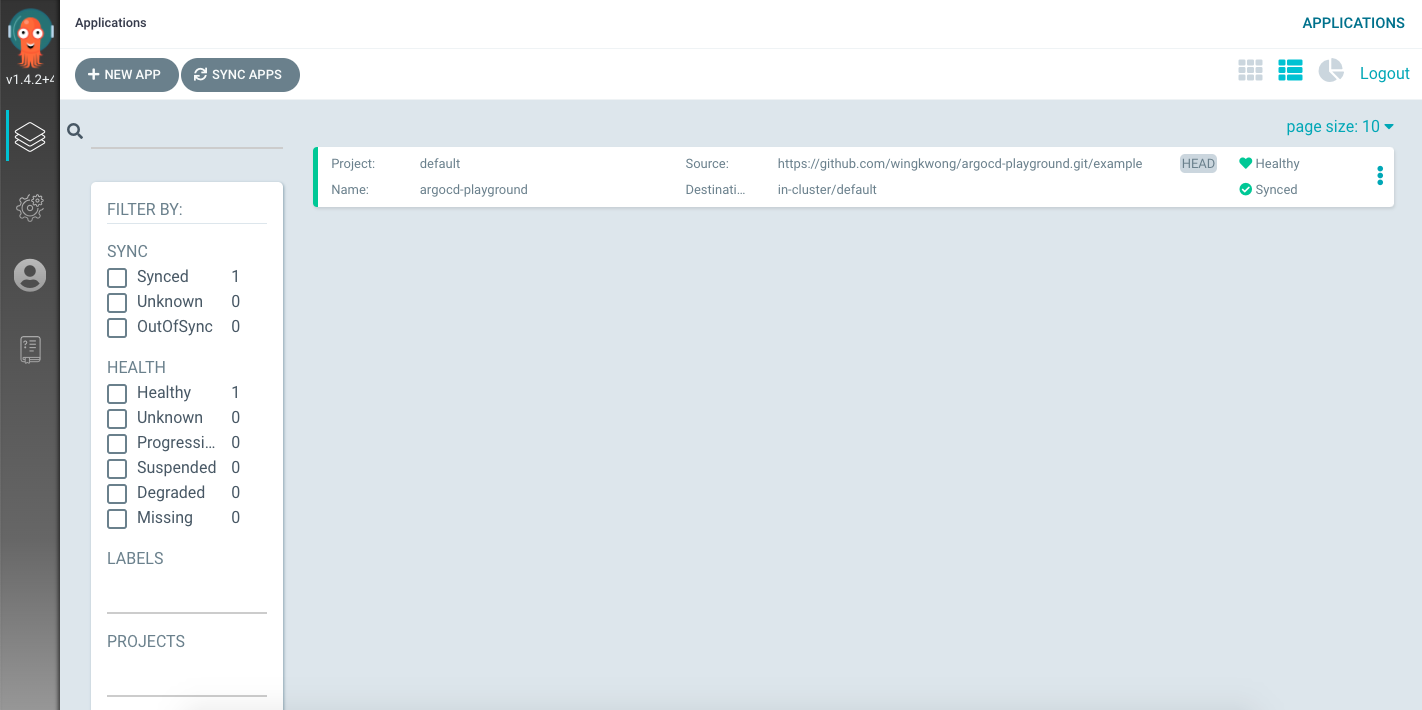
You can also switch it to the list view
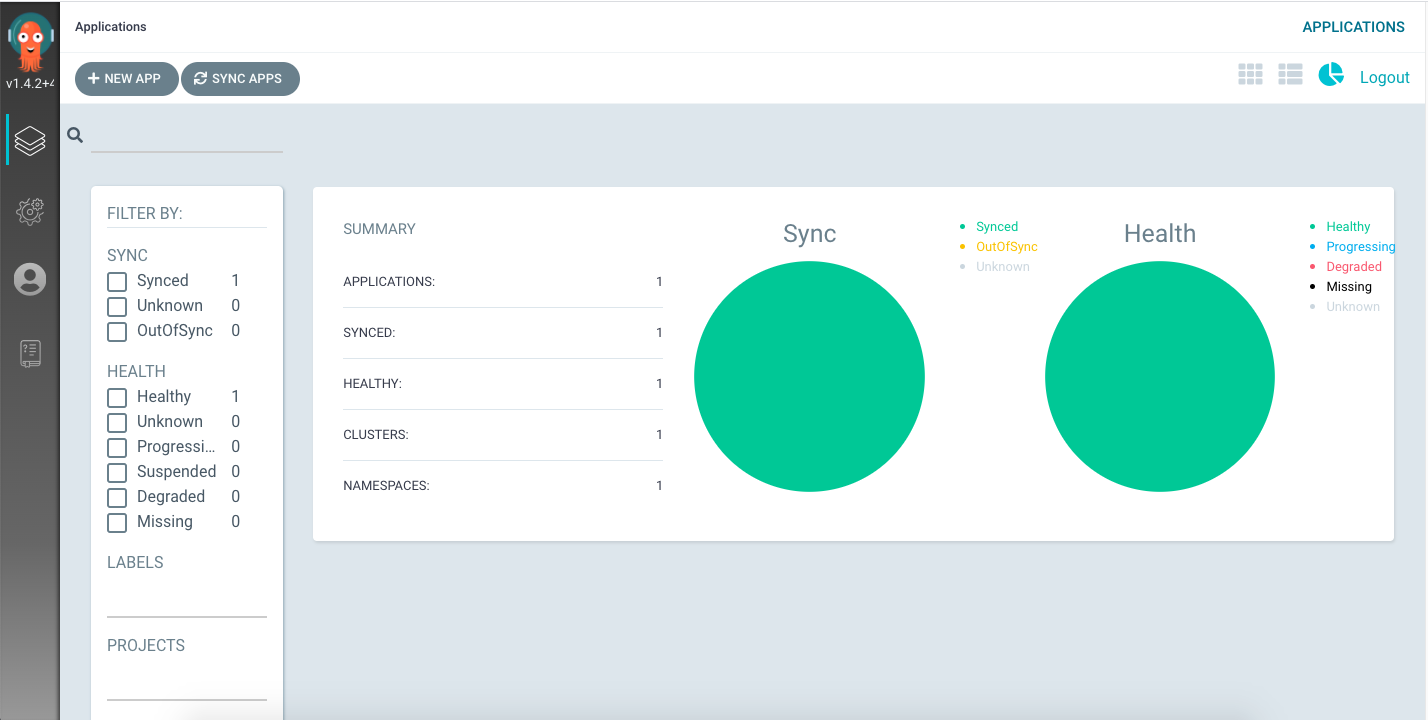
or summary view
Here is my application
```
package main
import (
"io"
"log"
"net/http"
)
func main() {
http.HandleFunc("/", Handler)
if err := http.ListenAndServe(":8888", nil); err != nil {
log.Fatal(err)
}
}
func Handler(w http.ResponseWriter, r *http.Request) {
w.Header().Add("Content-Type", "application/json")
io.WriteString(w, `{"status":"ok"}`)
}
```
Let's add ``deployment.yaml``
```
apiVersion: apps/v1
kind: Deployment
metadata:
name: argocd-playground
spec:
replicas: 1
revisionHistoryLimit: 3
selector:
matchLabels:
app: argocd-playground
template:
metadata:
labels:
app: argocd-playground
spec:
containers:
- image: wingkwong/argocd-playground:v1
name: argocd-playground
ports:
- containerPort: 8888
```
and ``service.yaml``
```
apiVersion: v1
kind: Service
metadata:
name: argocd-playground
spec:
ports:
- port: 8888
targetPort: 8888
selector:
app: argocd-playground
```
Once you've pushed your commit, Argo CD detects changes under ``manifests``. It updates the status to ``OutOfSync``.
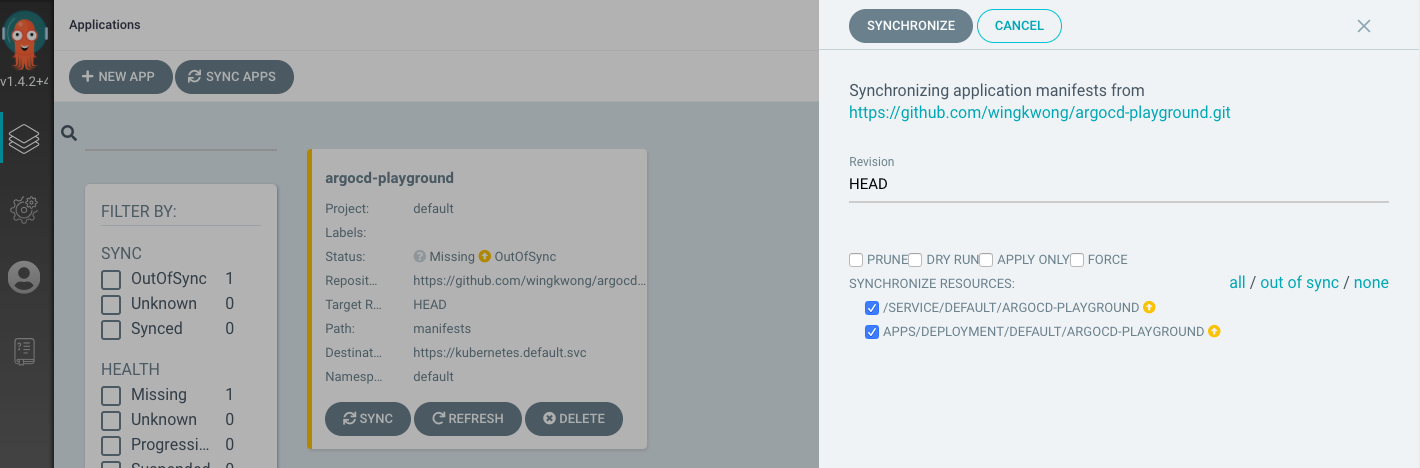
Let's sync.
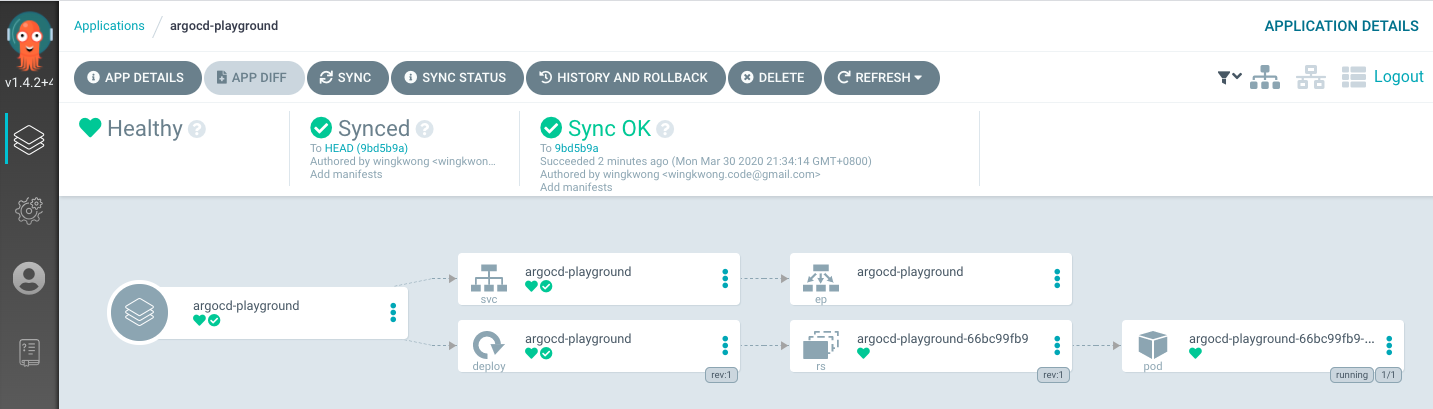
Enable port forwarding
```
kubectl port-forward svc/argocd-playground 8888:8888
```
Verify v1 in the browser
```
http://localhost:8888/
```
You should see
```
{"status":"ok"}
```
Update the application

Build and push the docker image to docker hub. Then update the image tag to v2 in ``deployment.yaml``.
```
- image: wingkwong/argocd-playground:v2
```
Go back to Argo CD UI, the status becomes ``OutofSync``.
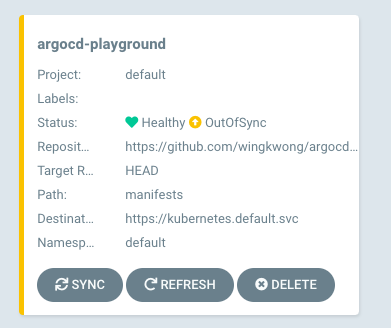
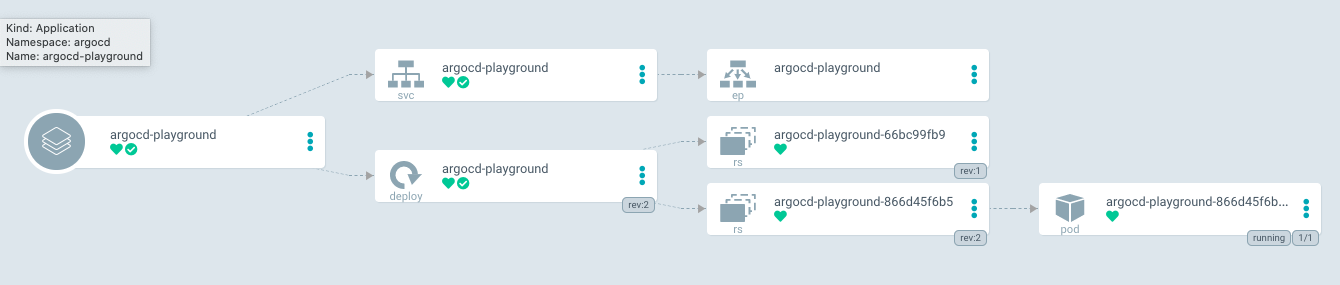
Click ``SYNC``
A new pod is being created, while the original one is still here.

Once it is ready, the original one will be deleted.
You should see the below error
```
E0331 20:24:00.727018 61938 portforward.go:400] an error occurred forwarding 8888 -> 8888: error forwarding port 8888 to pod 0f8b6902adcdbfdcde17a17bc1d182db8c4c849ba50ef369d90969e1349797b5, uid : failed to find sandbox "0f8b6902adcdbfdcde17a17bc1d182db8c4c849ba50ef369d90969e1349797b5" in store: does not exist
```
We should stop port forwarding before redeploying a different version. Let's kill it and do it again.
```
kubectl port-forward svc/argocd-playground 8888:8888
```
Go to
```
http://localhost:8888/
```
Now you can see the new changes
```
{"status":"ok", "message": "hello-world"}
```
# Clean up
```
k3d delete -n argocd-playground
```
# Compare with FluxCD
Argo CD allows users to sync in an application level instead of a repository level by setting the Path. It supports different templating such as kustomize, helm, ksonnet, jsonnet, etc. With an UI portal, users can simply manage the application there. However, it cannot monitor a docker repository and deploy from the repository. The docker image needs to be manually updated for each updates.
# Useful links
- [Argo CD](https://argoproj.github.io/argo-cd/)
- [arkade](https://github.com/alexellis/arkade#get-arkade)
- [k3d](https://github.com/rancher/k3d)
Tuesday, 24 March 2020
Deploying Your Application to Amazon EKS with GitHub Actions and Weave Flux
Last month I've published a tutorial to show you how to build and push a docker image to Amazon ECR with GitHub Actions.
However, if you are using Amazon EKS, you may need to manually update the image URI every time you have a new release. is there a way to automate the whole process that the image URI can be updated automatically? Yes. Here's the solution for you.
Flux is the operator that makes GitOps happen in your cluster. It ensures that the cluster config matches the one in git and automates your deployments.
Suppose you've already provisioned your Amazon EKS cluster. If not, please check out my previous post.
Configure your kubectl so that you can connect to an Amazon EKS cluster by running
```bash
export AWS_REGION="ap-southeast-1"
export CLUSTER_NAME="your-cluster-name"
aws eks --region ${AWS_REGION} update-kubeconfig --name ${CLUSTER_NAME}
```
If you enable load balancer ingress access, make sure that you have the corresponding IAM role.
```bash
aws iam get-role --role-name "AWSServiceRoleForElasticLoadBalancing" || aws iam create-service-linked-role --aws-service-name "elasticloadbalancing.amazonaws.com"
```
Run your manifest files
```bash
kubectl apply -f manifests/deployment.yaml
kubectl apply -f manifests/service.yaml
kubectl apply -f manifests/ingress.yaml
```
A sample deployment can be found [here](https://github.com/github-developer/example-actions-flux-eks/blob/master/manifests/deployment.yml). Make sure you have ``fluxcd.io/automated: "true"`` under ``annotations``.
The next step is to run Flux on our EKS cluster. Let's create a new namespace ``flux`` in where flux objects will be installed.
```bash
kubectl create ns flux
```
Install flux objects under ``flux`` namespace. By doing so, flux is monitoring the manifests folder for the changes.
```bash
export GHUSER=your-github-user
export GHREPO=your-github-repo
fluxctl install \
--git-user=${GHUSER} \
--git-email=${GHUSER}@users.noreply.github.com \
--git-url=git@github.com:${GHUSER}/${GHREPO} \
--git-path=manifests \
--namespace=flux | kubectl apply -f -
```
You should see the following
```bash
serviceaccount/flux created
clusterrole.rbac.authorization.k8s.io/flux unchanged
clusterrolebinding.rbac.authorization.k8s.io/flux configured
deployment.apps/flux created
secret/flux-git-deploy created
deployment.apps/memcached created
service/memcached created
```
Let's verify if they are running or not
```bash
kubectl get all -n flux
```
```bash
NAME READY STATUS RESTARTS AGE
pod/flux-6449c6bd94-7gz88 1/1 Running 0 5m
pod/memcached-86869f57fd-52cwn 1/1 Running 0 5m
NAME TYPE CLUSTER-IP EXTERNAL-IP PORT(S) AGE
service/memcached ClusterIP 10.100.152.74 11211/TCP 5m
NAME READY UP-TO-DATE AVAILABLE AGE
deployment.apps/flux 1/1 1 1 5m
deployment.apps/memcached 1/1 1 1 5m
NAME DESIRED CURRENT READY AGE
replicaset.apps/flux-6449c6bd94 1 1 0 5m
replicaset.apps/memcached-86869f57fd 1 1 1 5m
```
Upon the completion of deployment, the docker image URI in deployment.yaml should be updated. To do so, we need to grand read/write access to the repository with a deploy key so that Flux can be able to write it back every time it deploys.
By running
```bash
fluxctl identity --k8s-fwd-ns flux
```
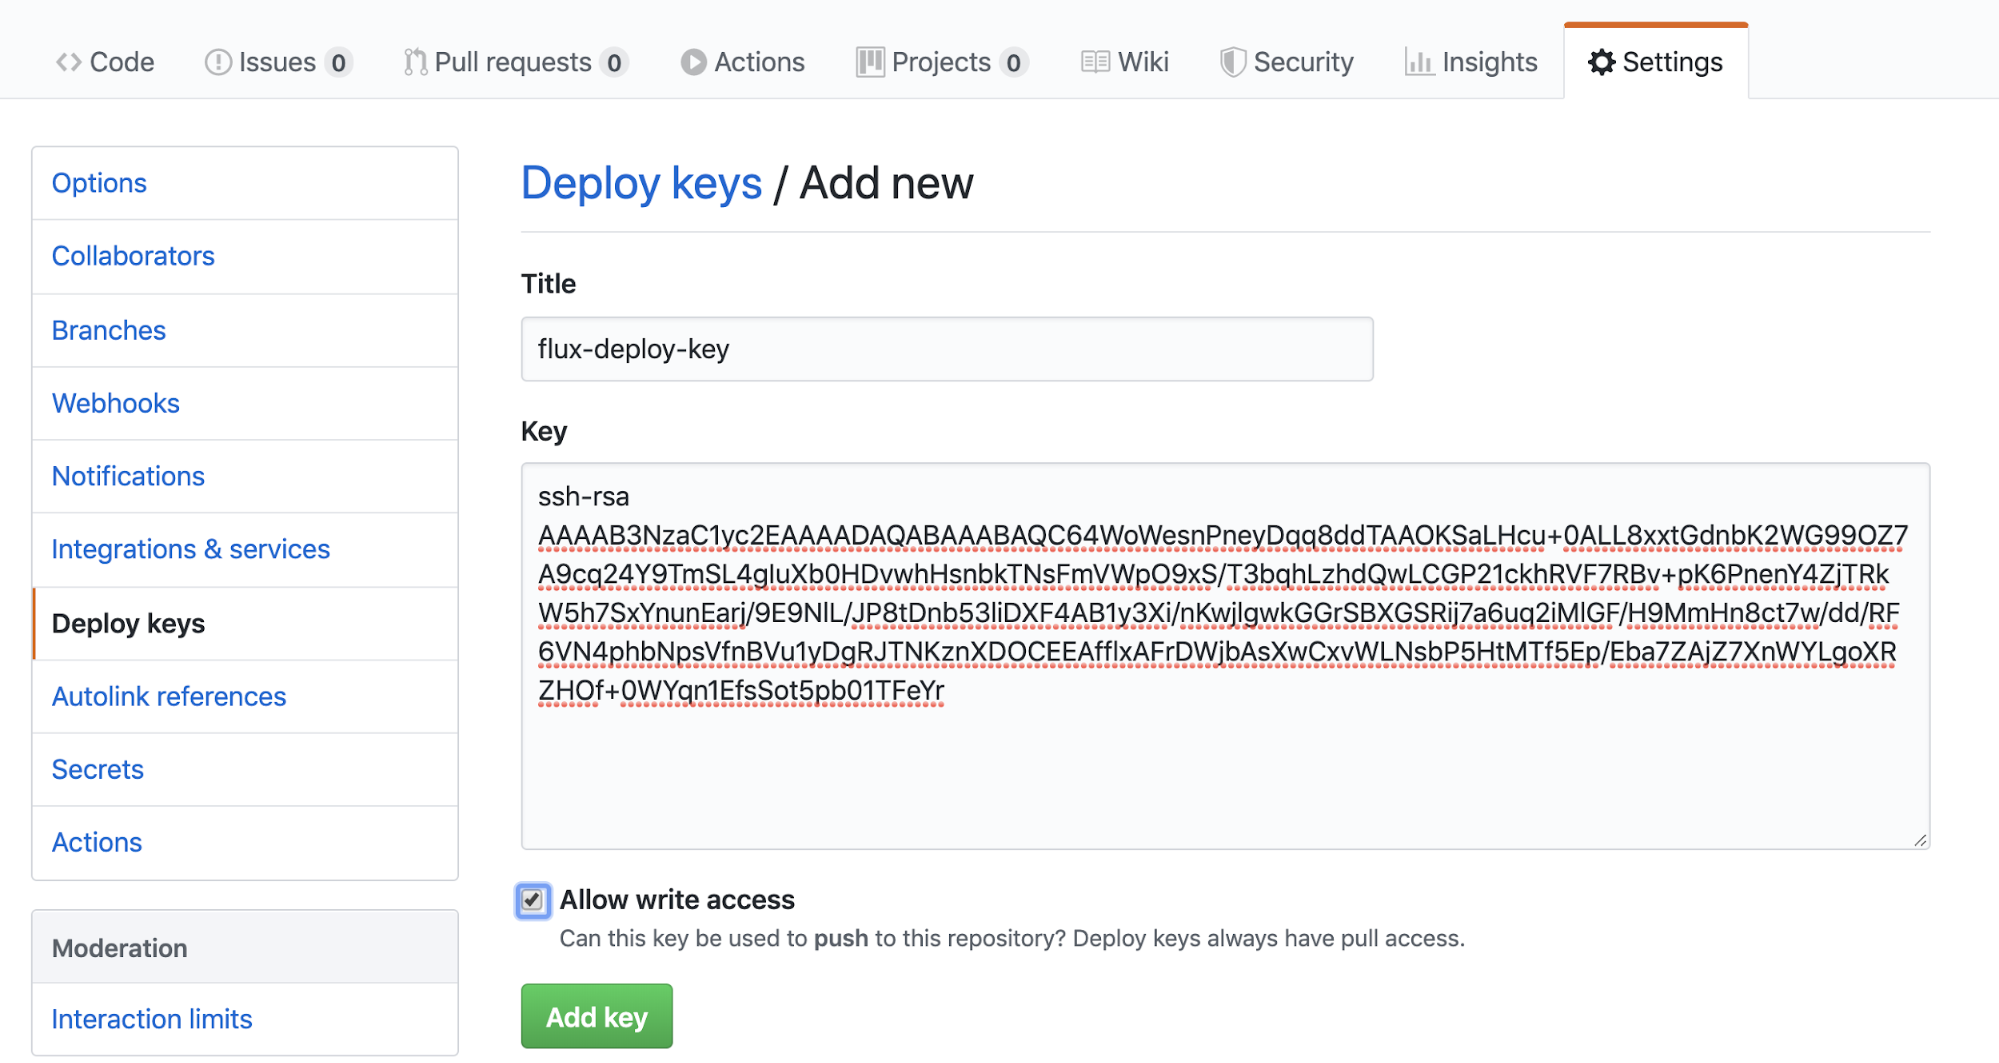
You should get a deploy key.
```bash
ssh-rsa
AAAAB3NzaC1yc2EAAAADAQABAAABAQC64WoWesnPneyDqq8ddTAAOKSaLHcu+0ALL8xxtGdnbK2WG99OZ7A9cq24Y9TmSL4gIuXb0HDvwhHsnbkTNsFmVWpO9xS/T3bqhLzhdQwLCGP21ckhRVF7RBv+pK6PnenY4ZjTRkW5h7SxYnunEarj/9E9NlL/JP8tDnb53liDXF4AB1y3Xi/nKwjlgwkGGrSBXGSRij7a6uq2iMlGF/H9MmHn8ct7w/dd/RF6VN4phbNpsVfnBVu1yDgRJTNKznXDOCEEAfflxAFrDWjbAsXwCxvWLNsbP5HtMTf5Ep/Eba7ZAjZ7XnWYLgoXRZHOf+0WYqn1EfsSot5pb01TFeYr
```
Go to Settings > Deploy keys and click 'Add deploy key'
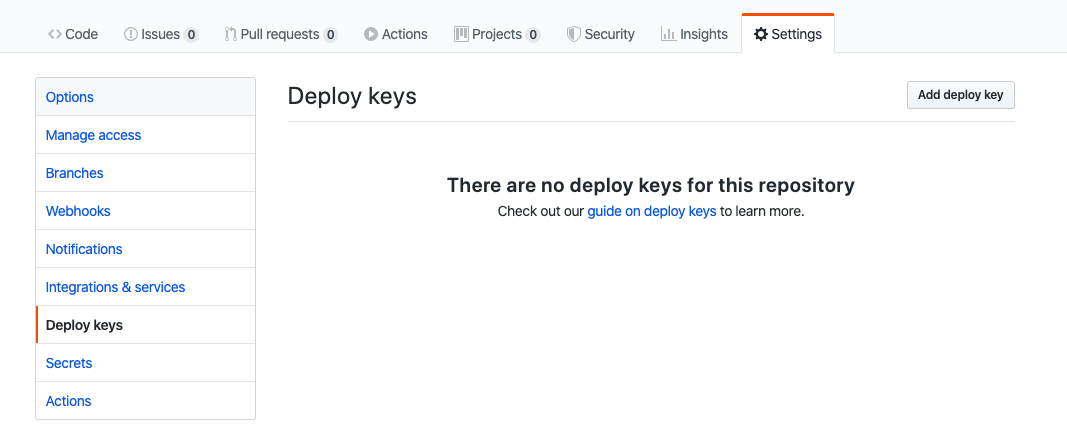
Enter the title and the key you just generated. Make sure you tick 'Allow write access'
Then we can go back to the console and run the following command to sync Flux and Github.
```bash
fluxctl sync --k8s-fwd-ns flux
```
For the first time, you should see
```bash
Synchronizing with git@github.com:wingkwong/eks-flux-playground
Revision of master to apply is a8e3b45
Waiting for a8e3b45 to be applied ...
Done.
```
If you make a change and push to master, Github Actions helps to build and push the docker image to Amazon ECR, and Flux helps to deploy the latest image to Amazon EKS.
Go back to the repository, you should see there is a new commit on your deployment.yaml while the change is only updating the image URI.
```bash
Auto-release xxxxxxxxxxxx.dkr.ecr.ap-southeast-1.amazonaws.com/eks-flux…
Saturday, 14 March 2020
A Workaround for Syncing and Updating Multiple Repositories with Flux
Flux is the GitOps Kubernetes operator, which is most useful when used as a deployment tool at the end of a Continuous Delivery pipeline. Flux will make sure that your new container images and config changes are propagated to the cluster.
However, at this moment, flux only works with a single git repository containing Kubernetes manifests.
Let's say you have three applications from three different repositories. If you run ``fluxctl install`` for each application on different namespace, and list the controllers with the last namespace you created.
```bash
fluxctl list-controllers --k8s-fwd-ns=app3
```
```bash
WORKLOAD CONTAINER IMAGE RELEASE POLICY
default:deployment/app1 app1 123456789123.dkr.ecr.ap-southeast-1.amazonaws.com/app1:f8ebcf87b02cd334b4228c1d22fe001dafff9ca6 ready
default:deployment/app2 app2 123456789123.dkr.ecr.ap-southeast-1.amazonaws.com/app2:92218e4aeefa8f19f5e9a900bc7d07f38b8622c6 ready
default:deployment/app3 app3 123456789123.dkr.ecr.ap-southeast-1.amazonaws.com/app3:a1a8231ff2ac89eb70fc353eeceb2470ee2d0ec3 ready automated
```
If you list the controllers with namespace ``app1``
```bash
fluxctl list-controllers --k8s-fwd-ns=app1
```
There is no workload for it
```bash
WORKLOAD CONTAINER IMAGE
```
Same as ``app1``
```bash
fluxctl list-controllers --k8s-fwd-ns=app2
```
No workload is expected
```bash
WORKLOAD CONTAINER IMAGE
```
Therefore, even you make a commit to repo ``app1`` or ``app2``, it never triggers the controller to sync and update the repo. Your deployment would remain unchanged.
To fix it, run
```bash
kubectl edit clusterrolebinding.rbac.authorization.k8s.io/flux
```
You should see
```
apiVersion: rbac.authorization.k8s.io/v1
kind: ClusterRoleBinding
metadata:
annotations:
kubectl.kubernetes.io/last-applied-configuration: |
{"apiVersion":"rbac.authorization.k8s.io/v1beta1","kind":"ClusterRoleBinding","metadata":{"annotations":{},"labels":{"name":"flux"},"name":"flux"},"roleRef":{"apiGroup":"rbac.authorization.k8s.io","kind":"ClusterRole","name":"flux"},"subjects":[{"kind":"ServiceAccount","name":"flux","namespace":"app3"}]}
creationTimestamp: "2020-03-13T16:31:43Z"
labels:
name: flux
name: flux
resourceVersion: "85027"
selfLink: /apis/rbac.authorization.k8s.io/v1/clusterrolebindings/flux
uid: 202463ba-6548-11ea-a8a2-025c790809a6
roleRef:
apiGroup: rbac.authorization.k8s.io
kind: ClusterRole
name: flux
subjects:
- kind: ServiceAccount
name: flux
namespace: app3
```
Since you create ``app3`` at the end, the cluster role binding config is modified when you run ``fluxctl install``.
```
clusterrolebinding.rbac.authorization.k8s.io/flux configured
```
If you check out flux RBAC template, you can see there is only one subject.
```
apiVersion: rbac.authorization.k8s.io/v1beta1
kind: ClusterRoleBinding
metadata:
name: {{ template "flux.clusterRoleName" . }}
labels:
app: {{ template "flux.name" . }}
chart: {{ template "flux.chart" . }}
release: {{ .Release.Name }}
heritage: {{ .Release.Service }}
roleRef:
apiGroup: rbac.authorization.k8s.io
kind: ClusterRole
name: {{ template "flux.clusterRoleName" . }}
subjects:
- name: {{ template "flux.serviceAccountName" . }}
namespace: {{ .Release.Namespace | quote }}
kind: ServiceAccount
{{- end -}}
{{- end -}}
```
Therefore, to allow three applications at the same time, we need to add the missing two.
```
apiVersion: rbac.authorization.k8s.io/v1
kind: ClusterRoleBinding
metadata:
annotations:
kubectl.kubernetes.io/last-applied-configuration: |
{"apiVersion":"rbac.authorization.k8s.io/v1beta1","kind":"ClusterRoleBinding","metadata":{"annotations":{},"labels":{"name":"flux"},"name":"flux"},"roleRef":{"apiGroup":"rbac.authorization.k8s.io","kind":"ClusterRole","name":"flux"},"subjects":[{"kind":"ServiceAccount","name":"flux","namespace":"app1"}]}
creationTimestamp: "2020-03-13T16:31:43Z"
labels:
name: flux
name: flux
resourceVersion: "85027"
selfLink: /apis/rbac.authorization.k8s.io/v1/clusterrolebindings/flux
uid: 202463ba-6548-11ea-a8a2-025c790809a6
roleRef:
apiGroup: rbac.authorization.k8s.io
kind: ClusterRole
name: flux
subjects:
- kind: ServiceAccount
name: flux
namespace: app1
- kind: ServiceAccount
name: flux
namespace: app2
- kind: ServiceAccount
name: flux
namespace: app3
```
Once you save the file, it will update the config in the background. Now we can verify the result.
```bash
fluxctl list-controllers --k8s-fwd-ns=app1
```
```bash
WORKLOAD CONTAINER IMAGE RELEASE POLICY
default:deployment/app1 app1 123456789123.dkr.ecr.ap-southeast-1.amazonaws.com/app1:f8ebcf87b02cd334b4228c1d22fe001dafff9ca6 ready automated
default:deployment/app2 app2 123456789123.dkr.ecr.ap-southeast-1.amazonaws.com/app2:92218e4aeefa8f19f5e9a900bc7d07f38b8622c6 ready
default:deployment/app3 app3 123456789123.dkr.ecr.ap-southeast-1.amazonaws.com/app3:a1a8231ff2ac89eb70fc353eeceb2470ee2d0ec3 ready
```
```bash
fluxctl list-controllers --k8s-fwd-ns=app2
```
```bash
WORKLOAD CONTAINER IMAGE RELEASE POLICY
default:deployment/app1 app1 123456789123.dkr.ecr.ap-southeast-1.amazonaws.com/app1:f8ebcf87b02cd334b4228c1d22fe001dafff9ca6 ready
default:deployment/app2 app2 123456789123.dkr.ecr.ap-southeast-1.amazonaws.com/app2:92218e4aeefa8f19f5e9a900bc7d07f38b8622c6 ready automated
default:deployment/app3 app3 123456789123.dkr.ecr.ap-southeast-1.amazonaws.com/app3:a1a8231ff2ac89eb70fc353eeceb2470ee2d0ec3 ready
```
```bash
fluxctl list-controllers --k8s-fwd-ns=app3
```
```bash
WORKLOAD CONTAINER IMAGE RELEASE POLICY
default:deployment/app1 app1 123456789123.dkr.ecr.ap-southeast-1.amazonaws.com/app1:f8ebcf87b02cd334b4228c1d22fe001dafff9ca6 ready
default:deployment/app2 app2 123456789123.dkr.ecr.ap-southeast-1.amazonaws.com/app2:92218e4aeefa8f19f5e9a900bc7d07f38b8622c6 ready
default:deployment/app3 app3 123456789123.dkr.ecr.ap-southeast-1.amazonaws.com/app3:a1a8231ff2ac89eb70fc353eeceb2470ee2d0ec3 ready automated
```
Then when you make a commit to your repo ``app1``, ``app2`` and ``app3``, it should auto release your application and your deployment.yml should be updated by flux with a latest docker image URI.
Monday, 24 February 2020
Building and pushing a docker image to Amazon ECR with GitHub Actions
GitHub Actions enables you to create custom software development life cycle (SDLC) workflows directly in your GitHub repository.
Workflows are custom automated processes that you can set up in your repository to build, test, package, release, or deploy any project on GitHub. With workflows you can automate your software development life cycle with a wide range of tools and services.
In this post, you'll learn how to use a GitHub Actions workflow to build and push a new container image to Amazon ECR upon code change.
You must store workflows in the ``.github/workflows`` directory in the root of your repository. The files are in ``.yml`` or ``.yaml`` format.
Let's create one called ``build.yml``.
The first part is the name of your workflow. It is used to display on your repository's actions page.
```
name: Building and pushing a docker image to Amazon ECR
```
The second part is ``on``, which is the name of the GitHub event triggering the workflow.
You can provide a single event
```
on: push
```
or a list of events
```
on: [push, pull_request]
```
We can also add more configurations. For example, we can specify activity types. The below example shows it triggers the workflow on push or pull request only for the master branch and for the paths under ``app/**``.
```
on:
pull_request:
paths:
- app/**
branches:
- master
push:
paths:
- app/**
branches:
- master
```
The next part is ``env``. We'll setup environment variables to provide configuration option and credentials via Github.
```
env:
AWS_DEFAULT_REGION: ap-southeast-1
AWS_DEFAULT_OUTPUT: json
AWS_ACCOUNT_ID: ${{ secrets.AWS_ACCOUNT_ID }}
AWS_ACCESS_KEY_ID: ${{ secrets.AWS_ACCESS_KEY_ID }}
AWS_SECRET_ACCESS_KEY: ${{ secrets.AWS_SECRET_ACCESS_KEY }}
CONTAINER_IMAGE: example-container:${{ github.sha }}
```
Go to Github, navigate to Settings in your repository. Click Secrets.
Add three new secrets namely ``AWS_ACCOUNT_ID``, ``AWS_ACCESS_KEY_ID``, and ``AWS_SECRET_ACCESS_KEY``.
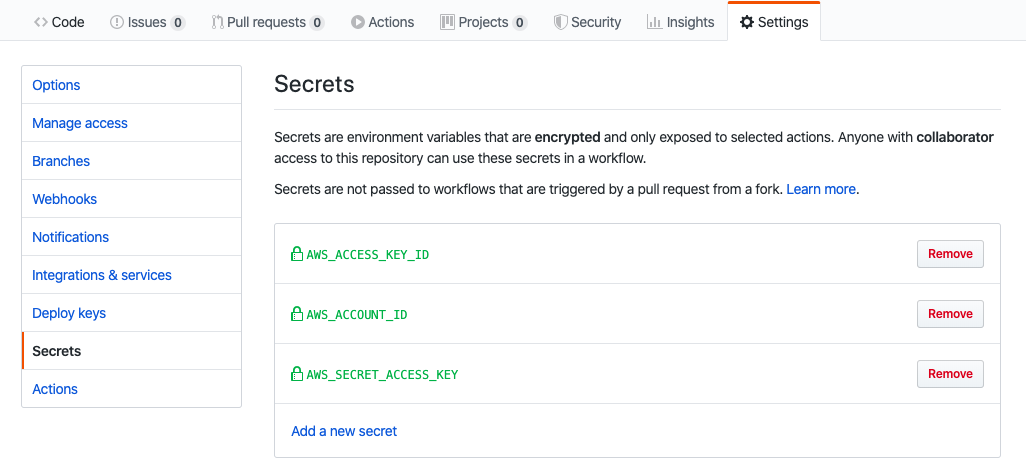
A workflow run is made up of one or more jobs. They run in parallel by default. Each job runs in an environment specified by ``runs-on``.
A job contains a sequence of tasks called steps. Steps can run commands, run setup tasks, or run an action in your repository, a public repository, or an action published in a Docker registry.
```
jobs:
build-and-push:
name: Building and pushing image to AWS ECR
runs-on: ubuntu-latest
steps:
- name: Checkout
uses: actions/checkout@master
- name: Setup ECR
run: |
$( aws ecr get-login --no-include-email )
- name: Build and tag the image
run: |
docker build \
-t $CONTAINER_IMAGE \
-t $AWS_ACCOUNT_ID.dkr.ecr.$AWS_DEFAULT_REGION.amazonaws.com/$CONTAINER_IMAGE ./app
- name: Push
if: github.ref == 'refs/heads/master'
run: |
docker push $AWS_ACCOUNT_ID.dkr.ecr.$AWS_DEFAULT_REGION.amazonaws.com/$CONTAINER_IMAGE
```
Let's break it out. There is a job called ``build-and-push``. There are four steps running on a virtual environment which is Ubuntu 18.04.
The first step is to check out the master.
```
- name: Checkout
uses: actions/checkout@master
```
Then, we need to setup our Amazon ECR in order to push our image to it.
```
run: |
$( aws ecr get-login --no-include-email )
```
The third step is to build and tag the docker image. Notice that we are using the environment variables defined in ``env``.
```
- name: Build and tag the image
run: |
docker build \
-t $CONTAINER_IMAGE \
-t $AWS_ACCOUNT_ID.dkr.ecr.$AWS_DEFAULT_REGION.amazonaws.com/$CONTAINER_IMAGE ./app
```
The last step is to run ``docker push`` to push the image built in the previous step to Amazon ECR.
```
- name: Push
if: github.ref == 'refs/heads/master'
run: |
docker push $AWS_ACCOUNT_ID.dkr.ecr.$AWS_DEFAULT_REGION.amazonaws.com/$CONTAINER_IMAGE
```
Commit something under app directory and push the changes to master.
Navigate to Actions. You should see a workflow is being processed.

You can see the status or check the log for each step.
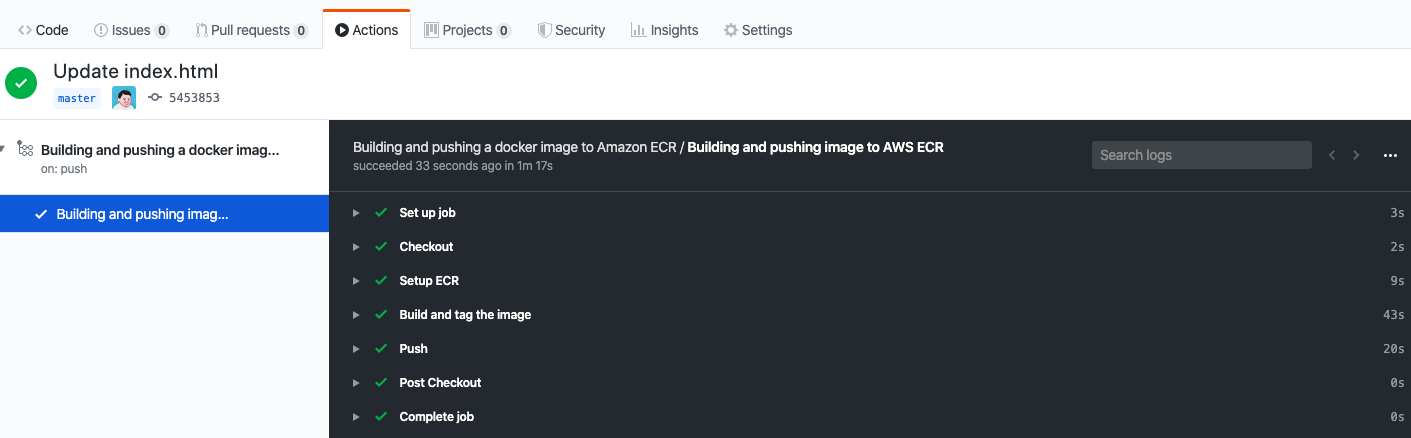
You can see the latest tag name when you expand ``Build and tag the image``.
```
Successfully built a1ffb1e3955b
Successfully tagged example-container:545385325b99e079cb7ee69d3809efd90cbffba9
Successfully tagged ***.dkr.ecr.ap-southeast-1.amazonaws.com/example-container:545385325b99e079cb7ee69d3809efd90cbffba9
```
Go to AWS ECR Console, you should see the image there.
That's it. Here's the complete build yaml file.
```
name: Building and pushing a docker image to Amazon ECR
on:
pull_request:
paths:
- app/**
branches:
- master
push:
paths:
- app/**
branches:
- master
env:
AWS_DEFAULT_REGION: ap-southeast-1
AWS_DEFAULT_OUTPUT: json
AWS_ACCOUNT_ID: ${{ secrets.AWS_ACCOUNT_ID }}
AWS_ACCESS_KEY_ID: ${{ secrets.AWS_ACCESS_KEY_ID }}
AWS_SECRET_ACCESS_KEY: ${{ secrets.AWS_SECRET_ACCESS_KEY }}
CONTAINER_IMAGE: example-container:${{ github.sha }}
jobs:
build-and-push:
name: Building and pushing image to AWS ECR
runs-on: ubuntu-latest
steps:
- name: Checkout
uses: actions/checkout@master
- name: Setup ECR
run: |
$( aws ecr get-login --no-include-email )
- name: Build and tag the image
run: |
docker build \
-t $CONTAINER_IMAGE \
-t $AWS_ACCOUNT_ID.dkr.ecr.$AWS_DEFAULT_REGION.amazonaws.com/$CONTAINER_IMAGE ./app
- name: Push
if: github.ref == 'refs/heads/master'
run: |
docker push $AWS_ACCOUNT_ID.dkr.ecr.$AWS_DEFAULT_REGION.amazonaws.com/$CONTAINER_IMAGE
```
For more, please check out [GitHub Actions Documentation](https://help.github.com/en/actions)
Sunday, 5 January 2020
Docker Commands Cheat Sheet
docker build with a tag
```
docker build -t wingkwong/example:latest .
```
Run a simple container using the hello-world image:
```
docker run hello-world
```
Run a container using a specific image tag:
```
docker run nginx:1.15.11
```
Run a container with a command and arguments:
```
docker run busybox echo hello world!
```
Run an Nginx container customized with a variety of flags:
- -d: Run container in detached mode. The **docker run** command will exit immediately and the container will run in the background
- --name: A container is assigned a random name by default, but you can give it a more descriptive name with this flag
- --restart: specify when the container should be automatically restarted
- no(default): never restart the container
- on-failure: only if the container fails (exits with a non-zero exit code)
- always: always restart the container whether it succeeds or fails. Also starts the container automatically on daemon startup
- unless-stopped: always restart the container whether it succeeds or fails, and on daemon startup, unless the container was manually stopped
```
docker run -d --name nginx --restart unless-stopped -p 8080:80 --memory 500M --memory-reservation 256M nginx
```
List any currently running containers:
```
docker ps
```
List all containers, both running and stopped:
```
docker ps -a
```
Stop the Nginx container:
```
docker container stop nginx
```
Start a stopped container:
```
docker container start nginx
```
Delete a container (but it must be stopped first):
```
docker container rm nginx
```
Downgrade to a previous version:
```
sudo systemctl stop docker
sudo apt-get remove -y docker-ce docker-ce-cli
sudo apt-get update
sudo apt-get install -y docker-ce=5:18.09.4~3-0~ubuntu-bionic docker-ce-cli=5:18.09.4~3-0~ubuntu-bionic
docker version
```
Upgrade to a new version:
```
sudo apt-get install -y docker-ce=5:18.09.5~3-0~ubuntu-bionic docker-ce-cli=5:18.09.5~3-0~ubuntu-bionic
docker version
```
Check the current default logging driver:
```
docker info | grep Logging
```
Edit daemon.json to set a new default logging driver configuration:
```
sudo vi /etc/docker/daemon.json
{
"log-driver": "json-file",
"log-opts": {
"max-size": "15m"
}
}
```
Restart docker
```
sudo systemctl restart docker
```
Run a docker container, overriding the system default logging driver settings:
```
docker run --log-driver json-file --log-opt max-size=50m nginx
```
Install Docker Engine:
```
sudo apt-get update
sudo apt-get -y install \
apt-transport-https \
ca-certificates \
curl \
gnupg-agent \
software-properties-common
curl -fsSL https://download.docker.com/linux/ubuntu/gpg | sudo apt-key add -
sudo apt-key fingerprint 0EBFCD88
sudo add-apt-repository \
"deb [arch=amd64] https://download.docker.com/linux/ubuntu \
$(lsb_release -cs) \
stable"
sudo apt-get update
sudo apt-get install -y docker-ce=5:18.09.5~3-0~ubuntu-bionic docker-ce-cli=5:18.09.5~3-0~ubuntu-bionic containerd.io
sudo usermod -a -G docker cloud_user
```
Initialize Docker Swarm
```
docker swarm init --advertise-addr
```
View the current state of the swarm:
```
docker info
```
List the current nodes in the swarm and their status:
```
docker node ls
```
Get a join token from the manager. Run this command on the swarm manager:
```
docker swarm join-token worker
```
Copy the docker swarm join command provided in the output and run it on both workers:
```
docker swarm join --token :2377
```
Docker Swarm Backup (on manager)
```
sudo systemctl stop docker
sudo tar -zvcf backup.tar.gz -C /var/lib/docker/swarm
sudo systemctl start docker
```
Docker Swarm Restore (on manager)
```
sudo systemctl stop docker
sudo rm -rf /var/lib/docker/swarm/*
sudo tar -zxvf backup.tar.gz -C /var/lib/docker/swarm/
sudo systemctl start docker
docker node ls
```
View file system layes in an image. Nginx as an example
```
docker image history nginx
```
Delete an iamge. Nginx as an example
```
docker image rm nginx:1.14.0
```
Download an image
```
docker image pull nginx:1.14.0
```
List images on the system:
```
docker image ls
docker image ls -a
```
Force Deleteion of an image used by a container
```
docker run -d --name nginx nginx:1.14.0
docker image rm -f nginx:1.14.0
```
Delete an iamge. Nginx as an example
```
docker image rm nginx:1.14.0
```
Locate a dangling image and clean it up. Nginx as an example
```
docker image ls -a
docker container ls
docker container rm -f nginx
docker image ls -a
docker image prune
```
Inspect image metadata. Nginx as an example
```
docker image inspect nginx:1.14.0
docker image inspect nginx:1.14.0 --format "{{.Architecture}}"
docker image inspect nginx:1.14.0 --format "{{.Architecture}} {{.Os}}"
```
Enable Docker Swarm autolock
```
docker swarm update --autolock=true
```
Unlock the swarm using the unlock key
```
docker swarm unlock
```
Get the current unlock key
```
docker swarm unlock-key
```
Rotate the unlock key
```
docker swarm unlock-key -rotate
```
Disable autolock
```
docker swarm update --autolock=false
```
Start Compose application with detached mode:
```
docker-compose up -d
```
Stop Compose application
```
docker-compose down
```
List the Docker Compose container
```
docker-compose ps
```
Deploy a new Stack to the cluster using a compose file
```
docker stack deploy -c
```
List current stacks
```
docker stack ls
```
List the tasks associated with a stack
```
docker stack ps
```
List the services associated with a stack
```
docker stack services
```
Delete a stack
```
docker stack rm
```
Subscribe to:
Posts (Atom)