Showing posts with label gcp. Show all posts
Showing posts with label gcp. Show all posts
Friday, 13 November 2020
Copying files to and from Google Compute Engine Virtual Machines via SCP
To specify the project, zone, and recurse all together, run:
```
gcloud compute scp --project "your-gcp-project" --zone "us-east1-b" --recurse ~/local-directory/ gcp-instance-name:~/server-directory/
```

GCP Compute 101
## Compute Engine
- Offers managed virtual machines
- No upfront investment
- Fast and consitent performance
- Create VMs with GCP Console or **gcloud**
- Run images of Linux or Windows Server
- Pick memory & CPU: use predefined types, or make a custom VM
- Pick GPUs if you need them
- Pick persistent disks: standard or SSD
- Pick local SSD for scratch space too if you need it
- Pick a boot image: Linux or Windows Server
- Define a startup script if you like
- Take disk snapshots as backups or as migration tools
- Offers innovative pricing
- Per-second billing, sustained use discounts
- Preemptible instances
- High throughput to storage at no exta cost
- Custom machine types: Only pay for the hardware you need
- Scales up or scale outs
- Use big VMs for memory- and compute-intensive applications
- Use Autoscaling for resilient, scalable applications
## App Engine
- a PaaS for building scalable applications
- makes deployment, maintenance, and scalability easy so you can focus on innovation
- esp suited for building scalable web applications and mobile backends
- standard environment:
- easily deploy your applications
- autoscale workloads
- free daily quota
- usage based pricing
- SDKs for development, testing and deployment
- sandbox constraints:
- no writing to local files
- all requests time out at 60s
- limits on third-party software
- flexible environment:
- build and deploy containerized applications with a click
- no sandbox constraints
- can access App Engine resources
- Comparing the App Engine environments


Truncated exponential backoff
Truncated exponential backoff is a standard error handling strategy for network applications in which a client periodically retries a failed request with increasing delays between requests.
```
min(((2^n)+random_number_milliseconds), maximum_backoff),
```
where
- n incremented by 1 for each iteration (request)
- random_number_milliseconds is a random number of milliseconds less than or equal to 1000.
- maximum_backoff is typically 32 or 64 seconds.
Saturday, 23 May 2020
Designing Cloud Native Apps in GCP
## Selecting the appropriate Cloud Service Model
- Infrastructure-as-a-service (IaaS) model
- large degree of fliexibility in implementation
- requries a significant amount of labor
- Software-as-a-service (SaaS) model
- higher velocity for delivery of services while maintaining a fair amount of flexibility
- at the expense of flexibility
- Iaas -> CaaS -> PaaS -> Faas -> Saas (from low fliexibility to high velocity)
## Protability and Design Consideration
- Protable Languages
- Platform considerations
- Platform specific designs are targeted for a specific environment
- Vendor lock in
## Evaluating Different Service Technologies
- Google App Engine
- you want to focus on writing code, never wants to touch a server, cluster or infrastructure
- you want to build a highly reliable and scalable serving app or component without doing it all yourself
- you value developer velocity over infrastructure control
- Minimize operational overhead
- Google Kubernetes Engine
- you want to increase velocity and improve operability dramatically by separating the app from the OS
- you need a secure, scalable way to manage containers in production
- you don't have dependencies on a specific operating system
- Google Compute Engine
- you need complete control over your infrastructure and direct access to high-performance hardware such as GPUs and local SSDs
- you need to make OS-level changes, such as providing your own network or graphic drivers, to squeeze out the last drop of performance
- You want to move your application from your own colo or datacenter to the cloud without rewriting it
- You need to run a software package that can't easily be containerized or your want to use existing VM images
## Operating System Considerations
- CentOS
- Container-optimized OS from Google
- CoreOS
- Debian
- Red Hat Enterprise Linux (RHEL)
- SUSE Enterprise Linux
- SLEX for SAP
- Ubuntu
- Windows Server
## Location of Your Service Components
- to cut down on latency and provide better services to your end users
## Microservice Architectures
- Separated into independent constituent parts, with each part having its own realm of responisbility
- Refactored from monolithic apps that have very tight coupling to a micro-service based architectures
- Advantages:
- the code base becomes more modular and easier to manage
- it becomes much easier to reuse services for other applications
- it is much easier to scale and tune individules services
## Defining Key Structures
- avoid monotonically increasing keys
- instead, migrate to keys that use random numbers, such as UUID
## Session Management
- keep a session cache
- Cloud Spanner
- a limit of 10K sessions per database per node
- a client can delete a session
- The Cloud Spanner database service can delete a session when the session is idle for more than 1 hour
## API Management Consideration
- Apps should be designed to have loosely coupled components
- Pub/Sub model enables event-driven architectures & asyn parallel processing
- Pulisher---(publish event)---> Event Channel --(Fire Event)---> Subscriber
- Pulisher---(publish event)---> Event Channel <--(Subscribe)---- Subscriber
## Health Checks
- Cloud Load Balancing
- Interal Load Balancing
- TCP Proxy Load Balancing
- SSL Proxy Load Balancing
- HTTP(s) Load Balancing
- Stackdriver Monitoring --- uptime check ---> storage/database/network
- Example:
```
gcloud compute health-checks create [PROTOCOl]
[HEALTH_CHECK_NAME] \
--description=[DESCRIPTION] \
--check-interval=[CHECK_INTERVAL] \
--timeout=[TIMEOUT] \
--healthy-threshold=[HEALTHY_THRESHOLD] \
--unhealthy-threshold=[UNHEALTHY_THRESHOLD] \
...additional flags
```
Thursday, 21 May 2020
Auto-upgrading nodes in GCP Containers
## Checking the state of auto-upgrade for an existing node pool
```
gcloud container node-pools describe node-pool-name \
--cluster cluster-name \
--zone compute-zone
```
## Enabling node auto-upgrades for an existing node pool
```
gcloud container node-pools update node-pool-name --cluster cluster-name \
--zone compute-zone --enable-autoupgrade
```
## Disabling node auto-upgrades for an existing node pool
where:
```
gcloud container node-pools update node-pool-name --cluster cluster-name \
--zone compute-zone --no-enable-autoupgrade
```
- node-pool-name is the name of the node pool.
- cluster-name is the name of the cluster that contains the node pool.
- compute-zone is the zone for the cluster.
Monday, 18 May 2020
Deleting objects in GCP using Lifecycle Policy File
Example: Delete the object after 31 days.
```json
{
"rule":
[
{
"action": {"type": "Delete"},
"condition": {"age": 31}
}
]
}
```
Set the policy
```
gsutil lifecycle set life.json gs://$BUCKET_NAME_1
```
Get the policy
```
gsutil lifecycle get gs://$BUCKET_NAME_1
```
GCP Storage 101
- Use cases:
- website content
- storing data for archiving and disaster recovery
- distributing large data objects to users via direct download
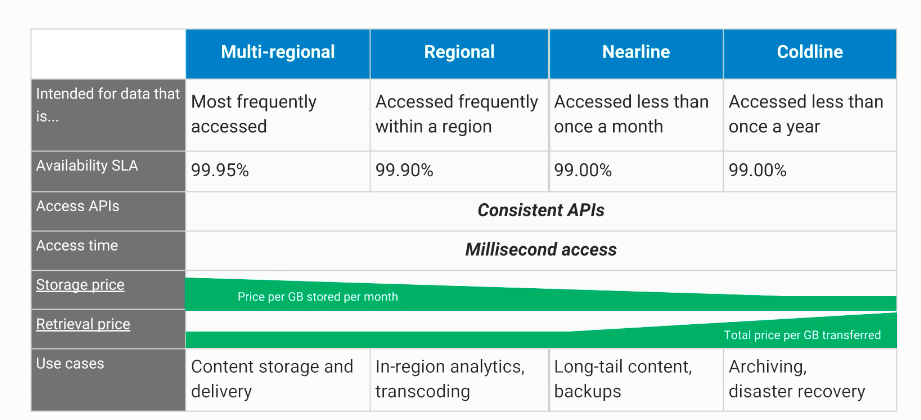
- Scalable to exabytes
- Time to first byte in milliseconds
- Very high availability across all storage classes
- Single API across storage classes
## Signed URLs
- Valet key access to buckets and objects via ticket:
- crytographically signed URL
- time-limited
- operations specfied in ticket: HTTP, GET, PUT, DELETE (not POST)
- any user with URL can invoke permitted operations
- Example:
- ``gsutil signurl -d 10m path/to/privatekey.p12 gs://bucket/object``
## Strong Global Consistency
- read-after-write
- read-after-metadata-update
- read-after-delete
- bucket-listing
- object-listing
- granting access to resources
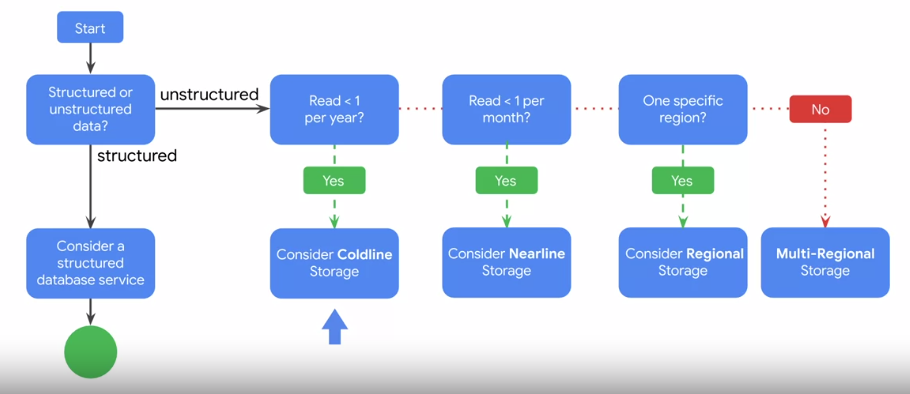
## Choose among Cloud Storage classes
## Cloud Bigtable
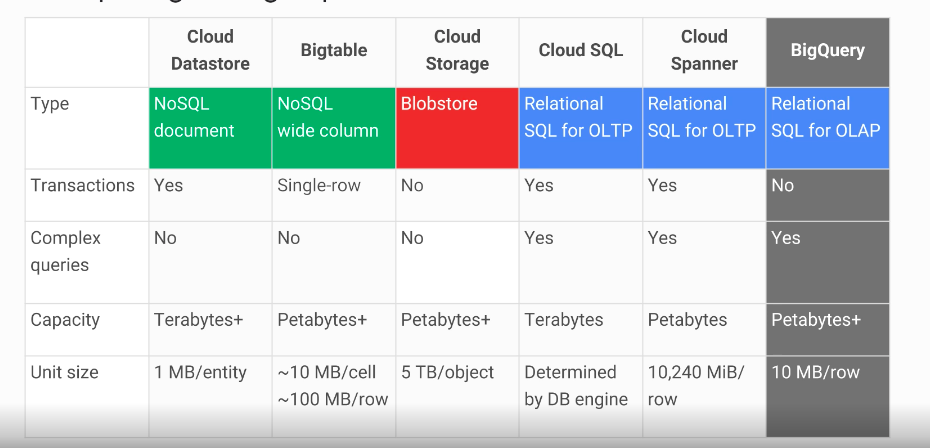
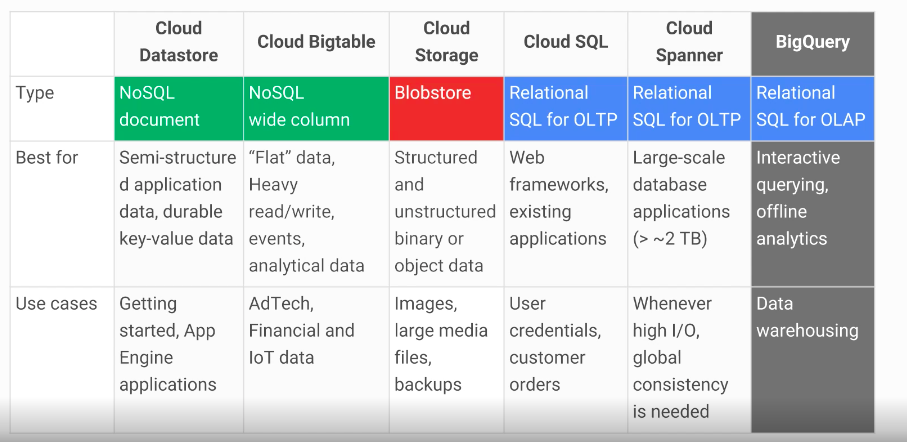
- Fully managed NoSQL, wide-column database service for terabyte applications
- Accessed using HBased API
- Native compatibility with big data Hadoop ecosystems
- Managed, scalable storage
- Data encryption in-flight and at rest
- Control access with IAM
- Bigtable drives major applications such as Google Analytics and Gmail
## Cloud SQL
- managed RDBMS
- offers MYSQL and PostgreSQLBeta databases as a service
- automatic replication
- managed backups
- vertical scaling (read & write)
- horizontal scaling (read)
- google security
- enable binary logging to use point-in-time recovery but it may slightly affect write performance
## Cloud Spanner
- horizontally scalable RDBMS
- strong global consistency
- managed instances with high availablity
- SQL queries
- ANSI 2011 with extensions
- automatic replication
## Cloud Datastore
- designed for application backends
- supports transactions
- includes a free daily quota
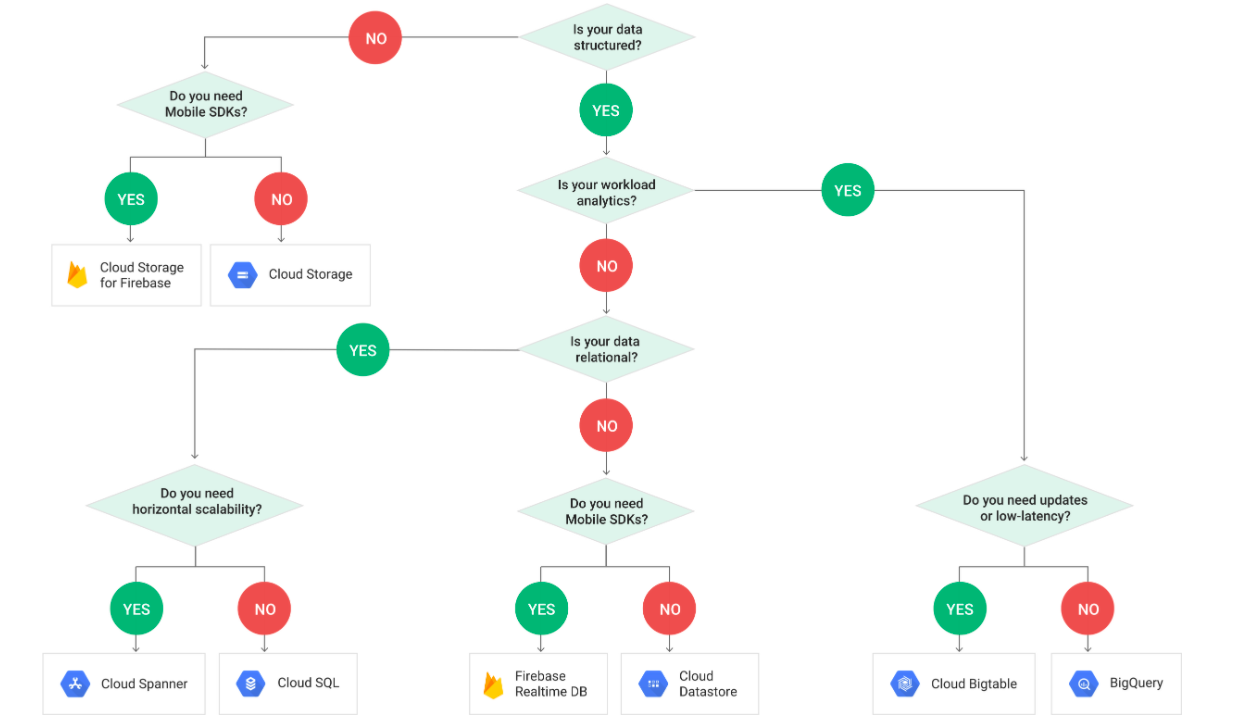
# Comparing Storage Options
# Decision Flowchart
Creating a Health Check in GCP Compute
Create a health check
```
gcloud compute health-checks create http autohealer-check \
--check-interval 10 \
--timeout 5 \
--healthy-threshold 2 \
--unhealthy-threshold 3 \
--request-path "/health"
```
Create a firewall rule to allow health check probes to make HTTP requests
```
gcloud compute firewall-rules create default-allow-http-health-check \
--network default \
--allow tcp:80 \
--source-ranges 130.211.0.0/22,35.191.0.0/16
```
Pro Tip: Use separate health checks for load balancing and for autohealing. Health checks for load balancing detect unresponsive instances and direct traffic away from them. Health checks for autohealing detect and recreate failed instances, so they should be less aggressive than load balancing health checks. Using the same health check for these services would remove the distinction between unresponsive instances and failed instances, causing unnecessary latency and unavailability for your users.
Sunday, 10 May 2020
Getting Started with Kubernetes Engine
## Objectives
- Provision a Kubernetes cluster using Kubernetes Engine.
- Deploy and manage Docker containers using kubectl.
## Prerequisites
- Existing GCP Project
- Kubernetes Engine API and Google Container Registry API have been enabled
## Start a Kubernetes Engine cluster
In GCP console, on the top right toolbar, click the Open Cloud Shell button.
Click Continue.
Place the zone into an environment variable called MY_ZONE. At the Cloud Shell prompt, type this partial command:
```
export MY_ZONE=us-central1-a
```
Start a Kubernetes cluster managed by Kubernetes Engine. Name the cluster ``webfrontend`` and configure it to run ``2`` nodes:
```
gcloud container clusters create webfrontend --zone $MY_ZONE --num-nodes 2
```
It takes several minutes to create a cluster as Kubernetes Engine provisions virtual machines for you.
```
NAME LOCATION MASTER_VERSION MASTER_IP MACHINE_TYPE NODE_VERSION NUM_NODES STATUS
webfrontend us-central1-a 1.14.10-gke.27 35.223.99.22 n1-standard-1 1.14.10-gke.27 2 RUNNING
```
After the cluster is created, check your installed version of Kubernetes using the ``kubectl version`` command:
kubectl version
The ``gcloud container clusters create`` command automatically authenticated kubectl for you.
```
kubectl version
```
```
Client Version: version.Info{Major:"1", Minor:"14+", GitVersion:"v1.14.10-dispatcher", GitCommit:"f5757a1dee5a89cc5e29cd7159076648bf21a02b", GitTreeState:"clean", BuildDate:"2020-02
-06T03:29:33Z", GoVersion:"go1.12.12b4", Compiler:"gc", Platform:"linux/amd64"}
Server Version: version.Info{Major:"1", Minor:"14+", GitVersion:"v1.14.10-gke.27", GitCommit:"145f9e21a4515947d6fb10819e5a336aff1b6959", GitTreeState:"clean", BuildDate:"2020-02-21T
18:01:40Z", GoVersion:"go1.12.12b4", Compiler:"gc", Platform:"linux/amd64"}
```
View your running nodes in the GCP Console. On the Navigation menu (Navigation menu), click Compute Engine > VM Instances. Your Kubernetes cluster is now ready for use.

## Run and deploy a container
From your Cloud Shell prompt, launch a single instance of the nginx container. (Nginx is a popular web server.)
```
kubectl run nginx --image=nginx:1.10.0
```
In Kubernetes, all containers run in pods. This use of the kubectl run command caused Kubernetes to create a deployment consisting of a single pod containing the nginx container. A Kubernetes deployment keeps a given number of pods up and running even in the event of failures among the nodes on which they run. In this command, you launched the default number of pods, which is 1.
> Note: If you see any deprecation warning about future version you can simply ignore it for now and can proceed furthe
View the pod running the nginx container:
```
kubectl get pods
```
```
NAME READY STATUS RESTARTS AGE
nginx-fb9c7b94d-p7x4x 1/1 Running 0 2m32s
```
Expose the nginx container to the Internet:
```
kubectl expose deployment nginx --port 80 --type LoadBalancer
```
```
service/nginx exposed
```
Kubernetes created a service and an external load balancer with a public IP address attached to it. The IP address remains the same for the life of the service. Any network traffic to that public IP address is routed to pods behind the service: in this case, the nginx pod.
View the new service:
```
kubectl get services
```
```
NAME TYPE CLUSTER-IP EXTERNAL-IP PORT(S) AGE
kubernetes ClusterIP 10.51.240.1 443/TCP 5m42s
nginx LoadBalancer 10.51.242.185 80:31576/TCP 15s
```
You can use the displayed external IP address to test and contact the nginx container remotely.
It may take a few seconds before the External-IP field is populated for your service. This is normal. Just re-run the kubectl get services command every few seconds until the field is populated.
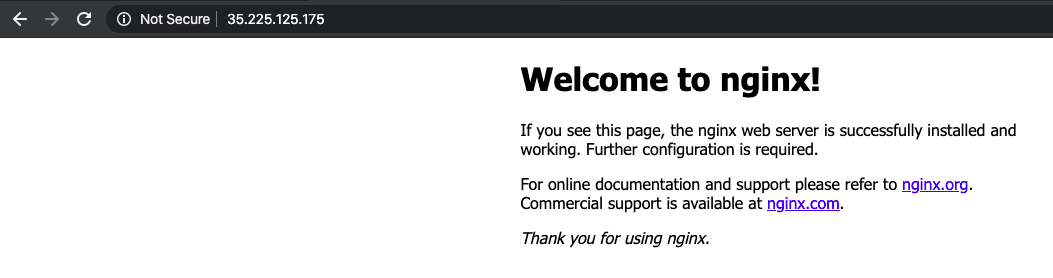
Open a new web browser tab and paste your cluster's external IP address into the address bar. The default home page of the Nginx browser is displayed.
Scale up the number of pods running on your service:
```
kubectl scale deployment nginx --replicas 3
```
```
deployment.extensions/nginx scaled
```
Scaling up a deployment is useful when you want to increase available resources for an application that is becoming more popular.
Confirm that Kubernetes has updated the number of pods:
```
kubectl get pods
```
```
NAME READY STATUS RESTARTS AGE
nginx-fb9c7b94d-p7x4x 1/1 Running 0 3m51s
nginx-fb9c7b94d-qvm4b 1/1 Running 0 18s
nginx-fb9c7b94d-sk4rm 1/1 Running 0 18s
```
Confirm that your external IP address has not changed:
```
kubectl get services
```
```
NAME TYPE CLUSTER-IP EXTERNAL-IP PORT(S) AGE
kubernetes ClusterIP 10.51.240.1 443/TCP 6m53s
nginx LoadBalancer 10.51.242.185 35.225.125.175 80:31576/TCP 86s
```
Return to the web browser tab in which you viewed your cluster's external IP address. Refresh the page to confirm that the nginx web server is still responding.
GCP Anthos 101
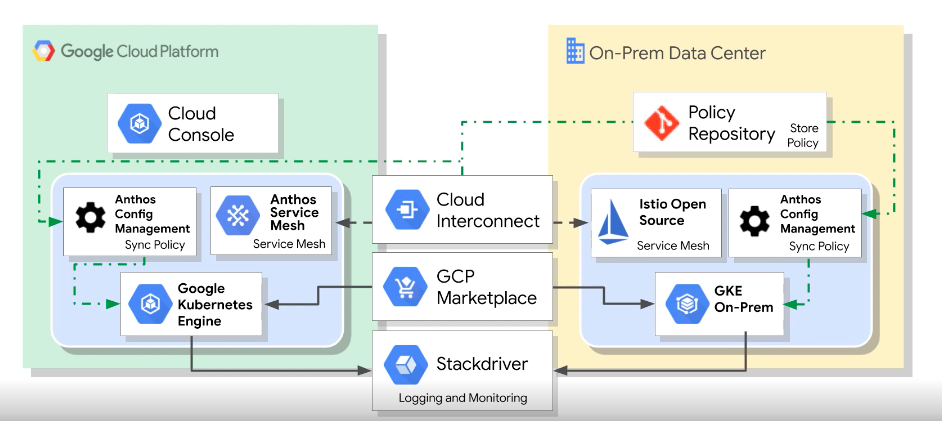
- google's modern solution for hybrid and multi-cloud systems and services management
- kubernetes and GKE on-prem create the foundation
- on-prem and cloud environments stay in sync
- a rich set of tools is provided for:
- manageing services on-prem and in the cloud
- monitoring systems and services
- migrating applications from VMs into your clusters
- maintaining consistent policies across all clusters, whether on-prem or in the cloud
Monday, 13 April 2020
Getting Started with Stackdriver
## Objectives
- View the load on a VM instance using Cloud Monitoring.
## Prerequisites
- Existing GCP Project
- Existing VM instance
## View the Load on a VM using Cloud Monitoring
In the GCP Console, on the Navigation menu (Navigation menu), click Compute Engine > VM instances.
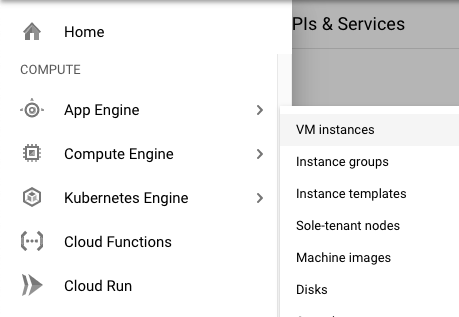
To open a command prompt on the my-vm instance, click SSH in its row in the VM instances list.
In the ssh session on my-vm, execute this command to create a CPU load:
```
dd if=/dev/urandom | gzip -9 >> /dev/null &
```
This Linux pipeline forces the CPU to work on compressing a continuous stream of random data.
Leave the window containing your SSH session open.
## Create a Monitoring workspace
You will now setup a Monitoring workspace that's tied to your GCP Project. The following steps create a new account that has a free trial of Monitoring.
In the Google Cloud Platform Console, click on Navigation menu > Monitoring.
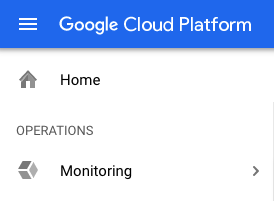
Wait for your workspace to be provisioned.
When the Monitoring dashboard opens, your workspace is ready.
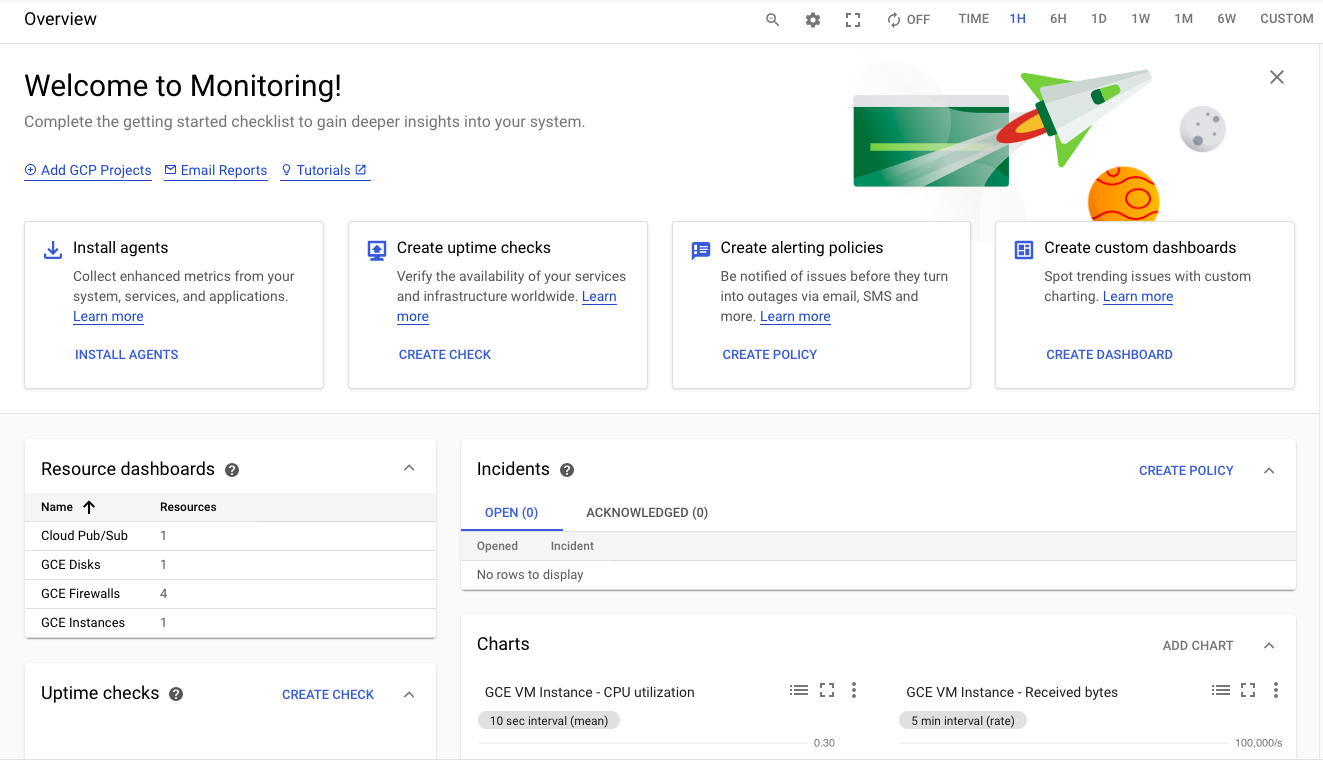
Click on Settings option from the left panel and confirm that the GCP project is shown under the GCP Projects section.
Under the Settings tab menu, click Agent. Using your VM's open SSH window and the code shown on the Agents page, install both the Monitoring and Logging agents on your project's VM.
The monitoring and logging agents give you deeper insight into your infrastructure and application data. Install both agents onto all the infrastructure you want deeper insight into.
### Monitoring agent
The Monitoring agent is a collectd-based daemon that gathers system and application metrics from virtual machine instances and sends them to Monitoring. By default, the Monitoring agent collects disk, CPU, network, and process metrics. Configuring the Monitoring agent allows third-party applications to get the full list of agent metrics.
Monitoring agent install script
```
curl -sSO https://dl.google.com/cloudagents/install-monitoring-agent.sh
sudo bash install-monitoring-agent.sh
```
### Logging Agent
The Logging agent streams logs from your VM instances and from selected third-party software packages to Logging. It is a best practice to run the Logging agent on all your VM instances.
Logging agent install script
```
curl -sSO https://dl.google.com/cloudagents/install-logging-agent.sh
sudo bash install-logging-agent.sh
```
Once both of the agents have been installed on your project's VM, click Metrics Explorer under the main Cloud Monitoring menu on the far left.
In the Metric pane of Metrics Explorer, select the resource type GCE VM instance
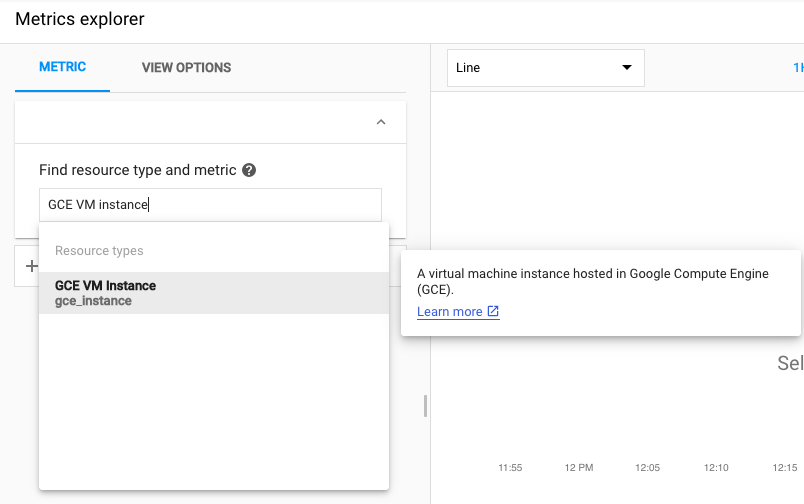
and the metric CPU usage.
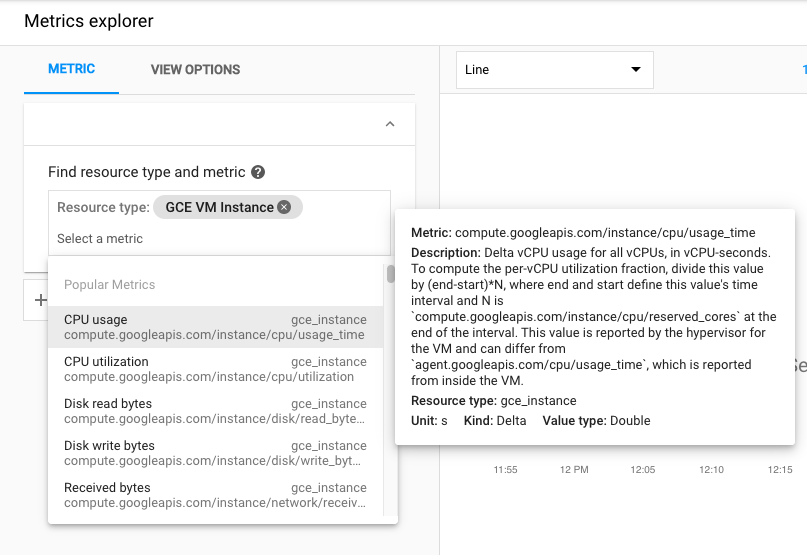
In the resulting graph, notice that CPU usage increased sharply a few minutes ago.
Terminate your workload generator. Return to your ssh session on my-vm and enter this command:
```
kill %1
```
Getting Started With App Engine
## Objectives
- Install the Cloud SDK for App Engine
- Preview an App Engine application running locally in Cloud Shell.
- Deploy an App Engine application, so that others can reach it.
- Disable an App Engine application, when you no longer want it to be visible.
## Prerequisites
- Existing GCP Project
## Install the Cloud SDK for App Engine
Run the following command to install the gcloud component that includes the App Engine extension for Python 3.7:
```
gcloud components install app-engine-python
```
Initialize your App Engine app with your project and choose its region:
```
gcloud app create --project=$DEVSHELL_PROJECT_ID
```
When prompted, select the region where you want your App Engine application located.
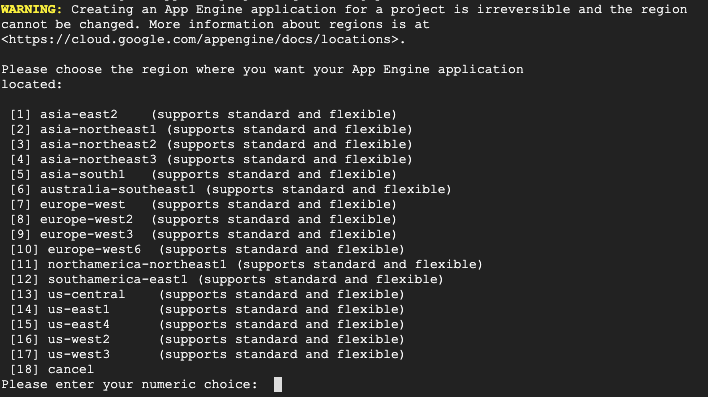
Clone the source code repository for a sample application in the hello_world directory:
```
git clone https://github.com/GoogleCloudPlatform/python-docs-samples
```

Navigate to the source directory:
```
cd python-docs-samples/appengine/standard_python37/hello_world
```
## Run Hello World application locally
Execute the following command to download and update the packages list.
```
sudo apt-get update
```
Set up a virtual environment in which you will run your application.
Python virtual environments are used to isolate package installations from the system.
```
sudo apt-get install virtualenv
```
```
virtualenv -p python3 venv
```
If prompted [Y/n], press Y and then Enter.
Activate the virtual environment.
```
source venv/bin/activate
```
Navigate to your project directory and install dependencies.
```
pip install -r requirements.txt
```
Run the application:
```
python main.py
```
```python
from flask import Flask
# If `entrypoint` is not defined in app.yaml, App Engine will look for an app
# called `app` in `main.py`.
app = Flask(__name__)
@app.route('/')
def hello():
"""Return a friendly HTTP greeting."""
return 'Hello World!'
if __name__ == '__main__':
# This is used when running locally only. When deploying to Google App
# Engine, a webserver process such as Gunicorn will serve the app. This
# can be configured by adding an `entrypoint` to app.yaml.
app.run(host='127.0.0.1', port=8080, debug=True)
```
In Cloud Shell, click Web preview (Web Preview) > Preview on port 8080 to preview the application.
To access the Web preview icon, you may need to collapse the Navigation menu.

Result:

To end the test, return to Cloud Shell and press Ctrl+C to abort the deployed service.
Using the Cloud Console, verify that the app is not deployed. In the Cloud Console, on the Navigation menu (Navigation menu), click App Engine > Dashboard.
Notice that no resources are deployed.
## Deploy and run Hello World on App Engine
To deploy your application to the App Engine Standard environment:
Navigate to the source directory:
```
cd ~/python-docs-samples/appengine/standard_python37/hello_world
```
Deploy your Hello World application.
```
gcloud app deploy
```
This app deploy command uses the app.yaml file to identify project configuration.
```yml
runtime: python37
```
Launch your browser to view the app at http://YOUR_PROJECT_ID.appspot.com
```
gcloud app browse
```
Copy and paste the URL into a new browser window.
Result:

## Disable the application
App Engine offers no option to Undeploy an application. After an application is deployed, it remains deployed, although you could instead replace the application with a simple page that says something like "not in service."
However, you can disable the application, which causes it to no longer be accessible to users.
In the Cloud Console, on the Navigation menu (Navigation menu), click App Engine > Settings.
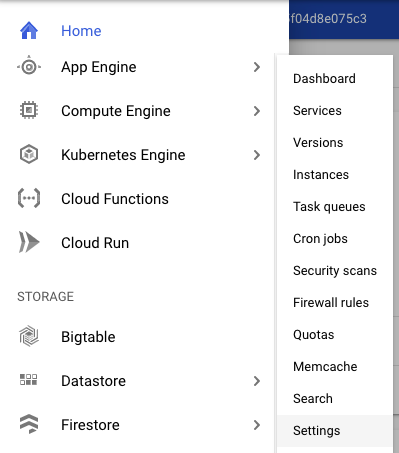
Click Disable application.
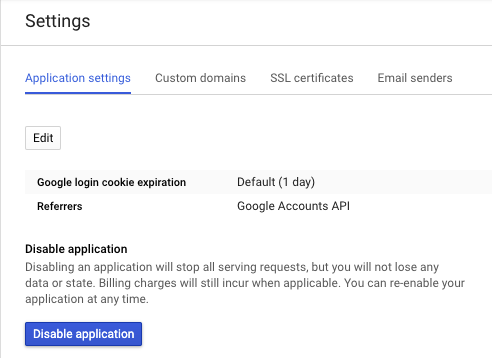
Read the dialog message. Enter the App ID and click DISABLE.
If you refresh the browser window you used to view to the application site, you'll get a 404 error.

Friday, 10 April 2020
Getting Started with Deployment Manager
## Objectives
- Create a Deployment Manager deployment.
- Update a Deployment Manager deployment.
## Prerequisites
- Existing GCP Project
## Confirm that needed APIs are enabled
In the GCP Console, on the Navigation menu (Navigation menu), click APIs & services.
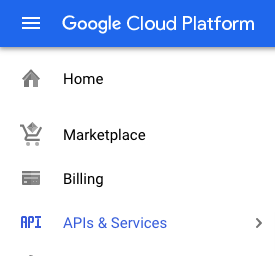
Scroll down in the list of enabled APIs, and confirm that these APIs are enabled:
- Cloud Deployment Manager v2 API
- Cloud Runtime Configuration API
If one or more APIs is missing, click the Enable APIs and Services button at top. Search for the above APIs by name and enable each for your current project.
## Create a Deployment Manager deployment
In GCP console, on the top right toolbar, click the Open Cloud Shell button (Activate Cloud Shell). Click Continue.
At the Cloud Shell prompt, type this partial command:
```
export MY_ZONE=
```
followed by the zone. Your complete command will look like this:
```
export MY_ZONE=us-central1-a
```
Create a YAML file
```
touch mydeploy.yaml
```
```yaml
resources:
- name: my-vm
type: compute.v1.instance
properties:
zone: ZONE
machineType: zones/ZONE/machineTypes/n1-standard-1
metadata:
items:
- key: startup-script
value: "apt-get update"
disks:
- deviceName: boot
type: PERSISTENT
boot: true
autoDelete: true
initializeParams:
sourceImage: https://www.googleapis.com/compute/v1/projects/debian-cloud/global/images/debian-9-stretch-v20180806
networkInterfaces:
- network: https://www.googleapis.com/compute/v1/projects/PROJECT_ID/global/networks/default
accessConfigs:
- name: External NAT
type: ONE_TO_ONE_NAT
```
Insert your Google Cloud Platform project ID into the file in place of the string PROJECT_ID using this command:
```
sed -i -e 's/PROJECT_ID/'$DEVSHELL_PROJECT_ID/ mydeploy.yaml
```
Insert your assigned Google Cloud Platform zone into the file in place of the string ZONE using this command:
```
sed -i -e 's/ZONE/'$MY_ZONE/ mydeploy.yaml
```
View the mydeploy.yaml file, with your modifications, with this command:
```
cat mydeploy.yaml
```
The file will look something like this:
```yaml
resources:
- name: my-vm
type: compute.v1.instance
properties:
zone: us-central1-a
machineType: zones/us-central1-a/machineTypes/n1-standard-1
metadata:
items:
- key: startup-script
value: "apt-get update"
disks:
- deviceName: boot
type: PERSISTENT
boot: true
autoDelete: true
initializeParams:
sourceImage: https://www.googleapis.com/compute/v1/projects/debian-cloud/global/images/debian-9-stretch-v20180806
networkInterfaces:
- network: https://www.googleapis.com/compute/v1/projects/wingkwong-gcp-playground/global/networks/default
accessConfigs:
- name: External NAT
type: ONE_TO_ONE_NAT
```
Do not use the above text literally in your own mydeploy.yaml file. Be sure that the zone that is named on the zone: and machineType: lines in your file matches the zone. Be sure that the GCP project ID on the network: line in your file matches the project ID, not the one in this example.
Build a deployment from the template:
```
gcloud deployment-manager deployments create my-first-depl --config mydeploy.yaml
```

If everything goes wrong, modify the file and you can either delete my-first-depl and create it again
```
gcloud deployment-manager deployments delete my-first-depl
```
or simply just update it
```
gcloud deployment-manager deployments update my-first-depl --config mydeploy.yaml
```
When the deployment operation is complete, the gcloud command displays a list of the resources named in the template and their current state.
Confirm that the deployment was successful. In the GCP Console, on the Navigation menu (Navigation menu), click Compute Engine > VM instances.

You will see that a VM instance called my-vm has been created, as specified by the template.
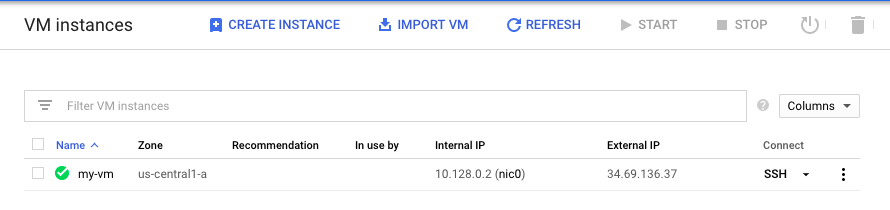
Click on the VM instance's name to open its VM instance details screen.
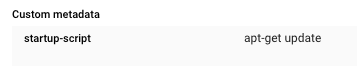
Scroll down to the Custom metadata section. Confirm that the startup script you specified in your Deployment Manager template has been installed.
## Update a Deployment Manager deployment
Return to your Cloud Shell prompt. Launch the vi text editor to edit the mydeploy.yaml file:
```
vi mydeploy.yaml
```
Find the line that sets the value of the startup script, value: "apt-get update", and edit it so that it looks like this:
```yml
value: "apt-get update; apt-get install nginx-light -y"
```
Do not disturb the spaces at the beginning of the line. The YAML templating language relies on indented lines as part of its syntax. As you edit the file, be sure that the v in the word value in this new line is immediately below the k in the word key on the line above it.
Press Ctrl+O and then press Enter to save your edited file.
Press Ctrl+X to exit the vi text editor.
Return to your Cloud Shell prompt. Enter this command to cause Deployment Manager to update your deployment to install the new startup script:
```
gcloud deployment-manager deployments update my-first-depl --config mydeploy.yaml
```
Wait for the gcloud command to display a message confirming that the update operation was completed successfully.
```
NAME TYPE STATE ERRORS INTENT
my-vm compute.v1.instance COMPLETED []
```
In the GCP console, on the Navigation menu (Navigation menu), click Compute Engine > VM instances.
Click on the my-vm VM instance's name to open its VM instance details pane.
Scroll down to the Custom metadata section. Confirm that the startup script has been updated to the value you declared in your Deployment Manager template.

Subscribe to:
Posts (Atom)