Monday, 30 December 2019
A Simple Amazon API Gateway Lambda Authoriser in Go
When you are building your application APIs, you may need to think how to protect those APIs. A simple way to do so is to protect them with Amazon API Gateway and Amazon Lambda authorisers.
Before diving it, you should know that Amazon API Gateway helps us to take the requests and re-route to corresponding backend service. It is a gate keeper providing security. To provide access control to our APIs, we can use Amazon Lambda authorisers which authorise our requests before reaching to our endpoints.
We can use it if we want to implement our custom authorisation scheme. For example, if our authentication strategy is to use bearer token like JWT.
Here's a general auth workflow.
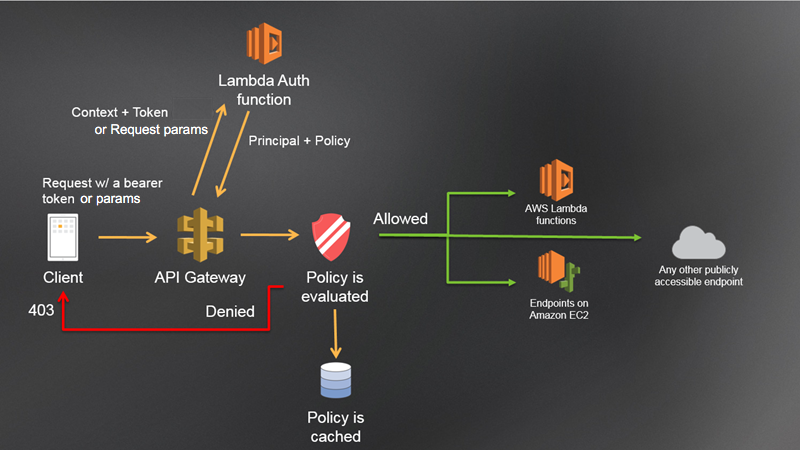
We can authorise the request to see if the bearer token is valid or not to verify the caller's identity. If it's valid, a corresponding permission will be granted and allow the caller to perform different actions.
This example will be written in Go.
The general idea is to create a lambda function to authorise the caller identity. First, we start with the below code.
```
package main
import (
"errors"
"strings"
"github.com/aws/aws-lambda-go/events"
"github.com/aws/aws-lambda-go/lambda"
jwt "github.com/dgrijalva/jwt-go"
"os"
)
func Auth(request events.APIGatewayCustomAuthorizerRequest) (events.APIGatewayCustomAuthorizerResponse, error) {
// TODO
}
func main() {
lambda.Start(Auth)
}
```
Our Auth function takes the input ``APIGatewayCustomAuthorizerRequest`` and returns ``APIGatewayCustomAuthorizerResponse`` and ``error``.
``APIGatewayCustomAuthorizerRequest`` contains data coming in to a custom API Gateway authorizer function such as type, authorisation token and method Arn.
``APIGatewayCustomAuthorizerResponse`` shows the expected format of an API Gateway authorisation response. We have to include principal ID and policy Document.
In our Auth function, we need to extract the token from the request.
```
token := request.AuthorizationToken
```
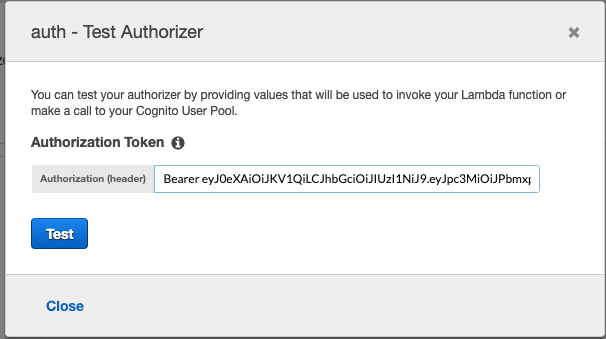
A simple token should look like
```
Bearer
eyJ0eXAiOiJKV1QiLCJhbGciOiJIUzI1NiJ9.eyJpc3MiOiJPbmxpbmUgSldUIEJ1aWxkZXIiLCJpYXQiOjE1Nzc2ODA5NzEsImV4cCI6MTYwOTIxNjk3MSwiYXVkIjoid3d3LmV4YW1wbGUuY29tIiwic3ViIjoianJvY2tldEBleGFtcGxlLmNvbSIsIkdpdmVuTmFtZSI6IkpvaG5ueSIsIlN1cm5hbWUiOiJSb2NrZXQiLCJFbWFpbCI6Impyb2NrZXRAZXhhbXBsZS5jb20iLCJSb2xlIjpbIk1hbmFnZXIiLCJQcm9qZWN0IEFkbWluaXN0cmF0b3IiXX0.S5yVf1U33yrZPLHh6e9xLkOrexo_78sd9Sl6ItBczzg
```
However, what we need is just the second part. Therefore, we take out the string ``Bearer ``
```
tokenSlice := strings.Split(token, " ")
var tokenString string
if len(tokenSlice) > 1 {
tokenString = tokenSlice[len(tokenSlice)-1]
}
```
Then, we need a key used to sign this JWT to verify the signature.
```
k := os.Getenv("JWT_SECRET_KEY")
```
We can use ``github.com/dgrijalva/jwt-go`` this library to perform the parsing action. We should also validate the expected algo.
If it is successful, we have to return the secret key in a []byte format or else you will get ``Invalid Signature``.
```
var jwtToken, _ = jwt.Parse(tokenString, func(jwtToken *jwt.Token) (interface{}, error) {
if _, ok := token.Method.(*jwt.SigningMethodHMAC); !ok {
return nil, fmt.Errorf("Unexpected signing method: %v", token.Header["alg"])
}
return []byte(k), nil
})
```
Check if the jwtToken is valid or not. If not, return an empty response with error Unauthorized.
```go
if jwtToken != nil && !jwtToken.Valid {
return events.APIGatewayCustomAuthorizerResponse{}, errors.New("Unauthorized")
}
```
If it is valid, we can generate our policy to the caller.
```
return generatePolicy("user", "Allow", request.MethodArn), nil
```
We can create another function called ``generatePolicy``. It takes three parameters - principalID, effect and resource in string type and returns events.APIGatewayCustomAuthorizerResponse at the end.
As I mention before, we need to return principal ID. Let's create a new response struct.
```
authResponse := events.APIGatewayCustomAuthorizerResponse{PrincipalID: principalID}
```
Also, we need to define our PolicyDocument for this response. What we are doing here is to allow the role to perform action ``execute-api:Invoke`` on the request method Arn.
```
if effect != "" && resource != "" {
authResponse.PolicyDocument = events.APIGatewayCustomAuthorizerPolicy{
Version: "2012-10-17",
Statement: []events.IAMPolicyStatement{
{
Action: []string{"execute-api:Invoke"},
Effect: effect,
Resource: []string{resource},
},
},
}
}
```
At the end, return the auth response.
```
return authResponse
```
Let's deploy and test it.
Go to API Gateway console, and click Authorisers. We should see our deployed authoriser. Click Test and we don't input any token.
Click Test and we will see it returns 401 which is Unauthorised.
```
Response
Response Code: 401
Latency 344
Execution log for request [HIDDEN]
Mon Dec 30 08:56:58 UTC 2019 : Starting authorizer: [HIDDEN]
Mon Dec 30 08:56:58 UTC 2019 : Incoming identity: [HIDDEN]
Mon Dec 30 08:56:58 UTC 2019 : Endpoint request URI: [HIDDEN]
Mon Dec 30 08:56:58 UTC 2019 : Endpoint request headers: [HIDDEN]
Mon Dec 30 08:56:58 UTC 2019 : Endpoint request body after transformations: [HIDDEN]
Mon Dec 30 08:56:58 UTC 2019 : Sending request to [HIDDEN]
Mon Dec 30 08:56:58 UTC 2019 : Unauthorized request: [HIDDEN]
Mon Dec 30 08:56:58 UTC 2019 : Unauthorized
```
Put the authorisation token and try again.
This time it returns 200
```
Response
Response Code: 200
Latency 26
```
and shows the policy statement.
```json
{
"Version": "2012-10-17",
"Statement": [
{
"Action": [
"execute-api:Invoke"
],
"Effect": "Allow",
"Resource": [
"arn:aws:execute-api:ap-southeast-1:*:a123456789/ESTestInvoke-stage/GET/"
]
}
]
}
```
That's it. For the complete code, please check out [here](https://gist.github.com/wingkwong/2bc368c1b5cd116114560d17d4c4de6c).
Subscribe to:
Post Comments (Atom)
No comments:
Post a Comment