Monday, 30 December 2019
Getting Hands Dirty with AWS CDK in AWS Cloud9
AWS CDK stands for AWS Cloud Development Kit. It allows us to create and provision AWS infrastructure deployments using programming languages. Currently it supports TypeScript, Java, .Net and Python.
It's been a while and I finally got some time to play with AWS CDK.
Go to IAM, create a user called ``cdk-user`` with AWS Management Console access

Grant AdministratorAccess to cdk-user

Go to AWS Cloud 9 and create a new environment
> Note: AWS Cloud9 is a cloud-based integrated development environment (IDE) that lets you write, run, and debug your code with just a browser.

Leave Step 2 as default,

Grab a coffee while waiting for AWS Cloud 9 initialization

Install aws-cdk

Let's init a sample app provided by AWS
```python
cdk init sample-app --language python
```
Oops..Got the first error
```
`cdk init` cannot be run in a non-empty directory!
```
By default, AWS Cloud9 workspace comes with a README.md. Let's remove it
```
rm README.md
```
If you are not using AWS Cloud9, you may need to activate the virtualenv providing a self-contained, isolated environment to run our Python code without polluting your system Python.
```
source .env/bin/activate
```
Install the required python module from a file called ``requirements.txt``
```
pip install -r requirements.txt
```
The project structure should look like this

This sample app will create the following resources
- SQS Queue
- SQS QueuePolicy
- SNS Topic
- SNS Subscription
- S3 Bucket x 4
- IAM User
The entry point is ``app.py``. It creates two stacks, namely ``hello-cdk-1`` and ``hello-cdk-2`` in ``us-east-2`` and ``us-west-2`` respectively.
```python
#!/usr/bin/env python3
from aws_cdk import core
from hello.hello_stack import MyStack
app = core.App()
MyStack(app, "hello-cdk-1", env={'region': 'us-east-2'})
MyStack(app, "hello-cdk-2", env={'region': 'us-west-2'})
app.synth()
```
Import the required packages.
> Note: For more, you can check the latest API doc [here](https://docs.aws.amazon.com/cdk/api/latest/python/)
```python
from aws_cdk import (
aws_iam as iam,
aws_sqs as sqs,
aws_sns as sns,
aws_sns_subscriptions as subs,
core
)
```
Create a SQS Queue
```python
queue = sqs.Queue(
self, "MyFirstQueue",
visibility_timeout=core.Duration.seconds(300),
)
```
Create a SNS Topic
```python
topic = sns.Topic(
self, "MyFirstTopic",
display_name="My First Topic"
)
```
Subscribe the queue to receive any messages published to the topic
```python
topic.add_subscription(subs.SqsSubscription(queue))
```
``HelloConstruct`` is a custom construct that we defined in our app and it creates four buckets in this stack.
```python
hello = HelloConstruct(self, "MyHelloConstruct", num_buckets=4)
```
``hello/hello_stack.py``
```python
from aws_cdk import (
aws_iam as iam,
aws_s3 as s3,
core,
)
class HelloConstruct(core.Construct):
@property
def buckets(self):
return tuple(self._buckets)
def __init__(self, scope: core.Construct, id: str, num_buckets: int) -> None:
super().__init__(scope, id)
self._buckets = []
for i in range(0, num_buckets):
self._buckets.append(s3.Bucket(self, f"Bucket-{i}"))
def grant_read(self, principal: iam.IPrincipal):
for b in self.buckets:
b.grant_read(principal, "*")
```
Create a user and grant the read permission for the user
```python
user = iam.User(self, "MyUser")
hello.grant_read(user)
```
When we run the CDK app, an AWS CloudFormation template for each stack will be generated. It is called **synthesize** in CDK parlance. To synthesize the app, use ``cdk synth`` with the application name.
```python
cdk synth hello-cdk-1
```
A cfn template will be generated
```yaml
Resources:
MyFirstQueueFF09316A:
Type: AWS::SQS::Queue
Properties:
VisibilityTimeout: 300
Metadata:
aws:cdk:path: hello-cdk-1/MyFirstQueue/Resource
MyFirstQueuePolicy596EEC78:
Type: AWS::SQS::QueuePolicy
Properties:
PolicyDocument:
Statement:
- Action: sqs:SendMessage
Condition:
ArnEquals:
aws:SourceArn:
Ref: MyFirstTopic0ED1F8A4
Effect: Allow
Principal:
Service: sns.amazonaws.com
Resource:
Fn::GetAtt:
- MyFirstQueueFF09316A
- Arn
Version: "2012-10-17"
Queues:
- Ref: MyFirstQueueFF09316A
Metadata:
aws:cdk:path: hello-cdk-1/MyFirstQueue/Policy/Resource
MyFirstQueuehellocdk1MyFirstTopicB252874C505090E8:
Type: AWS::SNS::Subscription
Properties:
Protocol: sqs
TopicArn:
Ref: MyFirstTopic0ED1F8A4
Endpoint:
Fn::GetAtt:
- MyFirstQueueFF09316A
- Arn
Metadata:
aws:cdk:path: hello-cdk-1/MyFirstQueue/hellocdk1MyFirstTopicB252874C/Resource
MyFirstTopic0ED1F8A4:
Type: AWS::SNS::Topic
Properties:
DisplayName: My First Topic
Metadata:
aws:cdk:path: hello-cdk-1/MyFirstTopic/Resource
MyHelloConstructBucket0DAEC57E1:
Type: AWS::S3::Bucket
UpdateReplacePolicy: Retain
DeletionPolicy: Retain
Metadata:
aws:cdk:path: hello-cdk-1/MyHelloConstruct/Bucket-0/Resource
MyHelloConstructBucket18D9883BE:
Type: AWS::S3::Bucket
UpdateReplacePolicy: Retain
DeletionPolicy: Retain
Metadata:
aws:cdk:path: hello-cdk-1/MyHelloConstruct/Bucket-1/Resource
MyHelloConstructBucket2C1DA3656:
Type: AWS::S3::Bucket
UpdateReplacePolicy: Retain
DeletionPolicy: Retain
Metadata:
aws:cdk:path: hello-cdk-1/MyHelloConstruct/Bucket-2/Resource
MyHelloConstructBucket398A5DE67:
Type: AWS::S3::Bucket
UpdateReplacePolicy: Retain
DeletionPolicy: Retain
Metadata:
aws:cdk:path: hello-cdk-1/MyHelloConstruct/Bucket-3/Resource
MyUserDC45028B:
Type: AWS::IAM::User
Metadata:
aws:cdk:path: hello-cdk-1/MyUser/Resource
MyUserDefaultPolicy7B897426:
Type: AWS::IAM::Policy
Properties:
PolicyDocument:
Statement:
- Action:
- s3:GetObject*
- s3:GetBucket*
- s3:List*
Effect: Allow
Resource:
- Fn::GetAtt:
- MyHelloConstructBucket0DAEC57E1
- Arn
- Fn::Join:
- ""
- - Fn::GetAtt:
- MyHelloConstructBucket0DAEC57E1
- Arn
- /*
- Action:
- s3:GetObject*
- s3:GetBucket*
- s3:List*
Effect: Allow
Resource:
- Fn::GetAtt:
- MyHelloConstructBucket18D9883BE
- Arn
- Fn::Join:
- ""
- - Fn::GetAtt:
- MyHelloConstructBucket18D9883BE
- Arn
- /*
- Action:
- s3:GetObject*
- s3:GetBucket*
- s3:List*
Effect: Allow
Resource:
- Fn::GetAtt:
- MyHelloConstructBucket2C1DA3656
- Arn
- Fn::Join:
- ""
- - Fn::GetAtt:
- MyHelloConstructBucket2C1DA3656
- Arn
- /*
- Action:
- s3:GetObject*
- s3:GetBucket*
- s3:List*
Effect: Allow
Resource:
- Fn::GetAtt:
- MyHelloConstructBucket398A5DE67
- Arn
- Fn::Join:
- ""
- - Fn::GetAtt:
- MyHelloConstructBucket398A5DE67
- Arn
- /*
Version: "2012-10-17"
PolicyName: MyUserDefaultPolicy7B897426
Users:
- Ref: MyUserDC45028B
Metadata:
aws:cdk:path: hello-cdk-1/MyUser/DefaultPolicy/Resource
CDKMetadata:
Type: AWS::CDK::Metadata
Properties:
Modules: aws-cdk=1.16.3,@aws-cdk/assets=1.16.3,@aws-cdk/aws-cloudwatch=1.16.3,@aws-cdk/aws-ec2=1.16.3,@aws-cdk/aws-events=1.16.3,@aws-cdk/aws-iam=1.16.3,@aws-cdk/aws-kms=1.16.3,@aws-cdk/aws-lambda=1.16.3,@aws-cdk/aws-logs=1.16.3,@aws-cdk/aws-s3=1.16.3,@aws-cdk/aws-s3-assets=1.16.3,@aws-cdk/aws-sns=1.16.3,@aws-cdk/aws-sns-subscriptions=1.16.3,@aws-cdk/aws-sqs=1.16.3,@aws-cdk/aws-ssm=1.16.3,@aws-cdk/core=1.16.3,@aws-cdk/cx-api=1.16.3,@aws-cdk/region-info=1.16.3,jsii-runtime=Python/3.6.8
```
Before the first deployment, we need to bootstrap the stack.
```
cdk bootstrap
```
It will look like this
```
Bootstrapping environment aws://999999999999/us-east-2...
Bootstrapping environment aws://999999999999/us-west-2...
CDKToolkit: creating CloudFormation changeset...
CDKToolkit: creating CloudFormation changeset...
0/2 | 3:37:20 AM | CREATE_IN_PROGRESS | AWS::S3::Bucket | StagingBucket
0/2 | 3:37:21 AM | CREATE_IN_PROGRESS | AWS::S3::Bucket | StagingBucket Resource creation Initiated
0/2 | 3:37:20 AM | CREATE_IN_PROGRESS | AWS::S3::Bucket | StagingBucket
0/2 | 3:37:20 AM | CREATE_IN_PROGRESS | AWS::S3::Bucket | StagingBucket Resource creation Initiated
1/2 | 3:37:42 AM | CREATE_COMPLETE | AWS::S3::Bucket | StagingBucket
2/2 | 3:37:44 AM | CREATE_COMPLETE | AWS::CloudFormation::Stack | CDKToolkit
Environment aws://999999999999/us-west-2 bootstrapped.
1/2 | 3:37:42 AM | CREATE_COMPLETE | AWS::S3::Bucket | StagingBucket
2/2 | 3:37:43 AM | CREATE_COMPLETE | AWS::CloudFormation::Stack | CDKToolkit
Environment aws://999999999999/us-east-2 bootstrapped.
```
Then we can use ``cdk deploy`` to deploy our CDK app

It shows some warnings here. Enter **y** to continue. The output shows the resources have been created.

Let's go to CloudFormation Console. We are able to see the stack we just created

Under the region, the following resources have been provisioned.
1 SQS queue

1 SNS Topic

1 Subscribion

1 User

4 Buckets

Let's try something different. Remove all the code from the simple app.
```python
from aws_cdk import (
core,
)
class MyStack(core.Stack):
def __init__(self, scope: core.Construct, id: str, **kwargs) -> None:
super().__init__(scope, id, **kwargs)
# TODO
```
By running ``cdk diff``, we can see the differences between the current app and the deployed one.

Run ``cdk deploy`` again to delete resources

Add the following to ``requirements.txt``
```
aws-cdk.aws-events
aws-cdk.aws-events-targets
aws-cdk.aws-lambda
aws-cdk.core
```
Install the required packages from ``requirements.txt``
```
pip install -r requirements.txt
```
Create a folder called ``lambda`` and create a file called ``handler.py`` inside this folder
```python
def handler(event, context):
return {
'statusCode': 200,
'headers': {
'Content-Type': 'text/plain'
},
'body': 'Hello World'
}
```
Back to ``hello_stack.py``, let's made a cron job on AWS Lambda with Scheduled Events
First, import the required packages.
> Note: ``lambda`` is a built-in identifier in Python. Normally we use ``lambda_`` instead.
```python
from aws_cdk import (
aws_events as events,
aws_lambda as lambda_,
aws_events_targets as targets,
core,
)
```
Read ``handler.py`` we just created
```python
with open("./lambda/handler.py", encoding="utf-8") as fp:
code_body = fp.read()
```
Define a lambda function
```python
cronFn = lambda_.Function(
self, "cronFn",
code = lambda_.InlineCode(code_body),
handler = "index.handler",
runtime = lambda_.Runtime.PYTHON_3_7,
)
```
Define an event rule. It will run the job every 6 PM.
```python
rule = events.Rule(
self, "cronRule",
schedule = events.Schedule.cron(
minute = '0',
hour = '18',
month = '*',
week_day = 'MON-FRI',
year = '*'
),
)
```
Finally, add the target to the lambda function
```python
rule.add_target(targets.LambdaFunction(cronFn))
```
Here's the complete code
```python
from aws_cdk import (
aws_events as events,
aws_lambda as lambda_,
aws_events_targets as targets,
core,
)
class MyStack(core.Stack):
def __init__(self, scope: core.Construct, id: str, **kwargs) -> None:
super().__init__(scope, id, **kwargs)
with open("./lambda/handler.py", encoding="utf-8") as fp:
code_body = fp.read()
cronFn = lambda_.Function(
self, "cronFn",
code = lambda_.InlineCode(code_body),
handler = "index.handler",
runtime = lambda_.Runtime.PYTHON_3_7,
)
rule = events.Rule(
self, "cronRule",
schedule = events.Schedule.cron(
minute = '0',
hour = '18',
month = '*',
week_day = 'MON-FRI',
year = '*'
),
)
rule.add_target(targets.LambdaFunction(cronFn))
```
Let's run ``cdk diff`` again

After deploying, let's check on the console

Run a simple test

Go to CloudWatch, we can see the event we just created

To clean up the code, we can simply delete the stack by running ``cdk destroy``.

Sunday, 29 December 2019
Building a Quiz with React using react-quiz-component
## Initial Setup
The first step is to install the library. Installing react-quiz-component is pretty simple. You just need to install it via npm:
```
npm i react-quiz-component
```
After that, you have to import Quiz class to your project:
```
import Quiz from 'react-quiz-component';
```
## Defining your quiz source
The next step is to define a quiz source in a JSON format. If you are not familiar with JSON, I have created another project called react-quiz-form to generate the JSON string with some validations.

Once you have submitted, you will get the JSON string like this:
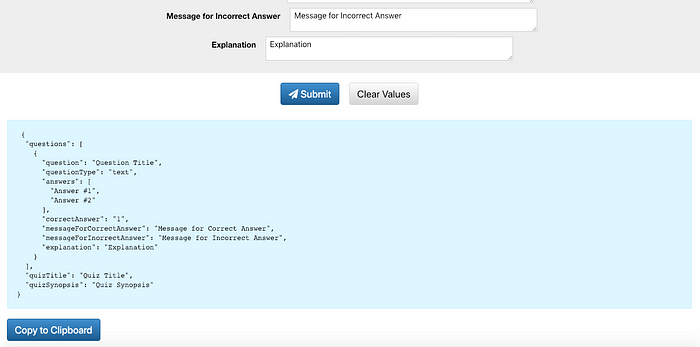
A quiz object may contains three attributes: ``quizTitle`` , ``quizSynopsis`` and ``questions``.
You do not need to include quizSynopsis but it is recommended to include it to let your users to know more about your quiz.
For questions, it may include a single or multiple objects defining the ``question``, ``questionType``, ``answers``, ``correctAnswer``, ``messageForCorrectAnswer``, ``messageForIncorrectAnswer``, and ``explanation``.
### question
The question you want to ask your users.
```
"question": "How can you access the state of a component from inside of a member function?"
```
### questionType
The type of your question. Supported types include text and photo.
```
"questionType": "text"
```
or
```
"questionType": "photo"
```
### answers
The possible answers for users to select.
For ``questionType`` is ``text`` :
```
"answers": [
"this.getState()",
"this.prototype.stateValue",
"this.state",
"this.values"
]
```
For ``questionType`` is ``photo`` :
```
"answers": [
"https://dummyimage.com/600x400/000/fff&text=A",
"https://dummyimage.com/600x400/000/fff&text=B",
"https://dummyimage.com/600x400/000/fff&text=C",
"https://dummyimage.com/600x400/000/fff&text=D"
]
```
### correctAnswer
The index of the correct answer (starting with 1). Current multiple answers are not supported.
```
"correctAnswer": "3"
```
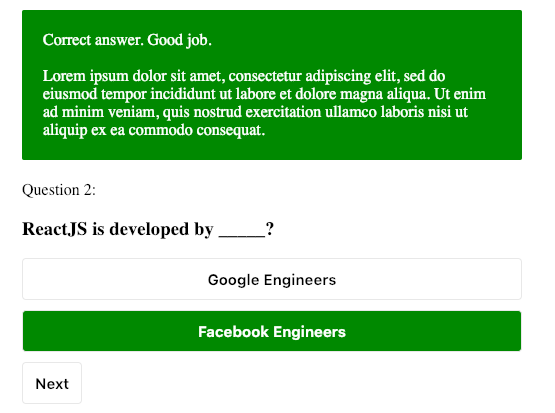
### messageForCorrectAnswer
The message shown when the user answered correctly.
```
"messageForCorrectAnswer": "Correct answer. Good job."
```
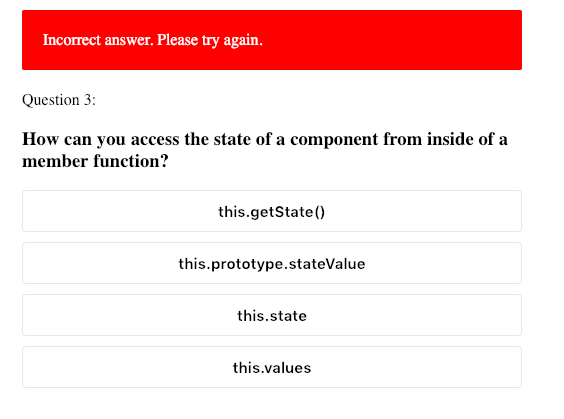
### messageForIncorrectAnswer
The message shown when the user answered incorrectly.
```
"messageForIncorrectAnswer": "Incorrect answer. Please try again."
```
### explanation
The explanation for this question.
```
"explanation": "Lorem ipsum dolor sit amet, consectetur adipiscing elit, sed do eiusmod tempor incididunt ut labore et dolore magna aliqua. Ut enim ad minim veniam, quis nostrud exercitation ullamco laboris nisi ut aliquip ex ea commodo consequat."
```

You may create a file called quiz.js. A full example is shown as below:
```
export const quiz = {
"quizTitle": "React Quiz Component Demo",
"quizSynopsis": "Lorem ipsum dolor sit amet, consectetuer adipiscing elit. Aenean commodo ligula eget dolor. Aenean massa. Cum sociis natoque penatibus et magnis dis parturient montes, nascetur ridiculus mus. Donec quam felis, ultricies nec, pellentesque eu, pretium quis, sem. Nulla consequat massa quis enim",
"questions": [
{
"question": "How can you access the state of a component from inside of a member function?",
"questionType": "text",
"answers": [
"this.getState()",
"this.prototype.stateValue",
"this.state",
"this.values"
],
"correctAnswer": "3",
"messageForCorrectAnswer": "Correct answer. Good job.",
"messageForIncorrectAnswer": "Incorrect answer. Please try again.",
"explanation": "Lorem ipsum dolor sit amet, consectetur adipiscing elit, sed do eiusmod tempor incididunt ut labore et dolore magna aliqua. Ut enim ad minim veniam, quis nostrud exercitation ullamco laboris nisi ut aliquip ex ea commodo consequat."
},
{
"question": "ReactJS is developed by _____?",
"questionType": "text",
"answers": [
"Google Engineers",
"Facebook Engineers"
],
"correctAnswer": "2",
"messageForCorrectAnswer": "Correct answer. Good job.",
"messageForIncorrectAnswer": "Incorrect answer. Please try again.",
"explanation": "Lorem ipsum dolor sit amet, consectetur adipiscing elit, sed do eiusmod tempor incididunt ut labore et dolore magna aliqua. Ut enim ad minim veniam, quis nostrud exercitation ullamco laboris nisi ut aliquip ex ea commodo consequat."
},
{
"question": "ReactJS is an MVC based framework?",
"questionType": "text",
"answers": [
"True",
"False"
],
"correctAnswer": "2",
"messageForCorrectAnswer": "Correct answer. Good job.",
"messageForIncorrectAnswer": "Incorrect answer. Please try again.",
"explanation": "Lorem ipsum dolor sit amet, consectetur adipiscing elit, sed do eiusmod tempor incididunt ut labore et dolore magna aliqua. Ut enim ad minim veniam, quis nostrud exercitation ullamco laboris nisi ut aliquip ex ea commodo consequat."
},
{
"question": "Which of the following concepts is/are key to ReactJS?",
"questionType": "text",
"answers": [
"Component-oriented design",
"Event delegation model",
"Both of the above",
],
"correctAnswer": "3",
"messageForCorrectAnswer": "Correct answer. Good job.",
"messageForIncorrectAnswer": "Incorrect answer. Please try again.",
"explanation": "Lorem ipsum dolor sit amet, consectetur adipiscing elit, sed do eiusmod tempor incididunt ut labore et dolore magna aliqua. Ut enim ad minim veniam, quis nostrud exercitation ullamco laboris nisi ut aliquip ex ea commodo consequat."
},
{
"question": "Lorem ipsum dolor sit amet, consectetur adipiscing elit,",
"questionType": "photo",
"answers": [
"https://dummyimage.com/600x400/000/fff&text=A",
"https://dummyimage.com/600x400/000/fff&text=B",
"https://dummyimage.com/600x400/000/fff&text=C",
"https://dummyimage.com/600x400/000/fff&text=D"
],
"correctAnswer": "1",
"messageForCorrectAnswer": "Correct answer. Good job.",
"messageForIncorrectAnswer": "Incorrect answer. Please try again.",
"explanation": "Lorem ipsum dolor sit amet, consectetur adipiscing elit, sed do eiusmod tempor incididunt ut labore et dolore magna aliqua. Ut enim ad minim veniam, quis nostrud exercitation ullamco laboris nisi ut aliquip ex ea commodo consequat."
}
]
}
```
## Passing your quiz object to Quiz container
Once you have defined your quiz object, the next step is to pass it as a prop to Quiz container.
```
import { quiz } from './quiz';
...
```
If you want your questions shuffled every time the component renders, you may simply pass true to the prop shuffle.
```
```
That’s it. With these steps, you have integrated ``react-quiz-component`` to your project.
## Quiz Result
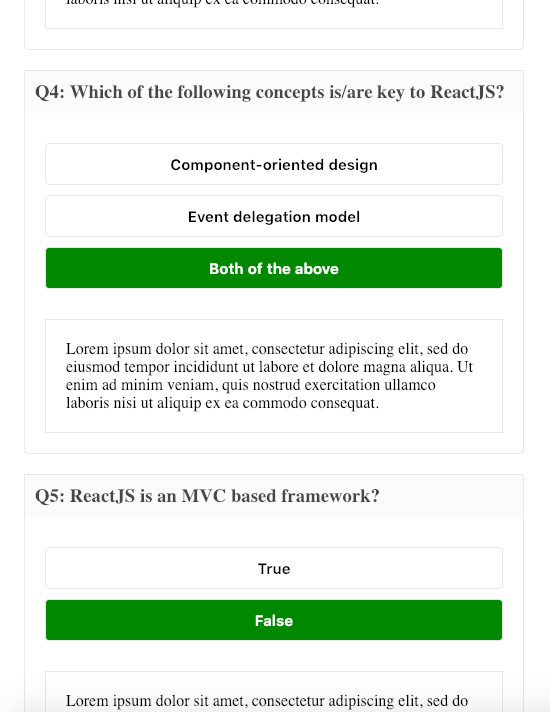
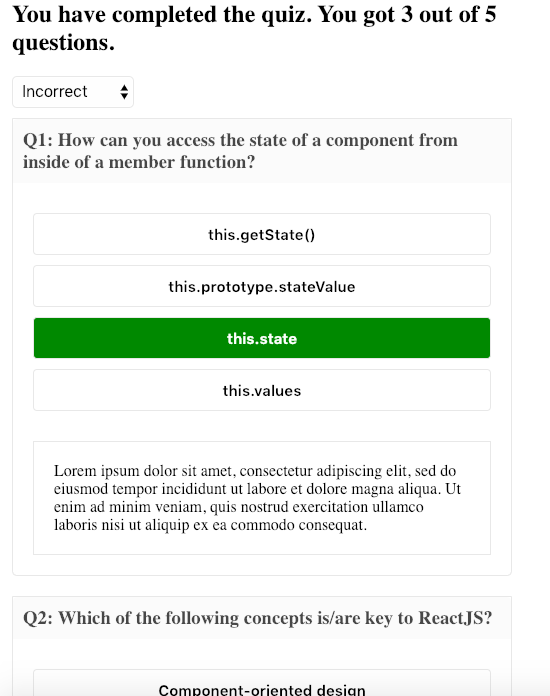
``react-quiz-component`` also provides an overall result at the end of the quiz.
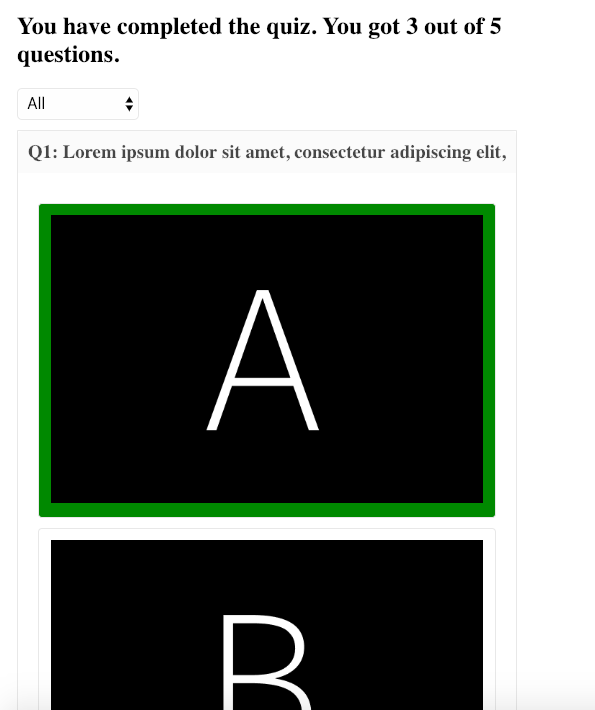
With the dropdown option, you can filter all questions and those that you answered correctly or incorrectly.
## Demonstration
The demonstration is available at [here](https://wingkwong.github.io/react-quiz-component/)
## Conclusion
react-quiz-component is an open source project. You can easily integrate it with your project. If you found any issues or have some new requested features, please feel free to let me know by filing an issue on the repo shown [here](https://github.com/wingkwong/react-quiz-component).
## Update:
react-quiz-component has introduced more features. For the changelog, please check it [here](https://github.com/wingkwong/react-quiz-component/blob/master/CHANGELOG.md).
Removing duplicate records in a CSV file
Recently my colleague was struggling on removing duplicate records based on composite keys in a large csv file before inserting into Oracle database. I wrote a simple python program to address the problem.
Given that python has already been installed in the server. I could install ``pandas`` in virtualenv using pip. The program is pretty short. First we need to import pandas. Pandas is a software library for data manipulation and analysis.
```python
import pandas as pd
```
Then, we use ``read_csv()`` to read a csv file into DataFrame, which is a 2d size-mutatable, potentially heterogeneous tabular data structure with labeled axes. Since our data contains a value of NA, so we need to set `keep_default_na` to False.
```python
d = pd.read_csv('LARGE_CSV_FILE.csv', keep_default_na = False)
```
Once we have the dataframe, we can call ``drop_duplicates()`` to remove duplicate rows. Since we remove them based on composite keys, we can pass those keys to `subset`. Setting `inplace` to True can drop duplicates in place instead of returning a copy. If depulicate records are found, we only keep the first one.
```python
d.drop_duplicates(subset = ['COMPOSITE_KEY1', 'COMPOSITE_KEY2', 'COMPOSITE_KEY3', 'COMPOSITE_KEY4', 'COMPOSITE_KEY5', 'COMPOSITE_KEY6', 'COMPOSITE_KEY7', 'COMPOSITE_KEY8', 'COMPOSITE_KEY9', 'COMPOSITE_KEY10'], inplace = True, keep = 'first')
```
At the end, we would like to save the result to another csv file for verification. By default, it comes with index. We can disable it by setting `index` to False.
```python
d.to_csv('LARGE_CSV_FILE_PROCESSED.csv', index = False)
```
Relocate Golang Boilerplate Packages using Taskfile
Supposing you've found a Go boilerplate and you want to relocate the project under your name. Here's a TaskFile to help you do so.
Task is a task runner / build tool that aims to be simpler and easier to use than, for example, [GNU Make](https://www.gnu.org/software/make/).
TaskFile is a yml file. A simple is shown below
```
version: '2'
tasks:
hello:
cmds:
- echo 'Hello World from Task!'
silent: true
```
Compared with Makefile, it indeed looks simpler.
For running the coverage tests, we just need add our commands under ``cmds`` block
```
test:
cmds:
- echo " *** Running Coverage Tests ***"
- $(pwd)/test.sh
- echo " *** Completed *** "
silent: true
```
What about ``relocate``? That would be a bit different as I need to think about how to inject the variables into it. Thanks to TaskFile development team, I could do something like this.
```
relocate:
cmds:
- echo " *** Relocating packages to {{.TARGET_PATH}} ***"
- task: replace-string
vars: {
SOURCE_STR: "{{.PACKAGE_NAME}}",
TARGET_STG: "{{.TARGET_PATH}}"
}
- task: replace-string
vars: {
SOURCE_STR: "{{.PROJECT_NAME}}",
TARGET_STG: "{{.TARGET_PROJECTNAME}}"
}
- echo " *** Completed *** "
silent: true
```
In Taskfile, a variable is represented like this: ``{{.VAR}}``. We just need to declare all the variables there.
```
vars:
GITHUB: "github.com"
PROJECT_NAME_DIR:
sh: echo $(basename "$(dirname "$(pwd)")")
PROJECT_NAME:
sh: echo $(basename "$(pwd)" | sed -e 's/[\/&]/\\&/g')
PACKAGE_NAME:
sh: echo "{{.GITHUB}}/{{.PROJECT_NAME_DIR}}/{{.PROJECT_NAME}}" | sed -e 's/[\/&]/\\&/g'
TARGET_PATH:
sh: echo "{{.TARGET}}" | sed -e 's/[\/&]/\\&/g'
TARGET_PROJECTNAME:
sh: basename "dirname {{.TARGET_PATH}}" | sed -e 's/[\/&]/\\&/g'
```
Remember ``relocate`` is only triggered if there is a TARGET path? A preconditions block can help in this case. The variable ``TARGET`` is a parameters when calling ``task relocate``.
```
preconditions:
- sh: "[ {{.TARGET}} != '' ]"
```
Wait a minute, then what is replace-string? replace-string is another task used to grep the file and perform the replacement.
```
replace-string:
cmds:
- grep -rlI '{{.SOURCE_STR}}' --include=*.{go,json} ./ | xargs -I@ sed -i '' 's/{{.SOURCE_STR}}/{{.TARGET_STG}}/g' @
silent: true
```
By adding ``silent: true``, we can make the console cleaner. Just like we add ``.SILENT`` in Makefile.
Sample usage: task relocate TARGET=github.com/wingkwong/project
Complete Code:
```
version: '2'
tasks:
relocate:
cmds:
- echo " *** Relocating packages to {{.TARGET_PATH}} ***"
- task: replace-string
vars: {
SOURCE_STR: "{{.PACKAGE_NAME}}",
TARGET_STG: "{{.TARGET_PATH}}"
}
- task: replace-string
vars: {
SOURCE_STR: "{{.PROJECT_NAME}}",
TARGET_STG: "{{.TARGET_PROJECTNAME}}"
}
- echo " *** Completed *** "
silent: true
vars:
GITHUB: "github.com"
PROJECT_NAME_DIR:
sh: echo $(basename "$(dirname "$(pwd)")")
PROJECT_NAME:
sh: echo $(basename "$(pwd)" | sed -e 's/[\/&]/\\&/g')
PACKAGE_NAME:
sh: echo "{{.GITHUB}}/{{.PROJECT_NAME_DIR}}/{{.PROJECT_NAME}}" | sed -e 's/[\/&]/\\&/g'
TARGET_PATH:
sh: echo "{{.TARGET}}" | sed -e 's/[\/&]/\\&/g'
TARGET_PROJECTNAME:
sh: basename "dirname {{.TARGET_PATH}}" | sed -e 's/[\/&]/\\&/g'
preconditions:
- sh: "[ {{.TARGET}} != '' ]"
replace-string:
cmds:
- grep -rlI '{{.SOURCE_STR}}' --include=*.{go,json} ./ | xargs -I@ sed -i '' 's/{{.SOURCE_STR}}/{{.TARGET_STG}}/g' @
silent: true
```
Building a K8s Cluster with Kubeadm
We build a K8s cluster for managing containers and use Kubeadm to simplify the proess of setting up a simple cluster.
# Install Docker on all three nodes
Add the Docker GPG Key:
```
curl -fsSL https://download.docker.com/linux/ubuntu/gpg | sudo apt-key add -
```
Add the Docker Repository
```
sudo add-apt-repository \
"deb [arch=amd64] https://download.docker.com/linux/ubuntu \
$(lsb_release -cs) \
stable"
```
Update packages:
```
sudo apt-get update
```
Install Docker:
```
sudo apt-get install -y docker-ce=18.06.1~ce~3-0~ubuntu
```
Hold Docker at this specific version:
```
sudo apt-mark hold docker-ce
```
Verify that Docker is up and running with:
```
sudo systemctl status docker
```
After running above commands, the Docker service status should be active (running).
```
● docker.service - Docker Application Container Engine
Loaded: loaded (/lib/systemd/system/docker.service; enabled; vendor preset: enabled)
Active: active (running) since Sun 2019-10-20 11:15:32 UTC; 19s ago
Docs: https://docs.docker.com
Main PID: 9869 (dockerd)
Tasks: 21
CGroup: /system.slice/docker.service
├─9869 /usr/bin/dockerd -H fd://
└─9894 docker-containerd --config /var/run/docker/containerd/containerd.toml
```
# Install Kubeadm, Kubelet, and Kubectl
Install the K8s components by running the following commands on all three nodes.
Add the K8s GPG Key
```
curl -s https://packages.cloud.google.com/apt/doc/apt-key.gpg | sudo apt-key add -
```
Add the K8s repo
```
cat << EOF | sudo tee /etc/apt/sources.list.d/kubernetes.list
deb https://apt.kubernetes.io/ kubernetes-xenial main
EOF
```
Update packages
```
sudo apt-get update
```
Install ``kubelet``, ``kubeadm`` and ``kubectl``
```
sudo apt-get install -y kubelet=1.12.7-00 kubeadm=1.12.7-00 kubectl=1.12.7-00
```
Hold the Kubernetes components at this specific version
```
sudo apt-mark hold kubelet kubeadm kubectl
```
# Bootstrap the cluster on the Kube master node
Initialize kubeadm on the master node
```
sudo kubeadm init --pod-network-cidr=10.244.0.0/16
```
After a few minutes, you should see a ``kubeadm join`` command that will be used later
```
kubeadm join 10.0.1.101:6443 --token ioxxtp.zugcxykam7jhmlqe --discovery-token-ca-cert-hash sha256:1feab8ca98d50689b5a524c1271b43a7c712d66dab0d6ab7b68c9fd472921731
```
Set up the local kubeconfig
```
mkdir -p $HOME/.kube
sudo cp -i /etc/kubernetes/admin.conf $HOME/.kube/config
sudo chown $(id -u):$(id -g) $HOME/.kube/config
```
Verify if Kube master node is up and running
```
kubectl version
```
You should see ``Client Version`` and ``Server Version`` as below
```
Client Version: version.Info{Major:"1", Minor:"12", GitVersion:"v1.12.7", GitCommit:"6f482974b76db3f1e0f5d24605a9d1d38fad9a2b", GitTreeState:"clean", BuildDate:"2019-03-25T02:52:13Z", GoVersion:"go1.10.8", Compiler:"gc", Platform:"linux/amd64"}
Server Version: version.Info{Major:"1", Minor:"12", GitVersion:"v1.12.10", GitCommit:"e3c134023df5dea457638b614ee17ef234dc34a6", GitTreeState:"clean", BuildDate:"2019-07-08T03:40:54Z", GoVersion:"go1.10.8", Compiler:"gc", Platform:"linux/amd64"}
```
## Join the two Kube worker nodes to the cluster
Once the Kube master node is ready, then we need to join those two Kube worker nodes to the cluster.
Copy the ``kubeadm join`` command that was printed by ``kubeadm init`` command in the previous step. Make sure you run it with ``sudo``
```
sudo kubeadm join 10.0.1.101:6443 --token ioxxtp.zugcxykam7jhmlqe --discovery-token-ca-cert-hash sha256:1feab8ca98d50689b5a524c1271b43a7c712d66dab0d6ab7b68c9fd472921731
```
Go back to the Kube master node, check if the nodes are joined the cluster successfully or not
```
kubectl get nodes
```
Verify the result. Three of nodes are expected to be here but in the ``NotReady`` state.
```
NAME STATUS ROLES AGE VERSION
ip-10-0-1-101 NotReady master 30s v1.12.2
ip-10-0-1-102 NotReady 8s v1.12.2
ip-10-0-1-103 NotReady 5s v1.12.2
```
# Setu up cluster networking
To get them ready, we need to use flannel because K8s does not provide any defalt network implementation. Flannel is a very simple overlay network that satisfies the Kubernetes requirements. Many people have reported success with Flannel and Kubernetes.
Turn on iptables bridge calls on all three nodes
```
echo "net.bridge.bridge-nf-call-iptables=1" | sudo tee -a /etc/sysctl.conf
sudo sysctl -p
```
Apply flannel on Kube master node
```
kubectl apply -f https://raw.githubusercontent.com/coreos/flannel/bc79dd1505b0c8681ece4de4c0d86c5cd2643275/Documentation/kube-flannel.yml
```
Once flannel is installed. Verifiy the node status.
```
kubectl get nodes
```
After a short time, all three nodes should be in the ``Ready`` state.
```
NAME STATUS ROLES AGE VERSION
ip-10-0-1-101 Ready master 85s v1.12.2
ip-10-0-1-102 Ready 63s v1.12.2
ip-10-0-1-103 Ready 60s v1.12.2
```
Subscribe to:
Posts (Atom)