Wednesday, 22 January 2020
7 Strategies for Migrating Applications to AWS
This post outlines seven common strategies for migration: "The 7 R's".
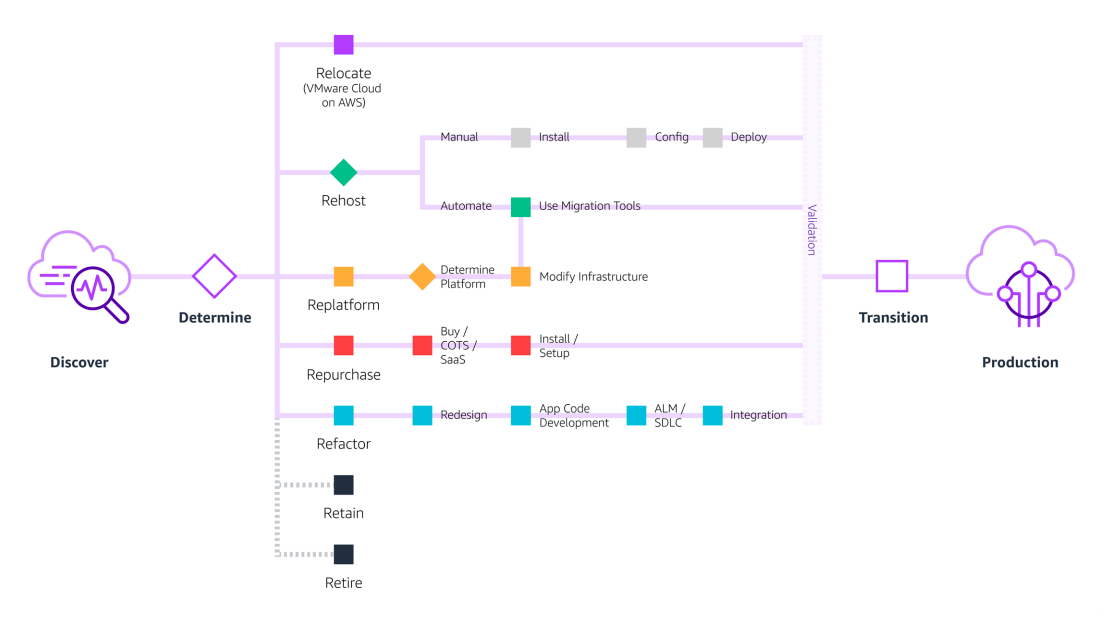
# 1. Relocate
> Move vSphere-based applications to AWS without application changes
VMware Cloud on AWS allows you to quickly relocate hundreds of applications virtualised on vSphere to the AWS Cloud in just days and to maintain consistent operations with your VMware Cloud Foundation-based environments.
Once in the AWS Cloud, your applications are easier to optimise or rearchitect to take advantage of the breadth and depth of AWS services
# 2. Rehost
> Also known as “lift-and-shift”
In a large-scale migration scenario where you need to migrate and scale
quickly to meet a business case, such as a data centre lease termination, we find that the majority of applications are rehosted.
Most rehosting can be automated with tools such as CloudEndure Migration,
(from CloudEndure, an AWS company). CloudEndure Migration quickly rehosts
a large number of machines from multiple source platforms (physical, virtual, or another cloud) to AWS without worrying about compatibility, performance disruption, long cutover windows, or long-distance data replications. For times when you can’t install an agent on the server, AWS Server Migration Service offers an agentless service, which makes it easier and faster for you to migrate thousands of on-premises workloads to AWS from a snapshot of the existing servers.
We find that applications are easier to optimise and re-architect once they are already running in the cloud, as your organisation will have developed better skills and can iteratively adopt new technologies (e.g., containers, serverless, etc.) without having to deploy and manage the underlying services.
# 3. Replatform
> Sometimes referred to as “lift-tinker-and-shift”
This entails making a few cloud optimisations in order to achieve tangible benefits, without changing the core architecture of the application. For example, if you’re managing a messaging broker today, you can easily replace this with the fully managed Amazon MQ service, without re-writing your applications or paying for third-party software licenses. Or, if you’re migrating a Windows-based application that requires file storage, you can use the fully-managed Amazon FSx for Windows
File Server. To reduce the amount of time you spend managing database instances, you can move to a database-as-a-service offering such as Amazon Relational Database Service. AWS Database Migration Service makes this re-platforming easier than ever. When moving from one database source or version to a new platform or software version, AWS Database Migration Service keeps the source database fully operational during the migration, enabling near-zero downtime during the cutover.
# 4. Repurchase
> Replace your current environment, casually referred to as “drop and shop”
This is a decision to move to a newer version of the software or purchase an entirely new solution. You may also be looking for a new software licensing model that allows you more flexibility to match your business needs. AWS Marketplace is a curated digital catalog where you can find, buy, deploy, and manage third-party software and services that you need to build solutions and run your business.
# 5. Refactor
> Change the way the application is architected and developed, usually
done by employing cloud-native features
Typically, refactoring (or rearchitecting) is driven by a strong business need to add features, scale, or improve performance that would otherwise be difficult to achieve in the application’s existing environment.
If your organisation is looking to boost agility or improve business continuity by moving to a service-oriented architecture (SOA), this strategy may be worth pursuing—even though it is often the most expensive solution.
# 6. Retain
> Do nothing, for now
You may have portions of your IT portfolio that you are not ready to migrate, or believe are best-kept on-premises. Keep in mind that as more of your portfolio moves to the cloud, allocation of data centre expenses across fewer applications may eventually drive a need to revisit the retained applications.
For applications that remain on-premises, AWS Outposts bring the same hardware and software in the AWS cloud, the same services and APIs, the same management tools, and the same support and operating model to virtually any data centre, co-location space, or on-premises facility. With Outposts, you have a truly consistent hybrid cloud, so that you can develop once and deploy across Outposts on-premises or in the AWS cloud without having to recertify your applications.
# 7. Retire
> Decommission or archive unneeded portions of your IT portfolio
By rationalising your IT portfolio and identifying assets that are no longer useful and can be turned off, you can boost your business case and direct your team’s attention toward maintaining the resources that are more widely used.

Wednesday, 15 January 2020
How did AWS Improve VPC Networking for Lambda to Address Cold Start Problem
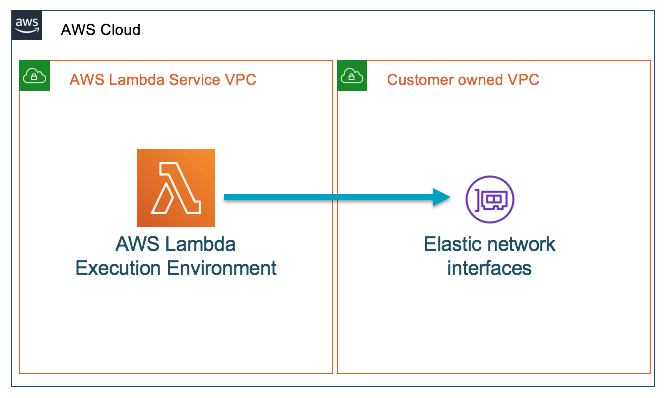
I believe there are a lot of people facing a cold start problem when they use Lambda to request resources in their own VPCs like Amazon RDS or Redis. Lambda function is managed by AWS. You can access anything on the public Internet. However, when your lambda function is configured to connect to your own VPC, it needs an elastic network interface (ENI) in VPC to allow the communication to your private resources. Normally creating and attaching a new ENI takes several seconds. However, if your Lambda environment scales to handle huge request spikes, you need more ENIs. The time causes long cold starts before it can be invoked. Some potential issues may include reaching ENI limit in your account or hitting API rate limit on creating ENIs.
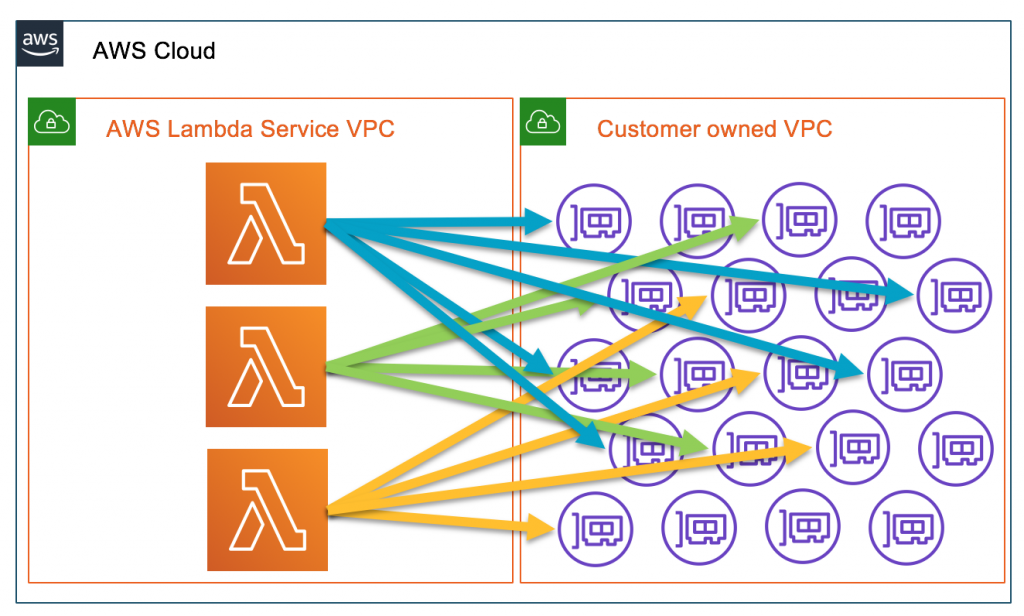
About months ago, AWS leveraged AWS Hyperplane, which is a netwwork function virtualization platform used for network load balancer and NAT gateway, to allow inter-VPC connectivity by providing NAT capabilities. When you deploy your Lambda, it will help you to build a VPC-to-VPC NAT in AWS Lambda Service VPC and the required ENIs in your own VPC. By doing so, the time can be significantly dropped from 10 seconds to 1 second or even few milliseconds.
Let's create a quick test using AWS CDK.
Here we create a lambda function first with inline code
```javascript
const fn = new lambda.Function(this, 'LambdaFunc', {
code: new lambda.InlineCode(`exports.handler = (event, context, callback) =>
callback(null, {
statusCode: '200',
body: JSON.stringify(event),
headers: {
'Content-Type': 'application/json',
},
});`),
handler: 'index.handler',
runtime: lambda.Runtime.NODEJS_8_10,
});
```
Define an API Gateway REST API with the Lambda function declared above
```javascript
new apigateway.LambdaRestApi(this, 'RestAPI', {
handler: fn,
endpointTypes: [apigateway.EndpointType.REGIONAL]
});
```
After deploying the stack, you will see the endpoint in the output. By running ``time curl -s ``, you should see the time taken is less than 1 second.
Monday, 13 January 2020
Autoscaling an EKS Cluster with Cluster Autoscaler
Last time we introduced how to use ``eksctl`` to create an EKS cluster. If you miss the previous post, please check out [Creating an EKS Cluster in AWS Using eksctl](https://dev.to/wingkwong/creating-an-eks-cluster-in-aws-using-eksctl-10ik). In this article, you will learn how to autoscale an EKS cluster using a default Kubernetes component - [Cluster Autoscaler](https://github.com/kubernetes/autoscaler/tree/master/cluster-autoscaler). It can be used to scale either pods or nodes in a cluster and automatically increases the size of an auto-scaling group.
Go to AWS console and navigate to EC2 Dashboard - Auto Scaling Groups.

Copy the auto-scaling group name and replace ```` with it.
With ``--nodes=2:8``, it will auto-scale with minimum 2 nodes and maximum 8 nodes.
cluster_autoscaler.yaml
```
apiVersion: v1
kind: ServiceAccount
metadata:
labels:
k8s-addon: cluster-autoscaler.addons.k8s.io
k8s-app: cluster-autoscaler
name: cluster-autoscaler
namespace: kube-system
---
apiVersion: rbac.authorization.k8s.io/v1beta1
kind: ClusterRole
metadata:
name: cluster-autoscaler
labels:
k8s-addon: cluster-autoscaler.addons.k8s.io
k8s-app: cluster-autoscaler
rules:
- apiGroups: [""]
resources: ["events","endpoints"]
verbs: ["create", "patch"]
- apiGroups: [""]
resources: ["pods/eviction"]
verbs: ["create"]
- apiGroups: [""]
resources: ["pods/status"]
verbs: ["update"]
- apiGroups: [""]
resources: ["endpoints"]
resourceNames: ["cluster-autoscaler"]
verbs: ["get","update"]
- apiGroups: [""]
resources: ["nodes"]
verbs: ["watch","list","get","update"]
- apiGroups: [""]
resources: ["pods","services","replicationcontrollers","persistentvolumeclaims","persistentvolumes"]
verbs: ["watch","list","get"]
- apiGroups: ["extensions"]
resources: ["replicasets","daemonsets"]
verbs: ["watch","list","get"]
- apiGroups: ["policy"]
resources: ["poddisruptionbudgets"]
verbs: ["watch","list"]
- apiGroups: ["apps"]
resources: ["statefulsets"]
verbs: ["watch","list","get"]
- apiGroups: ["storage.k8s.io"]
resources: ["storageclasses"]
verbs: ["watch","list","get"]
---
apiVersion: rbac.authorization.k8s.io/v1beta1
kind: Role
metadata:
name: cluster-autoscaler
namespace: kube-system
labels:
k8s-addon: cluster-autoscaler.addons.k8s.io
k8s-app: cluster-autoscaler
rules:
- apiGroups: [""]
resources: ["configmaps"]
verbs: ["create"]
- apiGroups: [""]
resources: ["configmaps"]
resourceNames: ["cluster-autoscaler-status"]
verbs: ["delete","get","update"]
---
apiVersion: rbac.authorization.k8s.io/v1beta1
kind: ClusterRoleBinding
metadata:
name: cluster-autoscaler
labels:
k8s-addon: cluster-autoscaler.addons.k8s.io
k8s-app: cluster-autoscaler
roleRef:
apiGroup: rbac.authorization.k8s.io
kind: ClusterRole
name: cluster-autoscaler
subjects:
- kind: ServiceAccount
name: cluster-autoscaler
namespace: kube-system
---
apiVersion: rbac.authorization.k8s.io/v1beta1
kind: RoleBinding
metadata:
name: cluster-autoscaler
namespace: kube-system
labels:
k8s-addon: cluster-autoscaler.addons.k8s.io
k8s-app: cluster-autoscaler
roleRef:
apiGroup: rbac.authorization.k8s.io
kind: Role
name: cluster-autoscaler
subjects:
- kind: ServiceAccount
name: cluster-autoscaler
namespace: kube-system
---
apiVersion: extensions/v1beta1
kind: Deployment
metadata:
name: cluster-autoscaler
namespace: kube-system
labels:
app: cluster-autoscaler
spec:
replicas: 1
selector:
matchLabels:
app: cluster-autoscaler
template:
metadata:
labels:
app: cluster-autoscaler
spec:
serviceAccountName: cluster-autoscaler
containers:
- image: k8s.gcr.io/cluster-autoscaler:v1.2.2
name: cluster-autoscaler
resources:
limits:
cpu: 100m
memory: 300Mi
requests:
cpu: 100m
memory: 300Mi
command:
- ./cluster-autoscaler
- --v=4
- --stderrthreshold=info
- --cloud-provider=aws
- --skip-nodes-with-local-storage=false
- --nodes=2:8:
env:
- name: AWS_REGION
value: us-east-1
volumeMounts:
- name: ssl-certs
mountPath: /etc/ssl/certs/ca-certificates.crt
readOnly: true
imagePullPolicy: "Always"
volumes:
- name: ssl-certs
hostPath:
path: "/etc/ssl/certs/ca-bundle.crt"
```
Then we need to apply below inline IAM policy to worker nodes to allow them to manipulate auto-scaling
```json
{
"Version": "2012-10-17",
"Statement": [
{
"Effect": "Allow",
"Action": [
"autoscaling:DescribeAutoScalingGroups",
"autoscaling:DescribeAutoScalingInstances",
"autoscaling:DescribeTags",
"autoscaling:SetDesiredCapacity",
"autoscaling:TerminateInstanceInAutoScalingGroup"
],
"Resource": "*"
}
]
}
```
Go back to AWS Console - IAM and search the worker node group role created by eksctl

Click Add inline poilcy
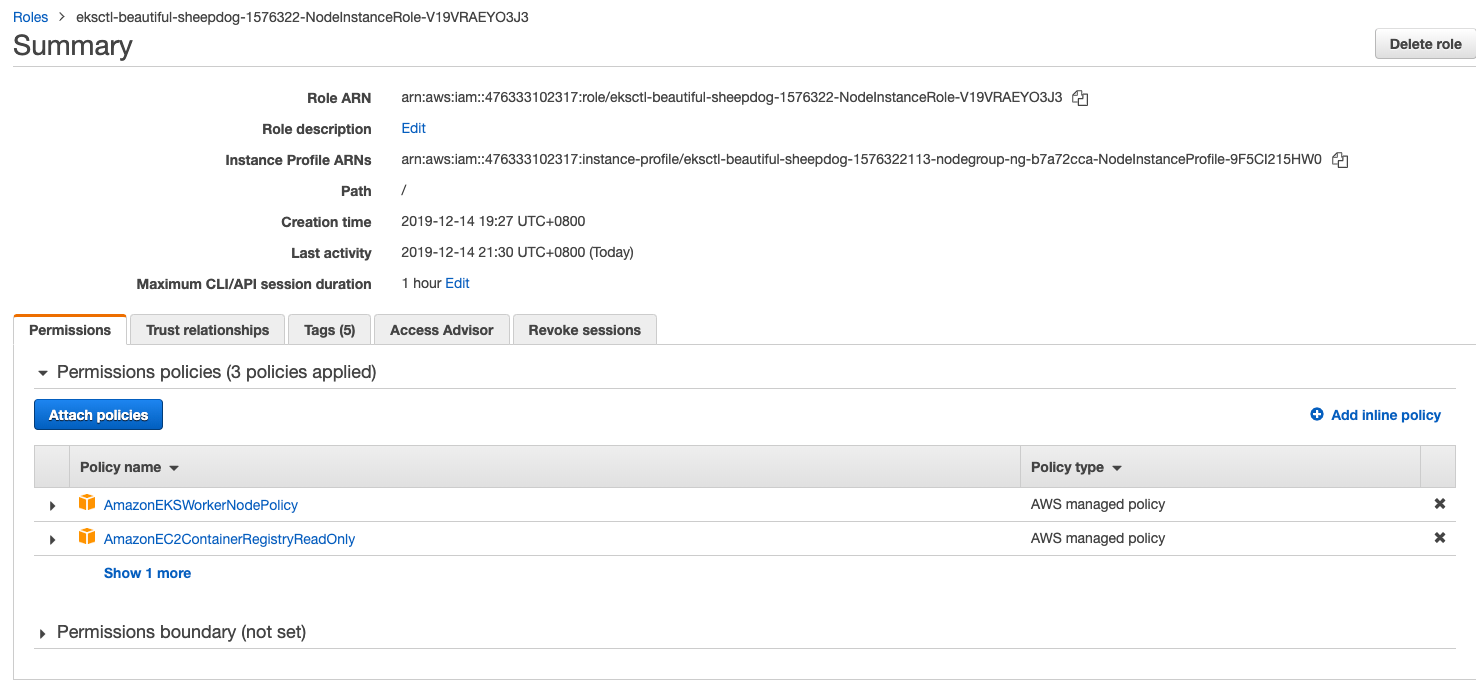
Click JSON tab and paste the above policy
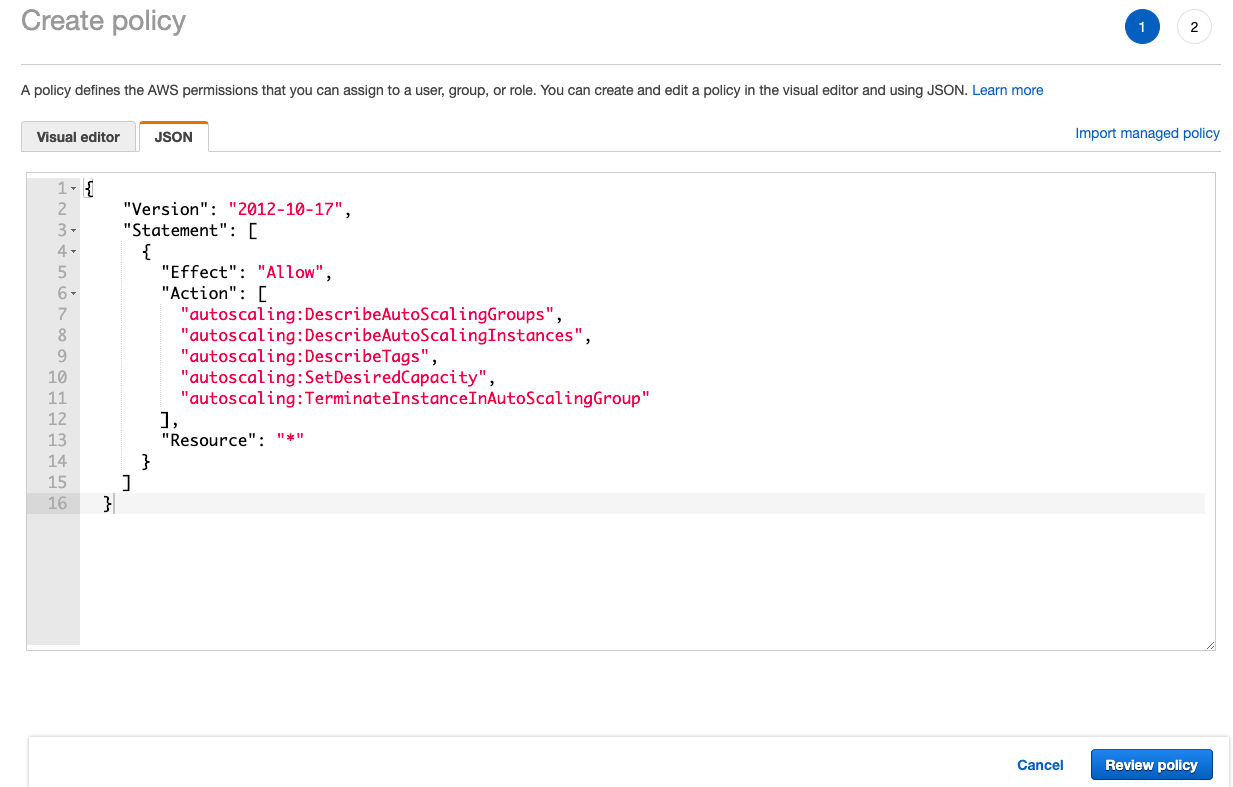
Name the policy and click Create policy
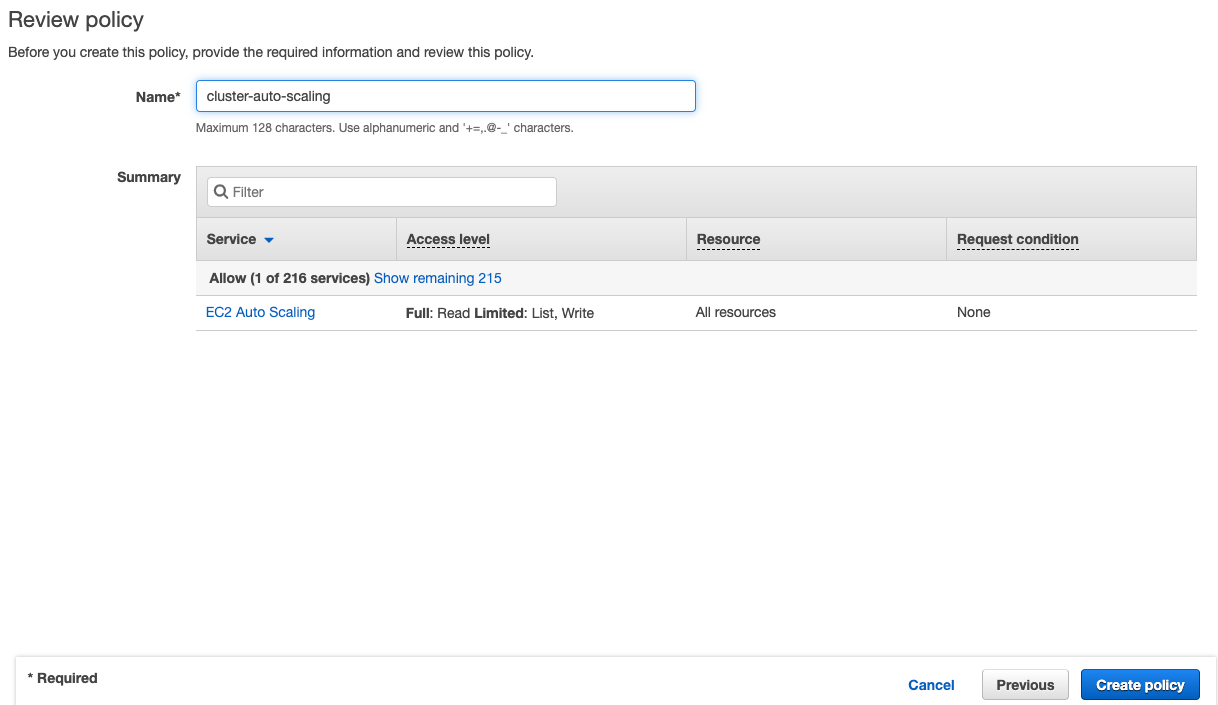
Run ``kubectl apply`` to deploy the autoscaler
```
kubectl apply -f cluster_autoscaler.yaml
```
You should see the following
```
serviceaccount/cluster-autoscaler created
clusterrole.rbac.authorization.k8s.io/cluster-autoscaler created
role.rbac.authorization.k8s.io/cluster-autoscaler created
clusterrolebinding.rbac.authorization.k8s.io/cluster-autoscaler created
rolebinding.rbac.authorization.k8s.io/cluster-autoscaler created
deployment.extensions/cluster-autoscaler created
```
Then let's deploy an Nginx sample application
```
apiVersion: extensions/v1beta1
kind: Deployment
metadata:
name: nginx-scaleout
spec:
replicas: 1
template:
metadata:
labels:
service: nginx
app: nginx
spec:
containers:
- image: nginx
name: nginx-scaleout
resources:
limits:
cpu: 500m
memory: 512Mi
requests:
cpu: 500m
memory: 512Mi
```
```
kubectl apply -f nginx.yaml
```
Check the deployment
```
kubectl get deployment/nginx-scaleout
```
```
NAME READY UP-TO-DATE AVAILABLE AGE
nginx-scaleout 1/1 1 1 14s
```
Let's scale the deployment with 10 replicas
```
kubectl scale --replicas=10 deployment/nginx-scaleout
```
```
deployment.extensions/nginx-scaleout scaled
```
You can run the following to see how it goes
```
kubectl logs -f deployment/cluster-autoscaler -n kube-system
```
Let's run it again
```
kubectl get deployment/nginx-scaleout
```
You can see 10 replicas have been scaled out
```
NAME READY UP-TO-DATE AVAILABLE AGE
nginx-scaleout 10/10 10 10 5m
```
Go to AWS Console - EC2 Dashboard. You should see there are 2 more instances spinning up.
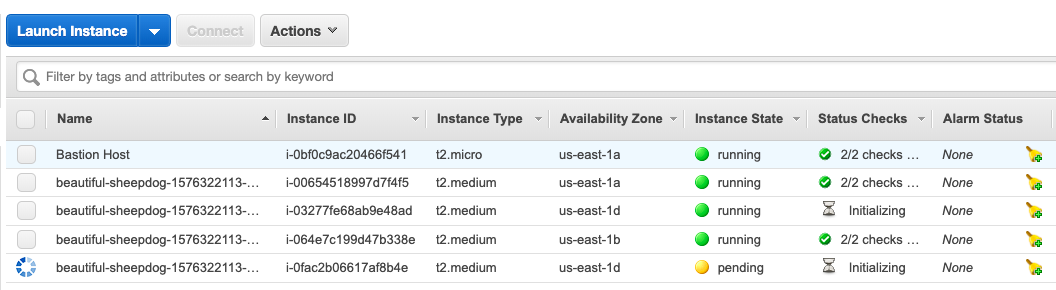
After a few minutes, try to see the nodes
```
kubectl get nodes
```
You'll get two more nodes joining to the cluster.
```
NAME STATUS ROLES AGE VERSION
ip-192-168-28-185.ec2.internal Ready 174m v1.14.7-eks-1861c5
ip-192-168-33-53.ec2.internal Ready 174m v1.14.7-eks-1861c5
ip-192-168-64-112.ec2.internal Ready 87s v1.14.7-eks-1861c5
ip-192-168-90-156.ec2.internal Ready 2m5s v1.14.7-eks-1861c5
```
To delete the deployments, run the following commands
```
kubectl delete -f cluster_autoscaler.yaml
kubectl delete -f nginx.yaml
```
Friday, 10 January 2020
Creating an EKS Cluster in AWS Using eksctl
In this article, we will create an EKS Cluster in AWS using [eksctl](https://github.com/weaveworks/eksctl).
eksctl is a simple CLI tool for creating clusters on EKS - Amazon's new managed Kubernetes service for EC2. It is written in Go, and uses CloudFormation.
This is the general architecture. This article only focuses on EKS part.
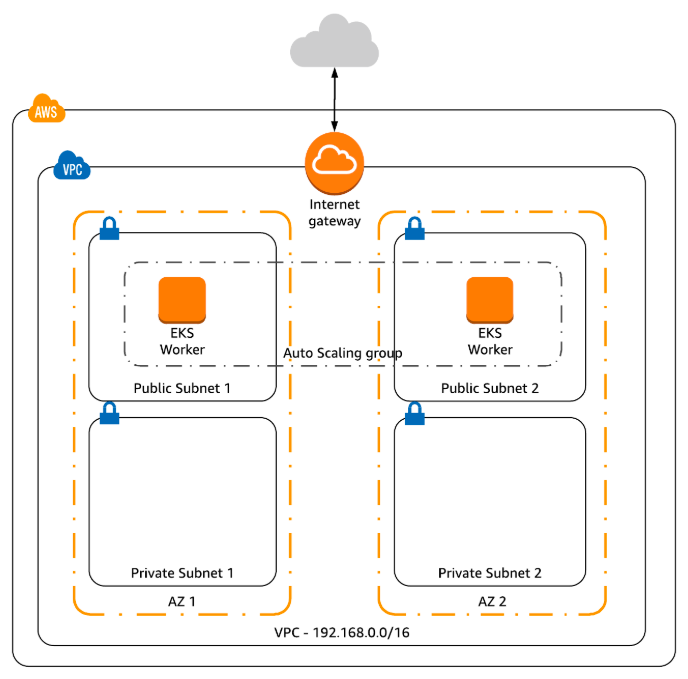
To install eksctl, you can use [homebrew](https://brew.sh/) if you are a macOS user:
```bash
brew tap weaveworks/tap
brew install weaveworks/tap/eksctl
```
or use [chocolatey](https://chocolatey.org/) if you are a Windows user:
```bash
chocolatey install eksctl
```
Before creating a cluster, make sure you have setup your aws credentials. To do that, you can run ``aws configure`` to perform your setup. The region for this demostration is ``us-east-1``.
After the configuration setup, you can run the below command to verify
```bash
aws sts get-caller-identity
```
To create a EKS cluster, you can simply use
```bash
eksctl create cluster
```
or with some parameters
```bash
eksctl create cluster --region=us-east-1 --node-type=t2.medium
```
If you don't specify parameters, the default parameters will be used:
```
exciting auto-generated name, e.g. "fabulous-mushroom-1527688624"
2x m5.large nodes (this instance type suits most common use-cases, and is good value for money)
use official AWS EKS AMI
us-west-2 region
dedicated VPC (check your quotas)
using static AMI resolver
```
The process may take up to 15 minutes.
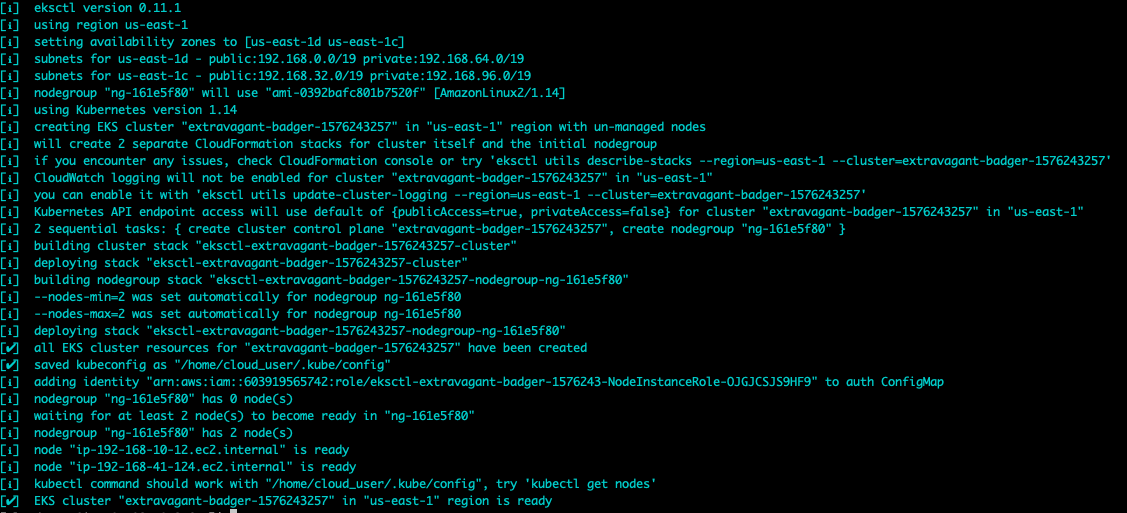
Once it is ready, run the following command to verify
```bash
kubectl get nodes
```
```
NAME STATUS ROLES AGE VERSION
ip-192-168-10-12.ec2.internal Ready 2m6s v1.14.7-eks-1861c5
ip-192-168-41-124.ec2.internal Ready 2m5s v1.14.7-eks-1861c5
```
If you go to AWS Console and direct to EKS page, you can see there are three clusters created by ``eksctl``. Since we do not specify the name, so the cluster name is generated randomly.
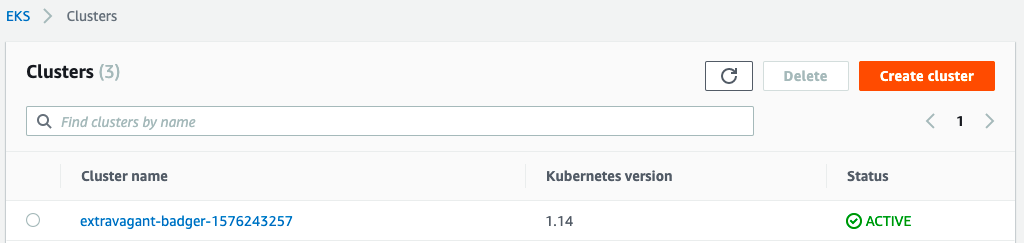
For the eksctl documentation, please check out [here](https://eksctl.io/).
Wednesday, 8 January 2020
Fixing Wrong Prompt String on a EC2 Linux Instance
One of my colleagues reported that he could not run a npm command on a EC2 instance (Amazon Linux AMI 2018.03). When I connected to the EC2 instance via SSH and found that the prompt string was using the default one which is ``\s-\v\$``. It shows the basename of the shell process with the version.
The ``~/.bashrc`` file looks normal. ``~/.bashrc`` should execute ``/etc/bashrc`` where ``PROMPT_COMMAND`` will be set based on the environment variable ``TERM`` after login.
```bash
# Source global definitions
if [ -f /etc/bashrc ]; then
. /etc/bashrc
fi
```
As I am using Mac OSX Terminal, my ``TERM`` is ``xterm-256color``, which matches the first case. ``/etc/sysconfig/bash-prompt-xterm`` does not exist, hence my ``PROMPT_COMMAND`` would be ``printf "\033]0;%s@%s:%s\007" "${USER}" "${HOSTNAME%%.*}" "${PWD/#$HOME/~}"``
```bash
if [ -z "$PROMPT_COMMAND" ]; then
case $TERM in
xterm*)
if [ -e /etc/sysconfig/bash-prompt-xterm ]; then
PROMPT_COMMAND=/etc/sysconfig/bash-prompt-xterm
else
PROMPT_COMMAND='printf "\033]0;%s@%s:%s\007" "${USER}" "${HOSTNAME%%.*}" "${PWD/#$HOME/~}"'
fi
;;
screen)
if [ -e /etc/sysconfig/bash-prompt-screen ]; then
PROMPT_COMMAND=/etc/sysconfig/bash-prompt-screen
else
PROMPT_COMMAND='printf "\033]0;%s@%s:%s\033\\" "${USER}" "${HOSTNAME%%.*}" "${PWD/#$HOME/~}"'
fi
;;
*)
[ -e /etc/sysconfig/bash-prompt-default ] && PROMPT_COMMAND=/etc/sysconfig/bash-prompt-default
;;
esac
fi
```
When an interactive shell is invoked, it executes commands from ``/etc/profile``, ``~/.bash_profile``, ``~/.bash_login``, and ``~/.profile``. The last three files does not exist.
``~/.bashrc`` is executed when the interactive shell is not a login shell. Hence, I added the following lines to ``~/.profile`` as it is executed by the command interpreter for login shell.
```bash
if [ -n "$BASH_VERSION" ]; then
if [ -f "$HOME/.bashrc" ]; then
. "$HOME/.bashrc"
fi
fi
```
Restart the shell and test. It is back to normal now and $PS1 is back to ``[\u@\h \W]\$``
```
[ec2-user@ip-xxx-xx-xx-xxx ~]$
```
Subscribe to:
Posts (Atom)