Monday, 24 February 2020
Building and pushing a docker image to Amazon ECR with GitHub Actions
GitHub Actions enables you to create custom software development life cycle (SDLC) workflows directly in your GitHub repository.
Workflows are custom automated processes that you can set up in your repository to build, test, package, release, or deploy any project on GitHub. With workflows you can automate your software development life cycle with a wide range of tools and services.
In this post, you'll learn how to use a GitHub Actions workflow to build and push a new container image to Amazon ECR upon code change.
You must store workflows in the ``.github/workflows`` directory in the root of your repository. The files are in ``.yml`` or ``.yaml`` format.
Let's create one called ``build.yml``.
The first part is the name of your workflow. It is used to display on your repository's actions page.
```
name: Building and pushing a docker image to Amazon ECR
```
The second part is ``on``, which is the name of the GitHub event triggering the workflow.
You can provide a single event
```
on: push
```
or a list of events
```
on: [push, pull_request]
```
We can also add more configurations. For example, we can specify activity types. The below example shows it triggers the workflow on push or pull request only for the master branch and for the paths under ``app/**``.
```
on:
pull_request:
paths:
- app/**
branches:
- master
push:
paths:
- app/**
branches:
- master
```
The next part is ``env``. We'll setup environment variables to provide configuration option and credentials via Github.
```
env:
AWS_DEFAULT_REGION: ap-southeast-1
AWS_DEFAULT_OUTPUT: json
AWS_ACCOUNT_ID: ${{ secrets.AWS_ACCOUNT_ID }}
AWS_ACCESS_KEY_ID: ${{ secrets.AWS_ACCESS_KEY_ID }}
AWS_SECRET_ACCESS_KEY: ${{ secrets.AWS_SECRET_ACCESS_KEY }}
CONTAINER_IMAGE: example-container:${{ github.sha }}
```
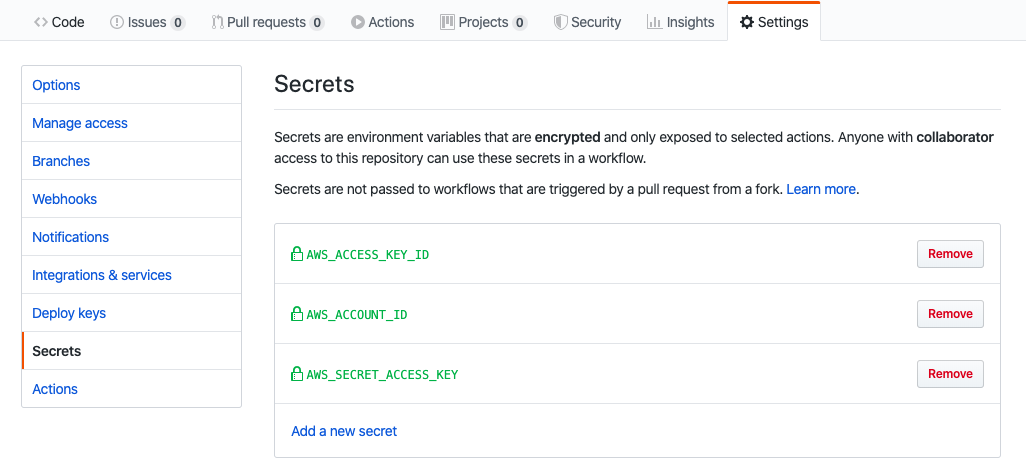
Go to Github, navigate to Settings in your repository. Click Secrets.
Add three new secrets namely ``AWS_ACCOUNT_ID``, ``AWS_ACCESS_KEY_ID``, and ``AWS_SECRET_ACCESS_KEY``.
A workflow run is made up of one or more jobs. They run in parallel by default. Each job runs in an environment specified by ``runs-on``.
A job contains a sequence of tasks called steps. Steps can run commands, run setup tasks, or run an action in your repository, a public repository, or an action published in a Docker registry.
```
jobs:
build-and-push:
name: Building and pushing image to AWS ECR
runs-on: ubuntu-latest
steps:
- name: Checkout
uses: actions/checkout@master
- name: Setup ECR
run: |
$( aws ecr get-login --no-include-email )
- name: Build and tag the image
run: |
docker build \
-t $CONTAINER_IMAGE \
-t $AWS_ACCOUNT_ID.dkr.ecr.$AWS_DEFAULT_REGION.amazonaws.com/$CONTAINER_IMAGE ./app
- name: Push
if: github.ref == 'refs/heads/master'
run: |
docker push $AWS_ACCOUNT_ID.dkr.ecr.$AWS_DEFAULT_REGION.amazonaws.com/$CONTAINER_IMAGE
```
Let's break it out. There is a job called ``build-and-push``. There are four steps running on a virtual environment which is Ubuntu 18.04.
The first step is to check out the master.
```
- name: Checkout
uses: actions/checkout@master
```
Then, we need to setup our Amazon ECR in order to push our image to it.
```
run: |
$( aws ecr get-login --no-include-email )
```
The third step is to build and tag the docker image. Notice that we are using the environment variables defined in ``env``.
```
- name: Build and tag the image
run: |
docker build \
-t $CONTAINER_IMAGE \
-t $AWS_ACCOUNT_ID.dkr.ecr.$AWS_DEFAULT_REGION.amazonaws.com/$CONTAINER_IMAGE ./app
```
The last step is to run ``docker push`` to push the image built in the previous step to Amazon ECR.
```
- name: Push
if: github.ref == 'refs/heads/master'
run: |
docker push $AWS_ACCOUNT_ID.dkr.ecr.$AWS_DEFAULT_REGION.amazonaws.com/$CONTAINER_IMAGE
```
Commit something under app directory and push the changes to master.
Navigate to Actions. You should see a workflow is being processed.

You can see the status or check the log for each step.
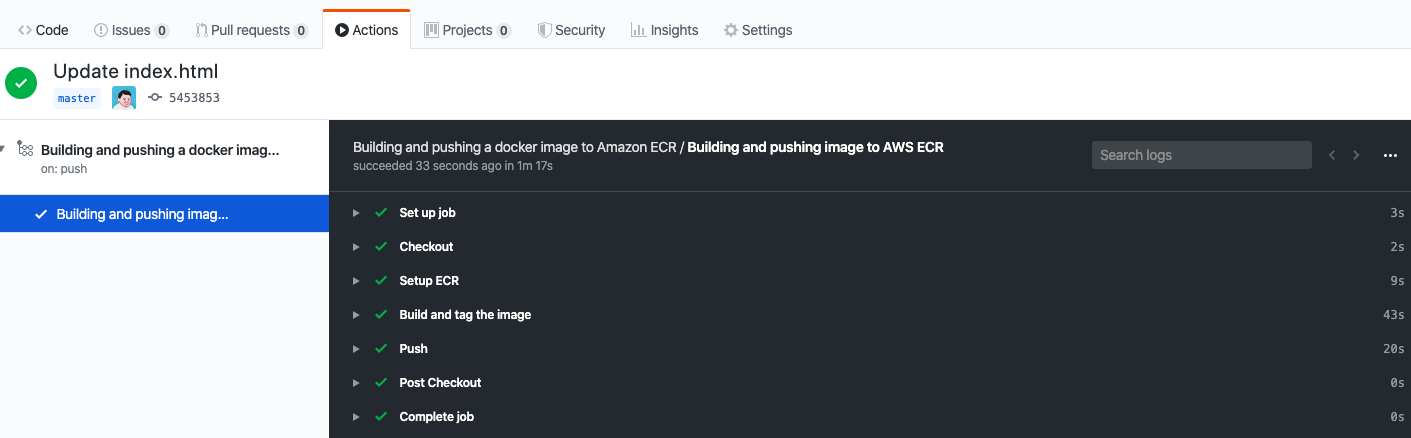
You can see the latest tag name when you expand ``Build and tag the image``.
```
Successfully built a1ffb1e3955b
Successfully tagged example-container:545385325b99e079cb7ee69d3809efd90cbffba9
Successfully tagged ***.dkr.ecr.ap-southeast-1.amazonaws.com/example-container:545385325b99e079cb7ee69d3809efd90cbffba9
```
Go to AWS ECR Console, you should see the image there.
That's it. Here's the complete build yaml file.
```
name: Building and pushing a docker image to Amazon ECR
on:
pull_request:
paths:
- app/**
branches:
- master
push:
paths:
- app/**
branches:
- master
env:
AWS_DEFAULT_REGION: ap-southeast-1
AWS_DEFAULT_OUTPUT: json
AWS_ACCOUNT_ID: ${{ secrets.AWS_ACCOUNT_ID }}
AWS_ACCESS_KEY_ID: ${{ secrets.AWS_ACCESS_KEY_ID }}
AWS_SECRET_ACCESS_KEY: ${{ secrets.AWS_SECRET_ACCESS_KEY }}
CONTAINER_IMAGE: example-container:${{ github.sha }}
jobs:
build-and-push:
name: Building and pushing image to AWS ECR
runs-on: ubuntu-latest
steps:
- name: Checkout
uses: actions/checkout@master
- name: Setup ECR
run: |
$( aws ecr get-login --no-include-email )
- name: Build and tag the image
run: |
docker build \
-t $CONTAINER_IMAGE \
-t $AWS_ACCOUNT_ID.dkr.ecr.$AWS_DEFAULT_REGION.amazonaws.com/$CONTAINER_IMAGE ./app
- name: Push
if: github.ref == 'refs/heads/master'
run: |
docker push $AWS_ACCOUNT_ID.dkr.ecr.$AWS_DEFAULT_REGION.amazonaws.com/$CONTAINER_IMAGE
```
For more, please check out [GitHub Actions Documentation](https://help.github.com/en/actions)
Saturday, 22 February 2020
Kubernetes Application Bible for Developers
This is a bible for certified Kubernetes application developers. It covers the features and how to design and build applications to run on Kubernetes.
> Updates on 22 Feb 2020
- Updated version to 1.17.3-00 for kubelet, kubeadm and kubectl
- Updated kube-flannel as ``extensions/v1beta1`` was removed
# Creating a cluster
```bash
# Setup Docker & Kubernetes repositories
curl -fsSL https://download.docker.com/linux/ubuntu/gpg | sudo apt-key add -
sudo add-apt-repository "deb [arch=amd64] https://download.docker.com/linux/ubuntu \
$(lsb_release -cs) \
stable"
curl -s https://packages.cloud.google.com/apt/doc/apt-key.gpg | sudo apt-key add -
cat << EOF | sudo tee /etc/apt/sources.list.d/kubernetes.list
deb https://apt.kubernetes.io/ kubernetes-xenial main
EOF
# Install Docker & Kubernetes
sudo apt-get update
sudo apt-get install -y docker-ce=18.06.1~ce~3-0~ubuntu kubelet=1.17.3-00 kubeadm=1.17.3-00 kubectl=1.17.3-00
sudo apt-mark hold docker-ce kubelet kubeadm kubectl
# Enable iptables bridge call
echo "net.bridge.bridge-nf-call-iptables=1" | sudo tee -a /etc/sysctl.conf
# Make that change take effect immediately
sudo sysctl -p
```
## Setting up the Kube master server
```bash
# Initalize the cluster
sudo kubeadm init --pod-network-cidr=10.244.0.0/16
# Setup local kube config
mkdir -p $HOME/.kube
sudo cp -i /etc/kubernetes/admin.conf $HOME/.kube/config
sudo chown $(id -u):$(id -g) $HOME/.kube/config
# Install Flannel networking
kubectl apply -f https://raw.githubusercontent.com/coreos/flannel/master/Documentation/kube-flannel.yml
```
## Setting up the Kube node server
```bash
# The command is part of output of kubeadm init running on your master
sudo kubeadm join $controller_private_ip:6443 --token $token --discovery-token-ca-cert-hash $hash
```
# Working with Kubernetes Objects
> Kubernetes Objects are persistent entities in the Kubernetes system. Kubernetes uses these entities to represent the state of your cluster.
Ref: [https://kubernetes.io/docs/concepts/overview/working-with-objects/kubernetes-objects/](https://kubernetes.io/docs/concepts/overview/working-with-objects/kubernetes-objects/)
List all the object types
```
kubectl api-resources -o name
```
```bash
# Some examples
Pod
Node
Service
ServiceAccount
...
```
Example of a Kubernetes Object : deployment.yml
```
apiVersion: apps/v1
kind: Deployment
metadata:
name: nginx-deployment
spec:
selector:
matchLabels:
app: nginx
replicas: 2 # tells deployment to run 2 pods matching the template
template:
metadata:
labels:
app: nginx
spec:
containers:
- name: nginx
image: nginx:1.7.9
ports:
- containerPort: 80
```
Use ``kubectl apply``
```
kubectl apply -f deployment.yml --record
```
# Working with Pods
> A Pod is the basic execution unit of a Kubernetes application–the smallest and simplest unit in the Kubernetes object model that you create or deploy. A Pod represents processes running on your Cluster.
Ref: [https://kubernetes.io/docs/concepts/workloads/pods/pod-overview/](https://kubernetes.io/docs/concepts/workloads/pods/pod-overview/)
Example of pod definition: my-pod.yml
```yml
apiVersion: v1
kind: Pod
metadata:
name: myapp-pod
labels:
app: myapp
spec:
containers:
- name: myapp-container
image: busybox
command: ['sh', '-c', 'echo Hello Kubernetes! && sleep 3600']
```
```bash
# Create a pod from the definition file in yaml format
kubectl create -f my-pod.yml
# Edit a pod and re-apply a pod definition
kubectl apply -f my-pod.yml
# Another way to edit a pod (Changes will be taken effect immediately)
kubectl edit pod my-pod
# Delete a pod
kubectl delete pod my-pod
```
# Working with Namespace
> Kubernetes supports multiple virtual clusters backed by the same physical cluster. These virtual clusters are called namespaces.
Ref: [https://kubernetes.io/docs/concepts/overview/working-with-objects/namespaces/](https://kubernetes.io/docs/concepts/overview/working-with-objects/namespaces/)
By default, a Kubernetes cluster will instantiate a default namespace.
```
NAME STATUS AGE
default Active 13m
```
Create a namespace
```
kubectl create ns development
```
Spcify a namespace in ``metadata.namespace`` attribute
```
apiVersion: v1
kind: Pod
metadata:
name: my-pod
namespace: my-namespace
labels:
app: myapp
spec:
containers:
- name: myapp-container
image: busybox
command: ['sh', '-c', 'echo Hello World! && sleep 3600']
```
```
kubectl create -f my-namespace.yml
```
Get a list of the namespaces in the cluster
```
kubectl get namespaces
```
```
NAME STATUS AGE
development Active 5m
default Active 1d
kube-system Active 1d
kube-public Active 1d
```
Specify a namespace when using ``kubectl get``
```
kubectl get pods -n my-namespace
```
Specify a namespace when using ``kubectl describe``
```
kubectl describe pod my-pod -n my-namespace
```
# Working with ConfigMaps
> ConfigMaps allow you to decouple configuration artifacts from image content to keep containerized applications portable.
Ref: [https://kubernetes.io/docs/tasks/configure-pod-container/configure-pod-configmap/](https://kubernetes.io/docs/tasks/configure-pod-container/configure-pod-configmap/)
## Consuming ConfigMap as Environment Variables
```
apiVersion: v1
kind: ConfigMap
metadata:
name: my-config-map
data:
myKey: myValue
anotherKey: anotherValue
```
```
apiVersion: v1
kind: Pod
metadata:
name: my-configmap-pod
spec:
containers:
- name: myapp-container
image: busybox
command: ['sh', '-c', "echo $(MY_VAR) && sleep 3600"]
env:
- name: MY_VAR
valueFrom:
configMapKeyRef:
name: my-config-map
key: myKey
```
## Consuming ConfigMap as Mounted Volume
```
apiVersion: v1
kind: Pod
metadata:
name: my-configmap-volume-pod
spec:
containers:
- name: myapp-container
image: busybox
command: ['sh', '-c', "echo $(cat /etc/config/myKey) && sleep 3600"]
volumeMounts:
- name: config-volume
mountPath: /etc/config
volumes:
- name: config-volume
configMap:
name: my-config-map
```
# Working with SecurityContexts
> A security context defines privilege and access control settings for a Pod or Container.
Ref: [https://kubernetes.io/docs/tasks/configure-pod-container/security-context/](https://kubernetes.io/docs/tasks/configure-pod-container/security-context/)
```
apiVersion: v1
kind: Pod
metadata:
name: my-securitycontext-pod
spec:
securityContext:
runAsUser: 2001
fsGroup: 3001
containers:
- name: myapp-container
image: busybox
command: ['sh', '-c', "cat /message/message.txt && sleep 3600"]
volumeMounts:
- name: message-volume
mountPath: /message
volumes:
- name: message-volume
hostPath:
path: /etc/message
```
# Working with Resource Requests
> When you specify a Pod, you can optionally specify how much CPU and memory (RAM) each Container needs. When Containers have resource requests specified, the scheduler can make better decisions about which nodes to place Pods on. And when Containers have their limits specified, contention for resources on a node can be handled in a specified manner. For more details about the difference between requests and limits, see [Resource QoS](https://git.k8s.io/community/contributors/design-proposals/node/resource-qos.md).
Ref: [https://kubernetes.io/docs/concepts/configuration/manage-compute-resources-container/#resource-requests-and-limits-of-pod-and-container](https://kubernetes.io/docs/concepts/configuration/manage-compute-resources-container/#resource-requests-and-limits-of-pod-and-container)
```
apiVersion: v1
kind: Pod
metadata:
name: my-resource-pod
spec:
containers:
- name: myapp-container
image: busybox
command: ['sh', '-c', 'echo Hello Kubernetes! && sleep 3600']
resources:
requests:
memory: "64Mi"
cpu: "250m"
limits:
memory: "128Mi"
cpu: "500m"
```
# Working with Secrets
> Kubernetes secret objects let you store and manage sensitive information, such as passwords, OAuth tokens, and ssh keys. Putting this information in a secret is safer and more flexible than putting it verbatim in a Pod definition or in a container image.
Ref: [https://kubernetes.io/docs/concepts/configuration/secret/](https://kubernetes.io/docs/concepts/configuration/secret/)
Create a secret using a yaml definition
```
apiVersion: v1
kind: Secret
metadata:
name: my-secret
stringData:
username: YWRtaW4=
password: MWYyZDFlMmU2N2Rm
```
For best practice, delete the definition after you create it
```bash
kubectl apply -f my-secret.yml
rm my-secret.yml
```
Pass the sensitive data to containers as an environment variable
```
apiVersion: v1
kind: Pod
metadata:
name: my-secret-pod
spec:
containers:
- name: myapp-container
image: busybox
command: ['sh', '-c', "echo Hello, Kubernetes! && sleep 3600"]
env:
- name: SECRET_USERNAME
valueFrom:
secretKeyRef:
name: mysecret
key: username
- name: SECRET_PASSWORD
valueFrom:
secretKeyRef:
name: mysecret
key: password
```
# Working with ServiceAccounts
> A service account provides an identity for processes that run in a Pod.
Ref:
- [https://kubernetes.io/docs/tasks/configure-pod-container/configure-service-account/](https://kubernetes.io/docs/tasks/configure-pod-container/configure-service-account/)
- [https://kubernetes.io/docs/reference/access-authn-authz/service-accounts-admin/](https://kubernetes.io/docs/reference/access-authn-authz/service-accounts-admin/)
Create a ServiceAccount
```bash
kubectl create serviceaccount my-serviceaccount
```
```
apiVersion: v1
kind: Pod
metadata:
name: my-serviceaccount-pod
spec:
serviceAccountName: my-serviceaccount
containers:
- name: myapp-container
image: busybox
command: ['sh', '-c', "echo Hello, Kubernetes! && sleep 3600"]
```
# Working with Multi-Container Pods
> Multi-container pods provide an opportunity to enhance containers with helper containers that provide additional functionality
Ref:
- [https://kubernetes.io/docs/concepts/cluster-administration/logging/#using-a-sidecar-container-with-the-logging-agent](https://kubernetes.io/docs/concepts/cluster-administration/logging/#using-a-sidecar-container-with-the-logging-agent)
- [https://kubernetes.io/docs/tasks/access-application-cluster/communicate-containers-same-pod-shared-volume/](https://kubernetes.io/docs/tasks/access-application-cluster/communicate-containers-same-pod-shared-volume/)
- [https://kubernetes.io/docs/tasks/access-application-cluster/communicate-containers-same-pod-shared-volume/](https://kubernetes.io/docs/tasks/access-application-cluster/communicate-containers-same-pod-shared-volume/)
```
apiVersion: v1
kind: Pod
metadata:
name: multi-container-pod
spec:
containers:
- name: nginx
image: nginx:1.15.8
ports:
- containerPort: 80
- name: busybox-sidecar
image: busybox
command: ['sh', '-c', 'while true; do sleep 30; done;']
```
# Working with Probes
> A Probe is a diagnostic performed periodically by the kubelet on a Container.
``livenessProbe``: Indicates whether the Container is running. If the liveness probe fails, the kubelet kills the Container, and the Container is subjected to its restart policy. If a Container does not provide a liveness probe, the default state is Success.
```
apiVersion: v1
kind: Pod
metadata:
labels:
test: liveness
name: liveness-exec
spec:
containers:
- name: liveness
image: k8s.gcr.io/busybox
args:
- /bin/sh
- -c
- touch /tmp/healthy; sleep 30; rm -rf /tmp/healthy; sleep 600
livenessProbe:
exec:
command:
- cat
- /tmp/healthy
initialDelaySeconds: 5
periodSeconds: 5
```
``readinessProbe``: Indicates whether the Container is ready to service requests. If the readiness probe fails, the endpoints controller removes the Pod’s IP address from the endpoints of all Services that match the Pod. The default state of readiness before the initial delay is Failure. If a Container does not provide a readiness probe, the default state is Success.
```
apiVersion: v1
kind: Pod
metadata:
labels:
test: liveness
name: liveness-exec
spec:
containers:
- name: liveness
image: k8s.gcr.io/busybox
args:
- /bin/sh
- -c
- touch /tmp/healthy; sleep 30; rm -rf /tmp/healthy; sleep 600
readinessProbe:
exec:
command:
- cat
- /tmp/healthy
initialDelaySeconds: 5
periodSeconds: 5
```
``startupProbe``: Indicates whether the application within the Container is started. All other probes are disabled if a startup probe is provided, until it succeeds. If the startup probe fails, the kubelet kills the Container, and the Container is subjected to its restart policy. If a Container does not provide a startup probe, the default state is Success.
```
apiVersion: v1
kind: Pod
metadata:
labels:
test: liveness
name: liveness-exec
spec:
containers:
- name: liveness
image: k8s.gcr.io/busybox
args:
- /bin/sh
- -c
- touch /tmp/healthy; sleep 30; rm -rf /tmp/healthy; sleep 600
startupProbe:
httpGet:
path: /healthz
port: liveness-port
failureThreshold: 30
periodSeconds: 10
```
Ref:
- [https://kubernetes.io/docs/concepts/workloads/pods/pod-lifecycle/#container-probes](https://kubernetes.io/docs/concepts/workloads/pods/pod-lifecycle/#container-probes)
- [https://kubernetes.io/docs/tasks/configure-pod-container/configure-liveness-readiness-probes/](https://kubernetes.io/docs/tasks/configure-pod-container/configure-liveness-readiness-probes/)
- [https://kubernetes.io/docs/tasks/configure-pod-container/configure-liveness-readiness-startup-probes/](https://kubernetes.io/docs/tasks/configure-pod-container/configure-liveness-readiness-startup-probes/)
# Working with Container Logging
Ref: [https://kubernetes.io/docs/concepts/cluster-administration/logging/](https://kubernetes.io/docs/concepts/cluster-administration/logging/)
Get the container's logs
```
kubectl logs
```
Get the specfic container's logs in a multi-container pod
```
kubectl logs -c
```
```
kubectl logs >
```
# Working with Monitoring Applications
Ref: [https://kubernetes.io/docs/tasks/debug-application-cluster/resource-usage-monitoring/](https://kubernetes.io/docs/tasks/debug-application-cluster/resource-usage-monitoring/)
```bash
# Get resource usage for all pods in the default namespace
kubectl top pods
# Get resource usage for a single pod
kubectl top pod
# Get resource usage for all pods in a specific namespace
kubectl top pods -n kube-system
# Get resource usage for nodes
kubectl top nodes
```
# Working with Labels, Selectors and Annotations
Ref:
- [https://kubernetes.io/docs/concepts/overview/working-with-objects/labels/](https://kubernetes.io/docs/concepts/overview/working-with-objects/labels/)
- [https://kubernetes.io/docs/concepts/overview/working-with-objects/annotations/](https://kubernetes.io/docs/concepts/overview/working-with-objects/annotations/)
```
apiVersion: v1
kind: Pod
metadata:
name: my-production-label-pod
labels:
app: my-app
environment: production
spec:
containers:
- name: nginx
image: nginx
```
```
apiVersion: v1
kind: Pod
metadata:
name: my-development-label-pod
labels:
app: my-app
environment: development
spec:
containers:
- name: nginx
image: nginx
```
```bash
# show labels for each pods
kubectl get pods --show-labels
# get pods using equality-based selectors
kubectl get pods -l environment=production
kubectl get pods -l environment=development
# get pods using inequality-based selectors
kubectl get pods -l environment!=production
# get pods using set-based selectors
kubectl get pods -l 'environment in (development,production)'
# get pods using chained multiple selectors with a comma-delimited list
kubectl get pods -l app=my-app,environment=production
# to view existing labels and annotations
kubectl describe pod
```
# Working with Deployment
> A Deployment provides declarative updates for Pods and ReplicaSets. You describe a desired state in a Deployment, and the Deployment Controller changes the actual state to the desired state at a controlled rate. You can define Deployments to create new ReplicaSets, or to remove existing Deployments and adopt all their resources with new Deployments.
Ref: [https://kubernetes.io/docs/concepts/workloads/controllers/deployment/](https://kubernetes.io/docs/concepts/workloads/controllers/deployment/)
```
apiVersion: apps/v1
kind: Deployment
metadata:
name: nginx-deployment
spec:
replicas: 3
selector:
matchLabels:
app: nginx
template:
metadata:
labels:
app: nginx
spec:
containers:
- name: nginx
image: nginx:1.7.9
ports:
- containerPort: 80
```
```
kubectl get deployments
kubectl get deployment
kubectl describe deployment
kubectl edit deployment
kubectl delete deployment
```
# Working with Rolling Update
```
apiVersion: apps/v1
kind: Deployment
metadata:
name: rolling-deployment
spec:
replicas: 3
selector:
matchLabels:
app: nginx
template:
metadata:
labels:
app: nginx
spec:
containers:
- name: nginx
image: nginx:1.7.1
ports:
- containerPort: 80
```
```bash
# Perform a rolling update
kubectl set image deployment/rolling-deployment nginx=nginx:1.7.9 --record
# Explore the rollout history of the deployment
kubectl rollout history deployment/rolling-deployment
kubectl rollout history deployment/rolling-deployment --revision=2
# Roll back to the previous revision
kubectl rollout undo deployment/rolling-deployment
# Roll back to a specific earlier revision by providing the revision number
kubectl rollout undo deployment/rolling-deployment --to-revision=1
```
Proportional scaling by setting ``maxSurge`` and ``maxUnavailable`` in the deployment spec
```
spec:
strategy:
rollingUpdate:
maxSurge: 3
maxUnavailable: 2
```
# Working with Jobs and CronJobs
Ref:
- [https://kubernetes.io/docs/concepts/workloads/controllers/jobs-run-to-completion/](https://kubernetes.io/docs/concepts/workloads/controllers/jobs-run-to-completion/)
- [https://kubernetes.io/docs/concepts/workloads/controllers/cron-jobs/](https://kubernetes.io/docs/concepts/workloads/controllers/cron-jobs/)
- [https://kubernetes.io/docs/tasks/job/automated-tasks-with-cron-jobs/](https://kubernetes.io/docs/tasks/job/automated-tasks-with-cron-jobs/)
This job calculates the first 2000 digits of pi
```
apiVersion: batch/v1
kind: Job
metadata:
name: pi
spec:
template:
spec:
containers:
- name: pi
image: perl
command: ["perl", "-Mbignum=bpi", "-wle", "print bpi(2000)"]
restartPolicy: Never
backoffLimit: 4
```
Check the status of Jobs. It may take several seconds to finish.
```bash
kubectl get jobs
```
By running ``kubectl get pods``, you should see a new pod with STATUS ``Completed``
```bash
kubectl get pods
```
Check the output
```bash
kubectl logs
```
A cronjob example
```
apiVersion: batch/v1beta1
kind: CronJob
metadata:
name: hello
spec:
schedule: "*/1 * * * *"
jobTemplate:
spec:
template:
spec:
containers:
- name: hello
image: busybox
args:
- /bin/sh
- -c
- date; echo Hello from the Kubernetes cluster
restartPolicy: OnFailure
```
List and check the status of CronJobs
```bash
kubectl get cronjobs
```
# Working with Services
Ref:
- [https://kubernetes.io/docs/concepts/services-networking/service/](https://kubernetes.io/docs/concepts/services-networking/service/)
- [https://kubernetes.io/docs/tutorials/kubernetes-basics/expose/expose-intro/](https://kubernetes.io/docs/tutorials/kubernetes-basics/expose/expose-intro/)
```
apiVersion: apps/v1
kind: Deployment
metadata:
name: nginx-deployment
spec:
replicas: 3
selector:
matchLabels:
app: nginx
template:
metadata:
labels:
app: nginx
spec:
containers:
- name: nginx
image: nginx:1.7.9
ports:
- containerPort: 80
```
```
apiVersion: apps/v1
kind: Deployment
metadata:
name: nginx-deployment
spec:
replicas: 3
selector:
matchLabels:
app: nginx
template:
metadata:
labels:
app: nginx
spec:
containers:
- name: nginx
image: nginx:1.7.9
ports:
- containerPort: 80
```
```bash
# Get services
kubectl get svc
# Get endpoints
kubectl get endpoints my-service
```
# Working with Network Policies
> A network policy is a specification of how groups of pods are allowed to communicate with each other and other network endpoints.
Ref: [https://kubernetes.io/docs/concepts/services-networking/network-policies/](https://kubernetes.io/docs/concepts/services-networking/network-policies/)
In order to use NetworkPolicies in the cluster, we need to have a network plugin called ``canal``
```
wget -O canal.yaml https://docs.projectcalico.org/v3.5/getting-started/kubernetes/installation/hosted/canal/canal.yaml
kubectl apply -f canal.yaml
```
Create a sample nginx pod
```
apiVersion: v1
kind: Pod
metadata:
name: network-policy-secure-pod
labels:
app: secure-app
spec:
containers:
- name: nginx
image: nginx
ports:
- containerPort: 80
```
Create a client pod used to test network access to the nginx pod
```
apiVersion: v1
kind: Pod
metadata:
name: network-policy-client-pod
spec:
containers:
- name: busybox
image: radial/busyboxplus:curl
command: ["/bin/sh", "-c", "while true; do sleep 3600; done"]
```
Get the cluster ip address of the nginx pod
```
kubectl get pod network-policy-secure-pod -o wide
```
By executing the below command, you should see the network is accessible
```
kubectl exec network-policy-client-pod -- curl
```
Create a network policy to restricts all access to the secure pod except pods with ``allow-access: "true"`` label
```
apiVersion: networking.k8s.io/v1
kind: NetworkPolicy
metadata:
name: my-network-policy
spec:
podSelector:
matchLabels:
app: secure-app
policyTypes:
- Ingress
- Egress
ingress:
- from:
- podSelector:
matchLabels:
allow-access: "true"
ports:
- protocol: TCP
port: 80
egress:
- to:
- podSelector:
matchLabels:
allow-access: "true"
ports:
- protocol: TCP
port: 80
```
Apply before network policy and execute the curl command again, you should see the network is not accessible
```
kubectl exec network-policy-client-pod -- curl
```
Get more info about NetworkPolicy in the cluster
```
kubectl get networkpolicies
kubectl describe networkpolicy my-network-policy
```
Edit the client pod
```
kubectl edit pod network-policy-client-pod
```
under metadata, add
```
labels:
allow-access: "true"
```
Re-run the curl command again, the secure pod is accessible from the client pod
# Working with Volumes
> On-disk files in a Container are ephemeral, which presents some problems for non-trivial applications when running in Containers. First, when a Container crashes, kubelet will restart it, but the files will be lost - the Container starts with a clean state. Second, when running Containers together in a Pod it is often necessary to share files between those Containers. The Kubernetes Volume abstraction solves both of these problems.
Ref: [https://kubernetes.io/docs/concepts/storage/volumes/](https://kubernetes.io/docs/concepts/storage/volumes/)
```
apiVersion: v1
kind: Pod
metadata:
name: volume-pod
spec:
containers:
- image: busybox
name: busybox
command: ["/bin/sh", "-c", "while true; do sleep 3600; done"]
volumeMounts:
- mountPath: /tmp/storage
name: my-volume
volumes:
- name: my-volume
emptyDir: {}
```
# Working with PersistentVolumes and PersistentVolumeClaims
> PersistentVolumes (PVs) and PersistentVolumeClaims (PVCs) provide a way to easily consume storage resources, especially in the context of a complex production environment that uses multiple storage solutions.
Ref:
- [https://kubernetes.io/docs/concepts/storage/persistent-volumes/](https://kubernetes.io/docs/concepts/storage/persistent-volumes/)
- [https://kubernetes.io/docs/tasks/configure-pod-container/configure-persistent-volume-storage/](https://kubernetes.io/docs/tasks/configure-pod-container/configure-persistent-volume-storage/)
```
kind: PersistentVolume
apiVersion: v1
metadata:
name: my-pv
spec:
storageClassName: local-storage
capacity:
storage: 1Gi
accessModes:
- ReadWriteOnce
hostPath:
path: "/mnt/data"
```
```
apiVersion: v1
kind: PersistentVolumeClaim
metadata:
name: my-pvc
spec:
storageClassName: local-storage
accessModes:
- ReadWriteOnce
resources:
requests:
storage: 512Mi
```
```
kubectl get pv
kubectl get pvc
```
```
kind: Pod
apiVersion: v1
metadata:
name: my-pvc-pod
spec:
containers:
- name: busybox
image: busybox
command: ["/bin/sh", "-c", "while true; do sleep 3600; done"]
volumeMounts:
- mountPath: "/mnt/storage"
name: my-storage
volumes:
- name: my-storage
persistentVolumeClaim:
claimName: my-pvc
```
Wednesday, 19 February 2020
Merging Multiple Worksheets into a Single Worksheet in Excel
Recently, we got a dozen of worksheets, which are some mappings that need to be loaded into Oracle Database, from clients intermittently. We need a macro to merge those worksheets together and save as a master csv file.
First, let's declare a public subroute and call it as PopulateSummary
```
Public Sub PopulateSummary()
```
Then, declare some variables that will be used later one
```
Dim ws As Worksheet
Dim SumWs As Worksheet
Dim no_of_ws As Integer
Dim i As Integer
Dim x As Integer
Dim y As Long
Dim LastCol As Integer
Dim CurR As Long
Dim hdrC As Integer
```
Since we don't know how many worksheets we have each time, we get the number dynamically and we will loop through each worksheet.
```
no_of_ws = ActiveWorkbook.Worksheets.count
For i = 1 To no_of_ws
' TODO
next i
```
All the data will be merged to a new sheet called Summary. We need to make sure that the sheet exists beforehand.
```
Set SumWs = ActiveWorkbook.Worksheets("Summary")
If SumWs Is Nothing Then
Debug.Print "Summary Worksheet not found"
Else
' TODO
End If
```
Inside the Else block, we loop through each cell and set the value to the Summary worksheet. Since our data starts from row 3, we set y to 3.
```
Set ws = ActiveWorkbook.Worksheets(i)
LastCol = 1
Do Until ws.Cells(1, LastCol).Value = ""
LastCol = LastCol + 1
Loop
LastCol = LastCol - 1
y = 3
Do Until ws.Cells(y, LastCol).Value = ""
x = 1
hdrC = 1
Do Until x > LastCol
Do Until SumWs.Cells(1, hdrC).Value = ""
If SumWs.Cells(1, hdrC).Value = ws.Cells(1, x).Value Then
SumWs.Cells(CurR, hdrC) = ws.Cells(y, x).Value
Exit Do
End If
hdrC = hdrC + 1
Loop
x = x + 1
Loop
y = y + 1
CurR = CurR + 1
Loop
```
Here's the full subroute:
```
Public Sub PopulateSummary()
Dim ws As Worksheet
Dim SumWs As Worksheet
Dim no_of_ws As Integer
Dim i As Integer
Dim x As Integer
Dim y As Long
Dim LastCol As Integer
Dim CurR As Long
Dim hdrC As Integer
no_of_ws = ActiveWorkbook.Worksheets.count
CurR = 2
For i = 1 To no_of_ws
Set SumWs = ActiveWorkbook.Worksheets("Summary")
If SumWs Is Nothing Then
Debug.Print "Summary Worksheet not found"
Else
Set ws = ActiveWorkbook.Worksheets(i)
LastCol = 1
Do Until ws.Cells(1, LastCol).Value = ""
LastCol = LastCol + 1
Loop
LastCol = LastCol - 1
y = 3
Do Until ws.Cells(y, LastCol).Value = ""
x = 1
hdrC = 1
Do Until x > LastCol
Do Until SumWs.Cells(1, hdrC).Value = ""
If SumWs.Cells(1, hdrC).Value = ws.Cells(1, x).Value Then
SumWs.Cells(CurR, hdrC) = ws.Cells(y, x).Value
Exit Do
End If
hdrC = hdrC + 1
Loop
x = x + 1
Loop
y = y + 1
CurR = CurR + 1
Loop
End If
Next i
End Sub
```
After running it, it is extremely slow when there are dozens of worksheets and it takes around 45 mintues to generate a merged worksheet. This is because we copy each cell one by one. If there are X worksheets with Y rows and Z columns, basically it will copy X*Y*Z times. The cost is pretty high.
Let's revamp the code.
Sometimes we turn on filtering for the selected cells. If the worksheet is actively filtering data, we make it visible.
```
If ws.FilterMode Then
ws.ShowAllData
End If
```
Then, we can use the constants ``xlToRight`` and ``xlDown`` to find out the last column and the last row.
```
LastCol = ws.Cells(1, 1).End(xlToRight).Column
LastRow = ws.Cells(1, 1).End(xlDown).Row
```
Instead of copying each cell one by one
```
SumWs.Cells(CurR, hdrC) = ws.Cells(y, x).Value
```
We copy the whole row instead
```
ws.Range(ws.Cells(3, x).Address, ws.Cells(LastRow, x).Address).Copy
SumWs.Cells(TotalNoRow, hdrC).PasteSpecial xlPasteValues
```
Here's the full revamped subroute:
```
Public Sub PopulateSummary()
Dim ws As Worksheet
Dim SumWs As Worksheet
Dim no_of_ws As Integer
Dim i As Integer
Dim x As Integer
Dim y As Long
Dim LastCol As Integer
Dim LastRow As Long
Dim CurR As Long
Dim hdrC As Integer
Dim TotalNoRow As Long
no_of_ws = ActiveWorkbook.Worksheets.Count
TotalNoRow = 2
For i = 1 To no_of_ws
Set ws = ActiveWorkbook.Worksheets(i)
Set SumWs = ActiveWorkbook.Worksheets("Summary")
If SumWs Is Nothing Then
Debug.Print "Summary Worksheet not found"
Else
LastCol = 1
If ws.FilterMode Then
ws.ShowAllData
End If
LastCol = ws.Cells(1, 1).End(xlToRight).Column
LastRow = ws.Cells(1, 1).End(xlDown).Row
x = 1
hdrC = 1
If LastRow > 2 Then
Do Until x > LastCol
Do Until SumWs.Cells(1, hdrC).Value = ""
If SumWs.Cells(1, hdrC).Value = ws.Cells(1, x).Value Then
ws.Range(ws.Cells(3, x).Address, ws.Cells(LastRow, x).Address).Copy
SumWs.Cells(TotalNoRow, hdrC).PasteSpecial xlPasteValues
Exit Do
End If
hdrC = hdrC + 1
Loop
x = x + 1
Loop
TotalNoRow = TotalNoRow + LastRow - 2
End If
End If
Next i
End Sub
```
That's it. By running the macro with the same dataset, the data from dozens of worksheets can be merged into one single worksheet within seconds.
Friday, 14 February 2020
Cross-Origin Resource Sharing (CORS) support for Gin
[gin](https://github.com/gin-gonic/gin) is a popular HTTP web framework written in Go. I've worked with a few people using it to build restful APIs. When the frontend side sends an Ajax request to their backend endpoint from my localhost, it shows the following error message:
```
Access to XMLHttpRequest at 'http:///?_=1575637880588' from origin 'http://localhost:3000' has been blocked by CORS policy: Response to preflight request doesn't pass access control check: No 'Access-Control-Allow-Origin' header is present on the requested resource.
```
This security risk is only considered by webkit based browsers like Chrome or Safari and they block ajax queries. If you use Firefox, you can get rid of it. If Chrome is your only browser, you use start with your Chrome with the ``--disable-web-security`` flag.
As the resources are requested by Ajax, it by default forbids same-origin security policy. That means the resources you request and the first page you access must be in the same origin.
The fix is pretty simple and it is quite clear to state that No 'Access-Control-Allow-Origin' header is present on the requested resource. In gin's world, we just need to add a middleware.
```
go get github.com/gin-contrib/cors
```
```
import "github.com/gin-contrib/cors"
```
You may use the ``DefaultConfig`` as a starting point. By default, no origin is allowed for GET, POST, PUT and HEAD methods. Credentials share is disabled the preflight requests is cached for 12 hours.
```
func main() {
router := gin.Default()
config := cors.DefaultConfig()
config.AllowOrigins = []string{"http://foo.com"}
router.Use(cors.New(config))
router.Run()
}
```
It can also allow all origins, which I personally don't recommend as you should create a whitelist to indicates which origins are allowed for best practice.
```
func main() {
router := gin.Default()
router.Use(cors.Default())
router.Run()
}
```
Subscribe to:
Posts (Atom)