Friday, 29 November 2019
Relocate Golang Boilerplate Packages using Makefile
Supposing you've found a golang boilerplate and you want to relocate the project under your name. Here's a makefile to help you do so.
> Note: A makefile is a file containing a set of directives used by a make build automation tool to generate a target/goal.
First, let's declare some variables for further use.
```makefile
GITHUB := "github.com"
PROJECTNAME := $(shell basename "$(PWD)")
PACKAGENAME := $(GITHUB)/$(shell basename "$(shell dirname "$(PWD)")")/$(PROJECTNAME)
GOBASE := $(shell pwd)
```
A code snippet for running coverage tests is shown below. It is triggered by running ``make test``
```makefile
.PHONY .SILENT: test
## test: Run coverage tests
test:
# Example: make test
@echo " *** Running Coverage Tests ***"
$(GOBASE)/test.sh
@echo " *** Completed *** "
```
The author has built a shell script to handle the coverage tests. Here we just need to call ``test.sh``
A simple test is required to see if a target path is provided or not. A sample usage would be ``make relocate TARGET=github.com/wingkwong/myproject``
```makefile
@test ${TARGET} || ( echo ">> TARGET is not set. Use: make relocate TARGET="; exit 1 )
```
Then, we need to have our variables escaped as we will to sed to perform the replacement
```makefile
$(eval ESCAPED_PACKAGENAME := $(shell echo "${PACKAGENAME}" | sed -e 's/[\/&]/\\&/g'))
$(eval ESCAPED_PROJECTNAME := $(shell echo "${PROJECTNAME}" | sed -e 's/[\/&]/\\&/g'))
$(eval ESCAPED_TARGET_PACKAGENAME := $(shell echo "${TARGET}" | sed -e 's/[\/&]/\\&/g'))
$(eval ESCAPED_TARGET_PROJECTNAME := $(shell basename "$(shell dirname ${TARGET})" | sed -e 's/[\/&]/\\&/g'))
$(eval ESCAPED_PARENT_DIRECTORY:= $(shell cd ../ && pwd | sed -e 's/[\/&]/\\&/g'))
$(eval ESCAPED_PARENT_DIRECTORYNAME:= $(shell basename $(ESCAPED_PARENT_DIRECTORY)))
```
We need to replace the package name ``github.com/author/project`` with the desired one.
```makefile
@grep -rlI '${PACKAGENAME}' --include=*.go ./ | xargs -I@ sed -i '' 's/${ESCAPED_PACKAGENAME}/${ESCAPED_TARGET_PACKAGENAME}/g' @
```
We also need to replace the project name ``project`` with the desired one.
```makefile
@grep -rlI '${PROJECTNAME}' --include=*.go ./ | xargs -I@ sed -i '' 's/${ESCAPED_PROJECTNAME}/${ESCAPED_TARGET_PROJECTNAME}/g' @
```
Sample usage: make relocate TARGET=github.com/wingkwong/myproject
```
GITHUB := "github.com"
PROJECTNAME := $(shell basename "$(PWD)")
PACKAGENAME := $(GITHUB)/$(shell basename "$(shell dirname "$(PWD)")")/$(PROJECTNAME)
GOBASE := $(shell pwd)
.PHONY .SILENT: relocate
## relocate: Relocate packages
relocate:
# Example: make relocate TARGET=github.com/wingkwong/myproject
@test ${TARGET} || ( echo ">> TARGET is not set. Use: make relocate TARGET="; exit 1 )
@echo " *** Relocating packages to $(TARGET) *** "
$(eval ESCAPED_PACKAGENAME := $(shell echo "${PACKAGENAME}" | sed -e 's/[\/&]/\\&/g'))
$(eval ESCAPED_PROJECTNAME := $(shell echo "${PROJECTNAME}" | sed -e 's/[\/&]/\\&/g'))
$(eval ESCAPED_TARGET_PACKAGENAME := $(shell echo "${TARGET}" | sed -e 's/[\/&]/\\&/g'))
$(eval ESCAPED_TARGET_PROJECTNAME := $(shell basename "$(shell dirname ${TARGET})" | sed -e 's/[\/&]/\\&/g'))
$(eval ESCAPED_PARENT_DIRECTORY:= $(shell cd ../ && pwd | sed -e 's/[\/&]/\\&/g'))
$(eval ESCAPED_PARENT_DIRECTORYNAME:= $(shell basename $(ESCAPED_PARENT_DIRECTORY)))
# Replacing ${ESCAPED_PACKAGENAME} to ${ESCAPED_TARGET_PACKAGENAME}
@echo " *** Replacing ${ESCAPED_PACKAGENAME} to ${ESCAPED_TARGET_PACKAGENAME} *** "
@grep -rlI '${PACKAGENAME}' --include=*.go ./ | xargs -I@ sed -i '' 's/${ESCAPED_PACKAGENAME}/${ESCAPED_TARGET_PACKAGENAME}/g' @
# Replacing ${PROJECTNAME} to ${ESCAPED_TARGET_PROJECTNAME}
@echo " *** Replacing ${PROJECTNAME} to ${ESCAPED_TARGET_PROJECTNAME} *** "
@grep -rlI '${PROJECTNAME}' --include=*.go ./ | xargs -I@ sed -i '' 's/${ESCAPED_PROJECTNAME}/${ESCAPED_TARGET_PROJECTNAME}/g' @
@echo " *** Completed *** "
.PHONY: help
all: help
help: Makefile
@echo
@echo " Choose a command run in "$(PROJECTNAME)":"
@echo
@sed -n 's/^##//p' $< | column -t -s ':' | sed -e 's/^/ /'
@echo
```

Synchronising Videos with PowerPoint Presentation Slides on your website
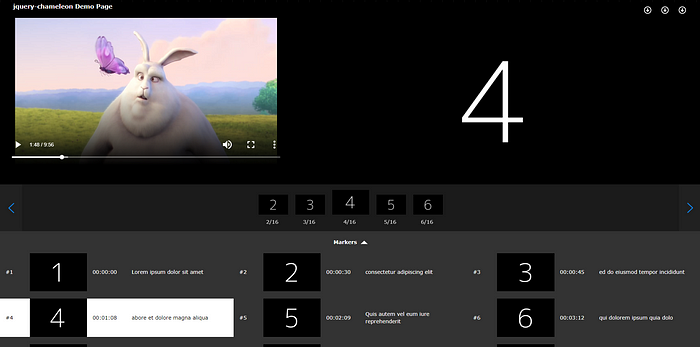
The synchronisation of videos and PowerPoint presentation slides enhance the user experience, especially for e-learning portal or lecture-viewing systems . The general approach is to utilise the time sequence to detect and recognise slide changes.
jQuery-chameleon gives more than that. It is a jQuery plugin which allows users to synchronise video with slide images in several players such as JWPlayer 7, HTML5 or Youtube Player as well as several features.
## Installation
To get started, you need to download the plugin files via NPM
```
npm install jquery-chameleon
```
or via CDN
```
https://gitcdn.xyz/repo/wingkwong/jquery-chameleon/master/src/chameleon.min.js
https://gitcdn.xyz/repo/wingkwong/jquery-chameleon/master/src/chameleon.min.css
```
As the plugin is dependent on jQuery, hence jQuery script must be included before jQuery-chameleon ones
```js
```
## Usage
In your HTML page, create a div like this
```html
```
In your JavaScript file, select the div you just created and trigger chameleon with options like this
```js
$(".chameleon").chameleon(options);
```
jQuery-chameleon supports below options:
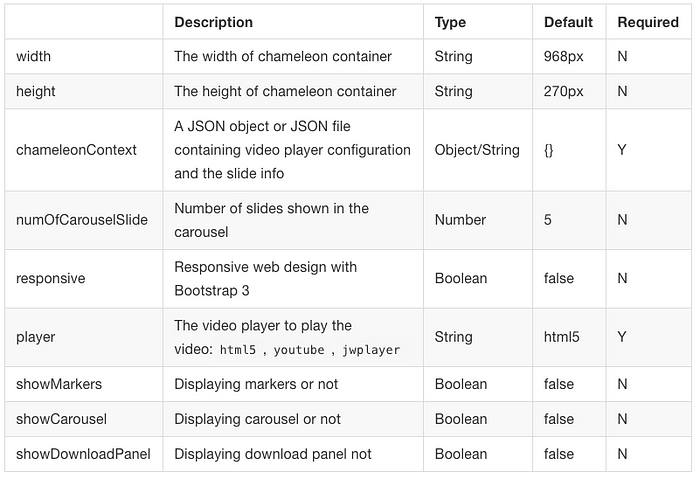
For chameleonContext, you can either pass a JSON file or an object with the below options:
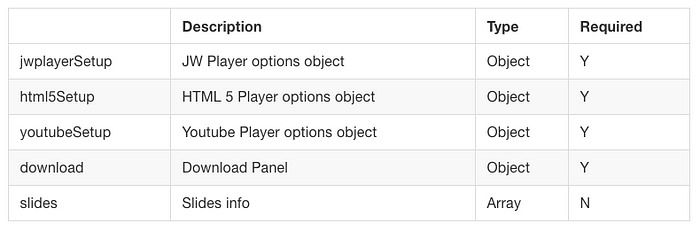
## Player Setup
### Configure Chameleon to use HTML5 Player:
By default, HTML5 Player is used. You can configure it in ‘’player’’ option.
HTML5 setup contains tow attributes — sources and poster:
The sources attribute contains “file” and “type” options, it can be a single object:
```js
$('.chameleon').chameleon({
player: "html5",
chameleonContext: {
"html5Setup" :{
"sources": [
{
"file": "http://commondatastorage.googleapis.com/gtv-videos-bucket/sample/BigBuckBunny.mp4",
"type": "video/mp4"
}
]
}
}
});
```
Or it can be an array of multiple objects. The browser will use the first recognized format.
```js
$('.chameleon').chameleon({
player: "html5",
chameleonContext: {
"html5Setup" :{
"sources": [
{
"file": "http://commondatastorage.googleapis.com/gtv-videos-bucket/sample/BigBuckBunny.mp4",
"type": "video/mp4"
},
{
"file": "http://commondatastorage.googleapis.com/gtv-videos-bucket/sample/BigBuckBunny.mp4",
"type": "video/mp4"
},
{
"file": "http://commondatastorage.googleapis.com/gtv-videos-bucket/sample/BigBuckBunny.mp4",
"type": "video/mp4"
}
]
}
}
});
```
### Configure Chameleon to use Youtube Player:
Only video ID needs to be specified in Youtube setup. The YT Player script will be loaded dynamically in the plugin.

Example:
```js
$('.chameleon').chameleon({
player: "youtube",
chameleonContext: {
"youtubeSetup": {
"videoId": "9xwazD5SyVg"
}
}
});
```
### Configure Chameleon to use JWPlayer 7:
[Please refer to JW Player Configuration Reference](https://developer.jwplayer.com/jw-player/docs/developer-guide/customization/configuration-reference/)
In order to use JWPlayer, the prerequisites are shown as following:
- You need to have a valid JWPlayer 7 script including a license key
- The script should be imported before the chameleon one
Example:
```js
$('.chameleon').chameleon({
player: "jwplayer",
chameleonContext: {
"jwplayerSetup": {
"file": "http://example.com/myVideo.mp4",
"height": 360,
"width": 640,
"autostart": true,
"advertising": {
"client": "vast",
"tag": "http://adserver.com/vastTag.xml"
}
}
}
});
```
### Download
jQuery-chameleon allows users to download slide, video and transcript files. To enable this feature, set showDownloadPanel to true.
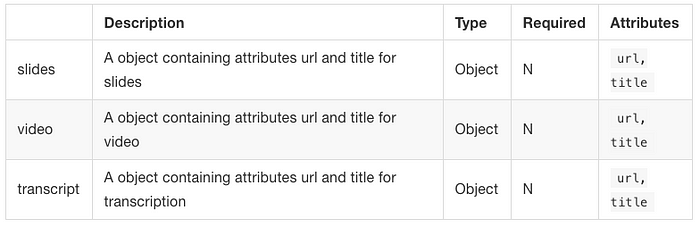
Example:
```js
$('.chameleon').chameleon({
chameleonContext: {
"html5Setup": {
"sources": [{
"file": "http://commondatastorage.googleapis.com/gtv-videos-bucket/sample/BigBuckBunny.mp4",
"type": "video/mp4"
}]
},
"download": {
"slides": {
"url": "https://dummy.gk/wIngKwoNg.zip",
"title": "Download Slides"
},
"video": {
"url": "http://commondatastorage.googleapis.com/gtv-videos-bucket/sample/BigBuckBunny.mp4",
"title": "Download Video"
},
"transcript": {
"url": "https://goo.gl/swiAnf.zip",
"title": "Download Transcript"
}
}
}
});
```
### Slides
The slides object contains slide information. jQuery-chameleon takes the slides object to render the synchronisation.
```js
$('.chameleon').chameleon({
player: "youtube",
chameleonContext: {
"html5Setup": {
"sources": [{
"file": "http://commondatastorage.googleapis.com/gtv-videos-bucket/sample/BigBuckBunny.mp4",
"type": "video/mp4"
}]
},
"slides": [{
"time": "00:00:00",
"img": "https://dummyimage.com/600x400/000/fff&text=1",
},
{
"time": "00:00:02",
"title": "Ultricies nec, pellentesque eu",
"img": "https://dummyimage.com/600x400/000/fff&text=2"
},
{
"time": "00:00:05",
"title": "Augue velit cursus nunc",
"img": "https://dummyimage.com/600x400/000/fff&text=3"
},
{
"time": "00:00:08",
"title": "Donec quam felis,",
"img": "https://dummyimage.com/600x400/000/fff&text=4",
"alt": "Donec quam felis"
}
]
}
});
```
### Carousel
Carousel is a navigation which allows users to select the previous / Next N slides where N can be configured numOfCarouselSlide option. To enable this feature, set showCarousel to true.
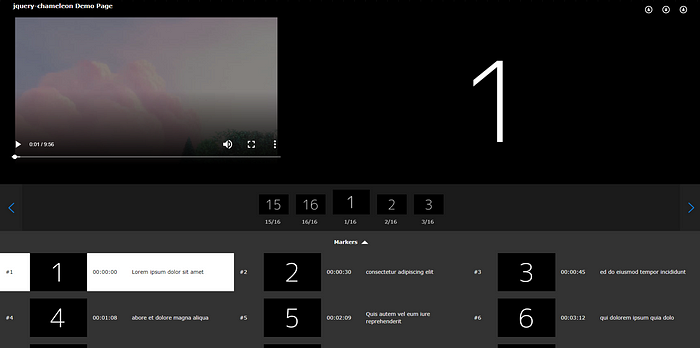
### Markers
Markers take “slides” object and show the information on all slides. By default, the block is collapsed and it can be expanded by clicking the arrow button. The current slide being showed is highlighted in White.To enable this feature, set showMarkers to true.
When the slide block is being clicked, the video and the slide would change to the corresponding one.
### Responsive Design
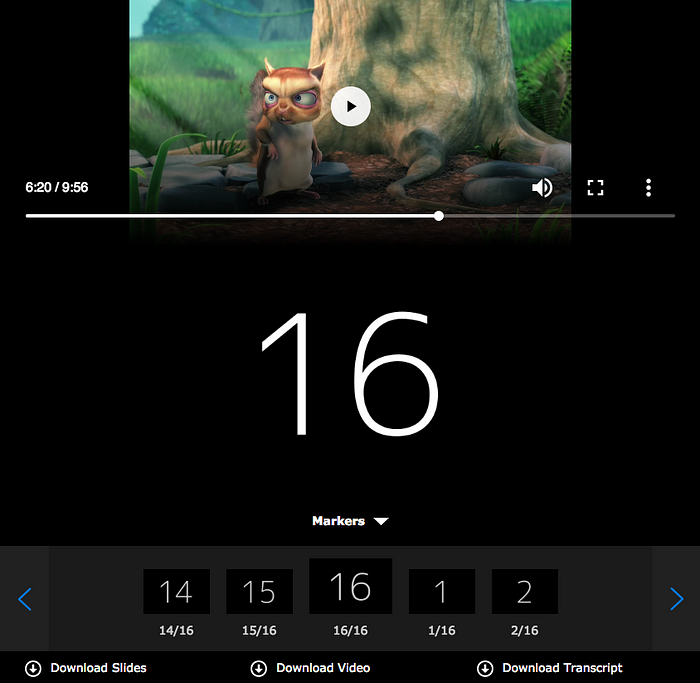
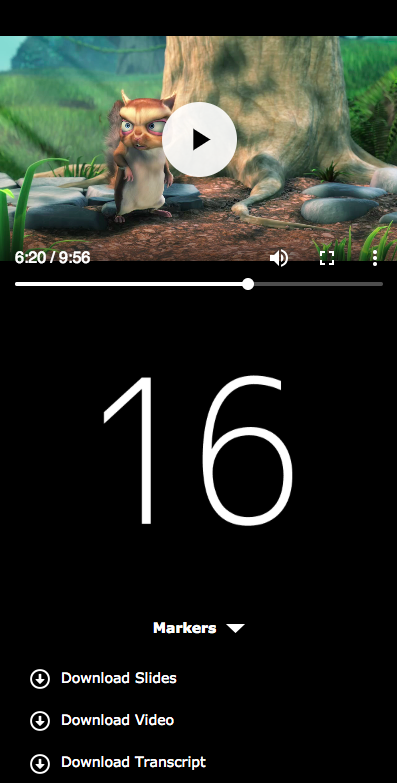
jQuery-chameleon can be rendered in a responsive way using Bootstrap 3. By default, the responsive attribute is set to false. If you enable responsive option, set responsive to true and make sure that you have include Bootstrap 3 library on your website.
Example:
```js
$('.chameleon').chameleon({
responsive: true
});
```
The carousel is not showing in mobile view. However, you are still able to locate to a specific slide in Markers.
Tablet:
Mobile:
## Conclusion
With jQuery-chameleon, we can easily implement a video-slide synchronisation on a HTML page. jQuery-chameleon is an open source plugin. You can find the source code, demonstration and documentation on [Github](https://github.com/wingkwong/jquery-chameleon).
Sunday, 28 October 2018
5 things I hate about Red Hat Decision Manager (RHDM)
Red Hat Decision Manager (RHDM) is a powerful platform for the development and deployment of automate business rules-based decisions. Its features include automate decision making, optimising resources, and business-friendly user interface. It sounds very promising but is not quite stable. Here is the list why I hate RHDM.
Disclaimer: The following points are based on version 7.0.0. These issues may be resolved in the latest version.
# Failure at Hello World Tutorial
Red Hat has provided a Hello World tutorial for people to try the product. However, it never tells you that you would probably fail at step 6 when you run the init.ps1 script to install the platform. You have to set execution policy to RemoteSigned as the default PowerShell script execution policy is set to Restricted. It would be nice if this is included as a note for people who do not know. For those who hit this error, you may run this command in your PowerShell and re-run the init.ps1:
```
Set-ExecutionPolicy -ExecutionPolicy RemoteSigned
```
# Low flexibility when importing your project
When you want to import your project, you can click Import Project in your repository. RHDM only provides importing from a repository URL, which means you cannot import your project from a zip file. Moreover, you cannot specify which branch you want to import. For the version control in the enterprise, your development project is never on the master branch and you have to find another way to deal with it.
# Zero file found after indexing your project
After importing your project, RHDM will index each files. However, you may see there is only zero file in your project after a period of time. This may be caused by the absence of Maven or incorrect setup. You have to install Maven in your machine and set up your M2_HOME pointing to your maven directory and add Maven bin directory to PATH in Environment Variables. This should have included in prerequisites in the tutorial.
The git for RHDM can be found in RHDM_HOME/target/jboss-eap-7.1/bin/.niogit. You may clone it as a local git to download your modified files on the platform in a rapid way. You may also modify the files in your local git and push them back to RHDM. However, you cannot push new files to RHDM because it does not re-index them. Therefore, after pushing the files, you will not able to see those files in RHDM. However, when you create a new file with the same name as the file you pushed, it will prompt an error saying this file does exist. Hence, this basically is a non-accessible file. An alternative is to create a file first, pull it, update the file, and push it back. However, it would be extremely painful if you plan to push a lot of new files to RHDM such as deploying a repository from one RHDM to another one.
# Guided Rule Editor Bug
If you write a guided rule, you have to pay attention to each condition when using the guided rule editor. When your condition is invalid, it may screw the whole rule up after saving it. You will not be able to open it again and you have to back up your project and re-import it again.
# You may not be able to restart RHDM service / server without stopping and removing KIE containers
After building and deploying your project, you can see your KIE container in Execution Servers. If you plan to restart RHDM service or server, you have to stop and remove all KIE containers prior to the restart. If you skip this step, the service may not be back on again. You may need to set up the whole thing again.
Subscribe to:
Posts (Atom)