Friday, 13 November 2020
Truncated exponential backoff
Truncated exponential backoff is a standard error handling strategy for network applications in which a client periodically retries a failed request with increasing delays between requests.
```
min(((2^n)+random_number_milliseconds), maximum_backoff),
```
where
- n incremented by 1 for each iteration (request)
- random_number_milliseconds is a random number of milliseconds less than or equal to 1000.
- maximum_backoff is typically 32 or 64 seconds.

Thursday, 22 October 2020
Getting started with Amazon MSK
Amazon MSK is a fully managed service that enables you to build and run applications that use Apache Kafka to process streaming data.
## Create MSK Cluster
### Via Console
Please check out [here](https://docs.aws.amazon.com/msk/latest/developerguide/getting-started.html)
### Via Amazon CDK
The source code is available [here](https://github.com/wingkwong/aws-playground/tree/master/msk/cdk)
Using CDK, we will create a VPC for Your MSK Cluster with a Single Public Subnet where you can modify ``lib/msk-stack.ts`` to meet your requirements.
```
const vpc = new Vpc(this, 'AWSKafkaVPC', {
cidr: '10.0.0.0/16',
maxAzs: 3,
subnetConfiguration: [
{ cidrMask: 24, name: 'kafka', subnetType: SubnetType.PUBLIC }
]
});
```
and then CDK will provision a MSK Cluster which is also defined in ``lib/msk-stack.ts``.
```
const cluster = new CfnCluster(this, 'mskCluster', {
clusterName: 'AWSKafkaCluster',
kafkaVersion: KafkaVersion.VERSION_2_3_1,
encryptionInfo: {
encryptionInTransit: {
inCluster: true,
clientBroker: 'TLS'
}
},
numberOfBrokerNodes: 2,
brokerNodeGroupInfo: {
clientSubnets: [
vpc.publicSubnets[0].subnetId,
vpc.publicSubnets[1].subnetId,
vpc.publicSubnets[2].subnetId
],
brokerAzDistribution: 'DEFAULT',
instanceType: KafkaInstanceType.T3_SMALL,
storageInfo: {
ebsStorageInfo: {
volumeSize: 10
}
}
}
});
```
Copy .env.sample and paste as .env and update the environment varibles.
```
CDK_DEFAULT_REGION=XXXXXXXXXXXXXXXXXXXX
CDK_DEFAULT_ACCOUNT=XXXXXXXXXXXXXXXXXXX
```
Run ``npm run build`` to compile typescript to js
Run ``cdk deploy`` to deploy this stack to your default AWS account/region
## Create a bastion machine
You need a machine to create a topic that produces and consumes data. Let's create a t2.xlarge instance of Amazon Linux 2 AMI (HVM), SSD Volume Type with Public IP enabled.
## Create Kafka Topic on the bastion machine
```
#!/bin/sh
zookeeperConnectString="" # retrieved from "View Client Information" in Amazon MSK Console
kafka_topic=""
replication_factor=1
partitions=1
# Change directory to Kafka bin
cd ~/kafka_2.13-2.6.0/bin/
# Execute kafka-topics.sh
./kafka-topics.sh --create --zookeeper $zookeeperConnectString --replication-factor $replication_factor --partitions $partitions --topic $kafka_topic
```
## Produce Data
Here's a sample producer
```
from time import sleep
from json import dumps
from kafka import KafkaProducer
# Define Amazon MSK Brokers
brokers=[':9092', ':9092']
# Define Kafka topic to be produced to
kafka_topic=''
# A Kafka client that publishes records to the Kafka cluster
producer = KafkaProducer(bootstrap_servers=brokers, value_serializer=lambda x: dumps(x).encode('utf-8'))
# To produce 1000 numbers from 0 to 999
for num in range(1000):
data = {'number' : num}
producer.send(kafka_topic, value=data)
sleep(1)
```
## Consume Data
Here's a sample consumer
```
from kafka import KafkaConsumer
from json import loads
# Define Amazon MSK Brokers
brokers=[':9092', ':9092']
# Define Kafka topic to be consumed from
kafka_topic=''
# A Kafka client that consumes records from a Kafka cluster
consumer = KafkaConsumer(
kafka_topic,
bootstrap_servers=brokers,
auto_offset_reset='earliest',
enable_auto_commit=True,
group_id='my-group',
value_deserializer=lambda x: loads(x.decode('utf-8')))
for message in consumer:
message = message.value
print('{}'.format(message))
```
Saturday, 10 October 2020
Writing middlewares using Middy for AWS Lambda
[Middy](https://github.com/middyjs/middy) is the stylish Node.js middleware engine for AWS Lambda. It allows us to focus on the strict business logic of your Lambda and attach common modular elements such as authentication, authorization, validation etc.
To install middy via NPM
```
npm install --save @middy/core
```
Middy supports multiple middlewares, we can create a new folder called ``middlewares`` and define the middlewares there.
Let's create ``middlewares/index.js``. In this file, it includes other middlewares. You can treat it as an entry point of all middlewares.
```js
const middy = require('@middy/core')
const middleware1 = require("./middleware1");
const middleware2 = require("./middleware2");
const middleware3 = require("./middleware3");
const middlewares = [
middleware1(),
middleware2(),
middleware3()
];
module.exports = { middlewares };
```
For example, if you wanna update your handler header for each Lambda function, you can create a middleware like
```js
const NEW_RESPONSE_HEADER = {
"Access-Control-Allow-Origin": "*",
"Access-Control-Allow-Credentials": true,
"Access-Control-Allow-Methods": "POST,GET",
"Access-Control-Allow-Headers": "*",
"Strict-Transport-Security": "max-age= 63072000",
"X-Content-Type-Options": "nosniff",
"X-Frame-Options": "DENY",
"X-XSS-Protection": "1; mode=block",
"Referrer-Policy": "same-origin",
};
const updateHandlerHeaders = (handler) => {
if (!handler.response) {
handler.response = {};
}
handler.response.headers = {
...RESPONSE_SECURITY_HEADER,
...handler.response.headers,
};
};
const headers = () => ({
before: async (handler) => updateHandlerHeaders(handler),
after: async (handler) => updateHandlerHeaders(handler),
onError: async (handler) => updateHandlerHeaders(handler),
});
module.exports = headers;
```
In your ``handle.js``, import core and your middlewares
```js
const middy = require('@middy/core')
const { middlewares }= require("../middleware");
```
Then define your business logic
```js
const func = (event, context, callback) => {
const { data } = event.body
// business logic goes here
return callback(null, { result: 'success', message: 'hello world'})
}
const handler = middy(func).use(middlewares)
```
Middlewares have two phases - ``before`` and ``after``. Therefore, the order does matter. In the previous example, there are three middlewares, the expected order of execution is
```
middleware1 (before)
middleware2 (before)
middleware3 (before)
handler
middleware3 (after)
middleware2 (after)
middleware1 (after)
```
By using Middy, we can address some common concerns like setting CORS headers and keep our business logic clean. For more details, please check out [here](https://github.com/middyjs/middy).
Sunday, 13 September 2020
Loading environment variables into Serverless
Storing config in the environment is one of the factors in The Twelve-Factor App. We do not want to store our environment variables in our code.
Normally the environment variables is stored in a file called ``.env`` in the root of the application and this file should be added to ``.gitignore`` so that no one can see the values. You may leave a file called ``.env.sample`` to let other team members to know what keys should be included.
Each line is composed in ``KEY=VALUE`` format. Blank lines and lines beginning with ``#`` are ignored.
Example:
```
AWS_REGION=ap-east-1
```
In order to load the environment variables so that the Lambda function can run successfully , we need to use ``serverless-dotenv-plugin`` to do so.
To install it, simply run
```
npm i -D serverless-dotenv-plugin
```
Then, add the following in your ``serverless.yml``
```
plugins:
- serverless-dotenv-plugin
```
Now you can include your environment variables in your serverless config by referencing them as ``${env:VAR_NAME}``.
```
region: ${env:AWS_REGION}
```
These variables are also injected into lambda functions so that you can reference them as ``process.env.SOMETHING``.
Friday, 4 September 2020
Streaming Data to Amazon S3 Using Kafka Connect S3
There is not a direct way to stream data to Amazon S3. You need a S3 Connector. The following demostration is performed in ``ap-east-1`` region and the Apache Kafka version is ``2.2.1``.
## Prerequisites
You should have
- MSK Cluster
- Client Machine
- Apache Kafka topic
- Producer
- S3 bucket
## Installation
Since we are not using Confluent Cloud, we need to download and install it manually.
Go to [https://www.confluent.io/hub/confluentinc/kafka-connect-s3](https://www.confluent.io/hub/confluentinc/kafka-connect-s3) to download Kafka Connect S3
Extract the ZIP file contents and copy the contents to the desired location. For example, you can create a directory named ``/home/ec2-user/kafka-plugins`` then copy the connector plugin contents.
## Configuration
Add this to the plugin path in your Connect properties file ``connect.properties``
```
plugin.path=/home/ec2-user/kafka-plugins/
```
Update ``bootstrap.servers``
```
bootstrap.servers=X-X.XXXXXXXXXXX-XX.XXXXXX.XX.kafka.ap-east-1.amazonaws.com:9092,X-X.XXXXXXXXXXX-XX.XXXXXX.XX.kafka.ap-east-1.amazonaws.com:9092
```
Update ``topic``
```
topic=<YOUR_KAFKA_TOPIC>
```
Define desired converter key and value. By default the value is empty, if you don't specify them, you will get ``JDBC Sink: JsonConverter with schemas.enable requires "schema" and "payload" fields and may not contain additional fields.`` error.
```
key.converter=org.apache.kafka.connect.storage.StringConverter
key.converter.schemas.enable=false
value.converter=org.apache.kafka.connect.storage.StringConverter
value.converter.schemas.enable=false
```
If you want to convert the data to parquet format. You must use the AvroConverter with ParquetFormat. Attempting to use other Converter will result in a runtime exception.
```
key.converter=io.confluent.connect.avro.AvroConverter
key.converter.schema.registry.url=http://10.0.0.0:8081
value.converter=io.confluent.connect.avro.AvroConverter
value.converter.schema.registry.url=http://10.0.0.0:8081
```
Then, define sink connector properties. A sample properties file is available under ``etc/`` in the zip.
```
name=s3-sink
connector.class=io.confluent.connect.s3.S3SinkConnector
tasks.max=1
topics=<YOUR_KAFKA_TOPIC>
s3.region=ap-east-1
s3.bucket.name=<YOUR_BUCKET>
s3.part.size=5242880
flush.size=1
storage.class=io.confluent.connect.s3.storage.S3Storage
format.class=io.confluent.connect.s3.format.avro.AvroFormat
partitioner.class=io.confluent.connect.storage.partitioner.DefaultPartitioner
schema.compatibility=NONE
```
With ``flush.size`` > 1 and ``value.converter`` = ``JsonConverter`` , you may get ``org.apache.avro.AvroRuntimeException: already open`` error.
In order to contacting S3 successfully, you need to provide AWS credentials to authenticate for the S3 connector.
```
export AWS_ACCESS_KEY_ID=foo
export AWS_SECRET_ACCESS_KEY=bar
```
## Producing the data
Here's a sample producer
```py
from time import sleep
from json import dumps
from kafka import KafkaProducer
# Define Amazon MSK Brokers
brokers=['<YOUR_MSK_BROKER_1>:9092', '<YOUR_MSK_BROKER_2>:9092']
# Define Kafka topic to be produced to
kafka_topic='<YOUR_KAFKA_TOPIC>'
# A Kafka client that publishes records to the Kafka cluster
producer = KafkaProducer(bootstrap_servers=brokers, value_serializer=lambda x: dumps(x).encode('utf-8'))
# To produce 1000 numbers from 0 to 999
for num in range(1000):
data = {'number' : num}
producer.send(kafka_topic, value=data)
sleep(1)
```
Start to produce data to the topic
```
python3 ./producer.py
```
## Streaming data to S3
Run
```
~/kafka_2.13-2.6.0/bin/connect-standalone.sh ~/kafka-plugins/confluentinc-kafka-connect-s3-5.5.1/etc/connector.properties ~/kafka-plugins/confluentinc-kafka-connect-s3-5.5.1/etc/s3-sink.properties
```
## Result
You should see those objects with keys:
```
topics/<YOUR_KAFKA_TOPIC>/partition=0/<YOUR_KAFKA_TOPIC>+0+0000000000.avro
topics/<YOUR_KAFKA_TOPIC>/partition=0/<YOUR_KAFKA_TOPIC>+0+0000000001.avro
topics/<YOUR_KAFKA_TOPIC>/partition=0/<YOUR_KAFKA_TOPIC>+0+0000000002.avro
...
```
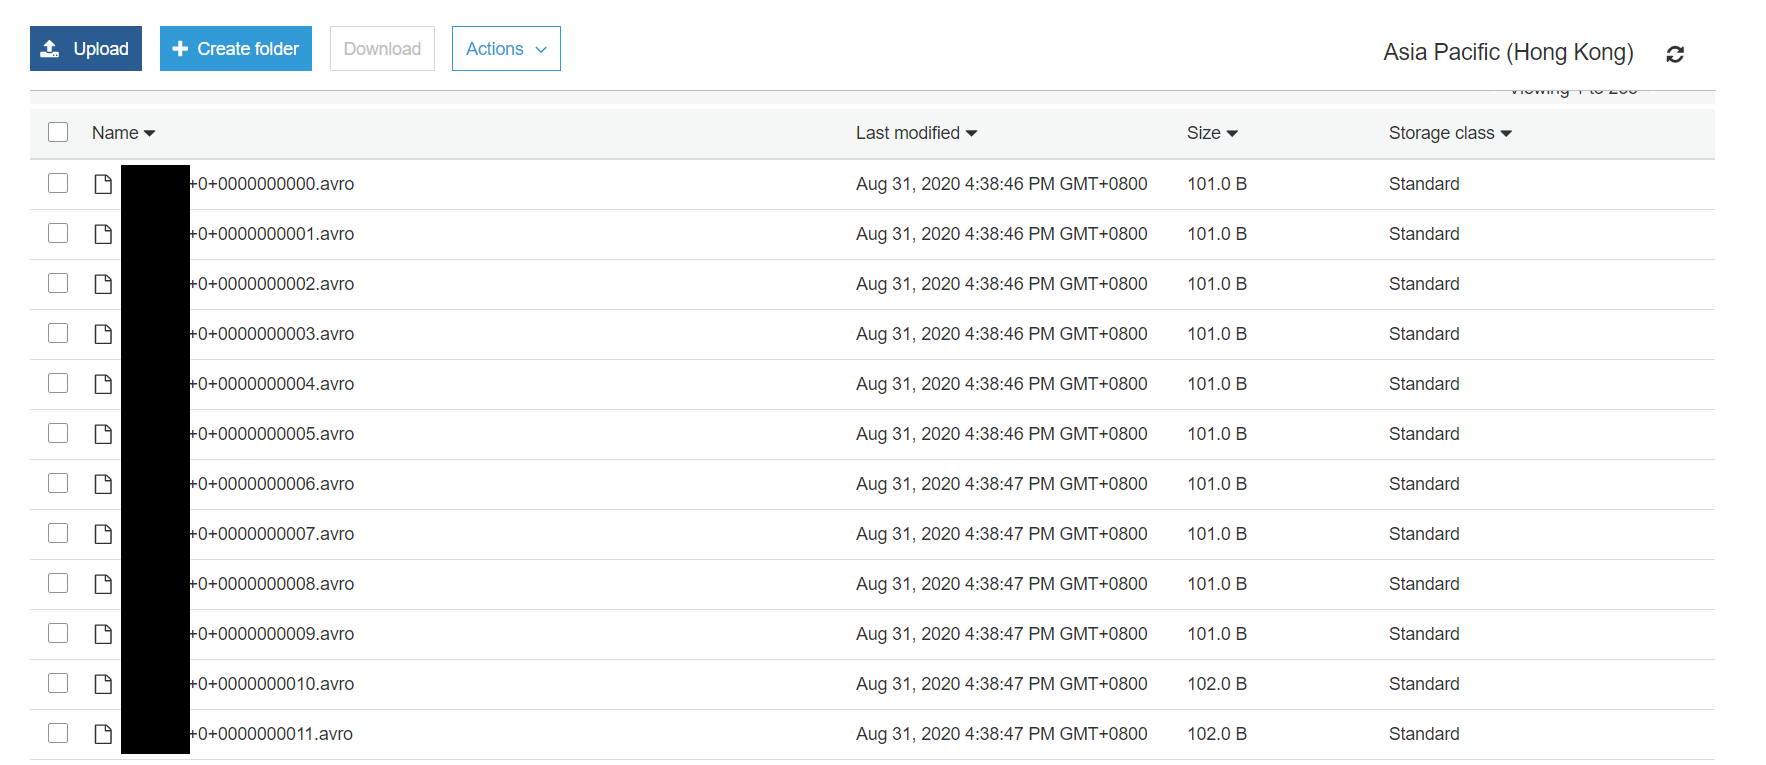
Download the first one verify. You can either use Avor Viewer to view it and export it as json
```json
[
{
"boolean": null,
"bytes": null,
"double": null,
"float": null,
"int": null,
"long": null,
"string": null,
"array": null,
"map": [
{
"key": {
"boolean": null,
"bytes": null,
"double": null,
"float": null,
"int": null,
"long": null,
"string": "number",
"array": null,
"map": null
},
"value": {
"boolean": null,
"bytes": null,
"double": null,
"float": null,
"int": null,
"long": 0,
"string": null,
"array": null,
"map": null
}
}
]
}
]
```
or use ``avro-tools-1.7.7.jar`` ([download here](http://mirror.metrocast.net/apache/avro/avro-1.7.7/java/avro-tools-1.7.7.jar)) to convert it back to json
```
java -jar avro-tools-1.7.7.jar tojson <YOUR_KAFKA_TOPIC>+0+0000000000.avro
```
```json
{"number":0}
```
If you want multiple records inside one .avro file, increase the value of ``flush.size``.
## Common issues
NoClassDefFoundError is thrown when using ``io.confluent.connect.s3.format.parquet.ParquetFormat ``
`` java.lang.NoClassDefFoundError: com/google/common/base/Preconditions``
Solution
Download the missing jar [guava-17.0.jar](https://www.findjar.com/jar/com/google/guava/guava/17.0/guava-17.0.jar.html) and add it back to ``/lib``
## Useful links
- [Amazon S3 Sink Connector for Confluent Platform](https://docs.confluent.io/current/connect/kafka-connect-s3/index.html)
- [Avor Viewer](https://zymeworks.github.io/avro-viewer/)
Subscribe to:
Posts (Atom)