Wednesday, 2 September 2020
Building a CI/CD pipeline for a SAM application written in Go
This tutorial shows how to build a CI/CD Pipeline for a SAM Application written in Go with CodeCommit, CodeBuild, CodePipeline, CloudFormation and the AWS CDK.
## Prerequisites
You need to have an AWS account and installed and configured AWS CLI and Go.
## Initialize The Hello World SAM project
- Run ``sam init``
- Type 1 to select AWS Quick Start Templates
- Choose ``go1.x`` for runtime
- Leave default ``sam-app`` for project name
- Type 1 to select the Hello World Example
- Verify if ``sam-app`` have been created
When deploying this project, it will create an API Gateway, a Lambda function and a IAM Role. They are defined in ``template.yaml``.
```
HelloWorldAPI:
Description: "API Gateway endpoint URL for Prod environment for First Function"
Value: !Sub "https://${ServerlessRestApi}.execute-api.${AWS::Region}.amazonaws.com/Prod/hello/"
HelloWorldFunction:
Description: "First Lambda Function ARN"
Value: !GetAtt HelloWorldFunction.Arn
HelloWorldFunctionIamRole:
Description: "Implicit IAM Role created for Hello World function"
Value: !GetAtt HelloWorldFunctionRole.Arn
```
The Lambda function simply prints out ``Hello World``.
```
func handler(request events.APIGatewayProxyRequest) (events.APIGatewayProxyResponse, error) {
return events.APIGatewayProxyResponse{
Body: "Hello World!",
StatusCode: 200,
}, nil
}
```
## Run SAM Application Locally
SAM allows your to run your serverless application locally for your development and testing by running the following command. The default local port number is ``3000``. If you are running your app on Cloud9 workspace, you need to override it with ``--port`` as Cloud 9 only support 8080, 8081 or 8082 in the local browser.
```
sam local start-api --port 8080
```
You should see
```
Mounting HelloWorldFunction at http://127.0.0.1:8080/hello [GET]
You can now browse to the above endpoints to invoke your functions. You do not need to restart/reload SAM CLI while working on your functions, changes will be reflected instantly/automatically. You only need to restart SAM CLI if you update your AWS SAM template
* Running on http://127.0.0.1:8080/ (Press CTRL+C to quit)
```
Let's verify it
```
curl http://127.0.0.1:8080/hello
```
You should see
```
Hello World
```
## Deploy to AWS
Run ``sam build`` to build the project.
```
sam build
```
A hidden directory has been created by SAM
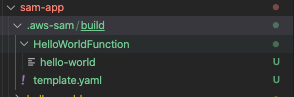
Run ``sam deploy`` to deploy your application. SAM will createa a CloudFormation stack and you can have a guided interactive mode by specifying ``--guided`` parameter.
```
sam deploy --guided
```
Configuring SAM deploy
```
Looking for samconfig.toml : Not found
Setting default arguments for 'sam deploy'
=========================================
Stack Name [sam-app]:
AWS Region [us-east-1]: ap-southeast-1
#Shows you resources changes to be deployed and require a 'Y' to initiate deploy
Confirm changes before deploy [y/N]: y
#SAM needs permission to be able to create roles to connect to the resources in your template
Allow SAM CLI IAM role creation [Y/n]: Y
HelloWorldFunction may not have authorization defined, Is this okay? [y/N]: Y
Save arguments to samconfig.toml [Y/n]: Y
Looking for resources needed for deployment: Not found.
Creating the required resources...
Successfully created!
Managed S3 bucket: aws-sam-cli-managed-default-samclisourcebucket-542w25h26du5
A different default S3 bucket can be set in samconfig.toml
Saved arguments to config file
Running 'sam deploy' for future deployments will use the parameters saved above.
The above parameters can be changed by modifying samconfig.toml
Learn more about samconfig.toml syntax at
https://docs.aws.amazon.com/serverless-application-model/latest/developerguide/serverless-sam-cli-config.html
Uploading to sam-app/9a42d6084bb2aaa2f7eaf7b2201e115a 5094701 / 5094701.0 (100.00%)
```
Deploying with following values
```
Stack name : sam-app
Region : ap-southeast-1
Confirm changeset : True
Deployment s3 bucket : aws-sam-cli-managed-default-samclisourcebucket-542w25h26du5
Capabilities : ["CAPABILITY_IAM"]
Parameter overrides : {}
```
Initiating deployment
```
HelloWorldFunction may not have authorization defined.
Uploading to sam-app/21a49766581b625811536c904121d4ba.template 1154 / 1154.0 (100.00%)
Waiting for changeset to be created..
CloudFormation stack changeset
---------------------------------------------------------------------------------------------------------------------------------------------------------------------------
Operation LogicalResourceId ResourceType
---------------------------------------------------------------------------------------------------------------------------------------------------------------------------
+ Add HelloWorldFunctionCatchAllPermissionProd AWS::Lambda::Permission
+ Add HelloWorldFunctionRole AWS::IAM::Role
+ Add HelloWorldFunction AWS::Lambda::Function
+ Add ServerlessRestApiDeployment47fc2d5f9d AWS::ApiGateway::Deployment
+ Add ServerlessRestApiProdStage AWS::ApiGateway::Stage
+ Add ServerlessRestApi AWS::ApiGateway::RestApi
---------------------------------------------------------------------------------------------------------------------------------------------------------------------------
Changeset created successfully. arn:aws:cloudformation:ap-southeast-1:XXXXXXXXXXX:changeSet/samcli-deploy1598436540/ea868c52-9c9a-4d27-a008-ef6157f65b9b
```
Previewing CloudFormation changeset before deployment
```
Deploy this changeset? [y/N]: y
2020-08-26 18:09:42 - Waiting for stack create/update to complete
CloudFormation events from changeset
-----------------------------------------------------------------------------------------------------------------------------------------------------------------------------
ResourceStatus ResourceType LogicalResourceId ResourceStatusReason
-----------------------------------------------------------------------------------------------------------------------------------------------------------------------------
CREATE_IN_PROGRESS AWS::IAM::Role HelloWorldFunctionRole -
CREATE_IN_PROGRESS AWS::IAM::Role HelloWorldFunctionRole Resource creation Initiated
CREATE_COMPLETE AWS::IAM::Role HelloWorldFunctionRole -
CREATE_IN_PROGRESS AWS::Lambda::Function HelloWorldFunction -
CREATE_IN_PROGRESS AWS::Lambda::Function HelloWorldFunction Resource creation Initiated
CREATE_COMPLETE AWS::Lambda::Function HelloWorldFunction -
CREATE_IN_PROGRESS AWS::ApiGateway::RestApi ServerlessRestApi -
CREATE_IN_PROGRESS AWS::ApiGateway::RestApi ServerlessRestApi Resource creation Initiated
CREATE_COMPLETE AWS::ApiGateway::RestApi ServerlessRestApi -
CREATE_IN_PROGRESS AWS::Lambda::Permission HelloWorldFunctionCatchAllPermissionProd Resource creation Initiated
CREATE_IN_PROGRESS AWS::ApiGateway::Deployment ServerlessRestApiDeployment47fc2d5f9d -
CREATE_IN_PROGRESS AWS::Lambda::Permission HelloWorldFunctionCatchAllPermissionProd -
CREATE_IN_PROGRESS AWS::ApiGateway::Deployment ServerlessRestApiDeployment47fc2d5f9d Resource creation Initiated
CREATE_COMPLETE AWS::ApiGateway::Deployment ServerlessRestApiDeployment47fc2d5f9d -
CREATE_IN_PROGRESS AWS::ApiGateway::Stage ServerlessRestApiProdStage -
CREATE_IN_PROGRESS AWS::ApiGateway::Stage ServerlessRestApiProdStage Resource creation Initiated
CREATE_COMPLETE AWS::ApiGateway::Stage ServerlessRestApiProdStage -
CREATE_COMPLETE AWS::Lambda::Permission HelloWorldFunctionCatchAllPermissionProd -
CREATE_COMPLETE AWS::CloudFormation::Stack sam-app -
-----------------------------------------------------------------------------------------------------------------------------------------------------------------------------
CloudFormation outputs from deployed stack
-----------------------------------------------------------------------------------------------------------------------------------------------------------------------------
Outputs
-----------------------------------------------------------------------------------------------------------------------------------------------------------------------------
Key HelloWorldFunctionIamRole
Description Implicit IAM Role created for Hello World function
Value arn:aws:iam::XXXXXXXXXXX:role/sam-app-HelloWorldFunctionRole-CXSDBGUHPMFS
Key HelloWorldAPI
Description API Gateway endpoint URL for Prod environment for First Function
Value https://yh1q5tcsqg.execute-api.ap-southeast-1.amazonaws.com/Prod/hello/
Key HelloWorldFunction
Description First Lambda Function ARN
Value arn:aws:lambda:ap-southeast-1:XXXXXXXXXXX:function:sam-app-HelloWorldFunction-13LO5HE0Y7BKS
-----------------------------------------------------------------------------------------------------------------------------------------------------------------------------
Successfully created/updated stack - sam-app in ap-southeast-1
```
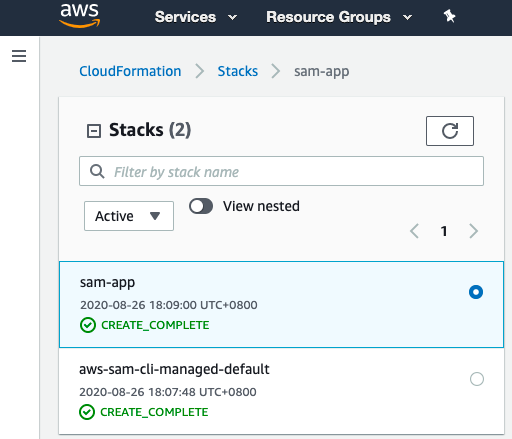
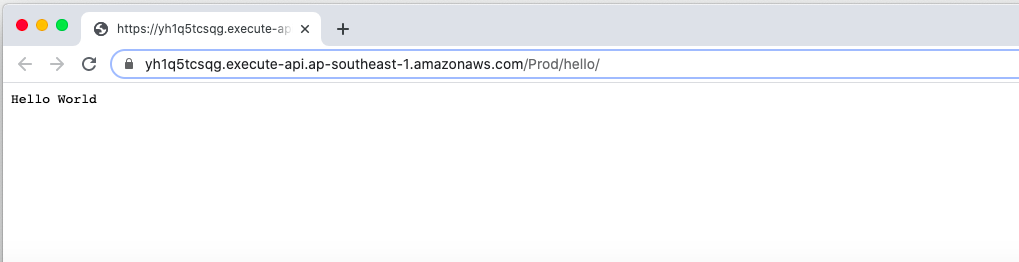
To verifiy it, click the HelloWorldApi Value in sam-app Output.
## Building the pipeline
With a continous delivery pipeline using AWS Code Pipeline, we can automate the build, package, and deploy commands. Other services will be used such as CodeCommit, CloudFormation and the AWS CDK.
The general flow would be like
```
Developer -- pushes changes --> Git Repository -- build --> deploy --> AWS
```
## Setting up CodeCommit
Let's create a CodeCommit repository
```
aws codecommit create-repository --repository-name sam-app
```
You should see the following output
```json
{
"repositoryMetadata": {
"accountId": "XXXXXXXXXXXX",
"repositoryId": "XXXXXXXX-XXXX-XXXX-XXXX-XXXXXXXXXXXX",
"repositoryName": "sam-app",
"lastModifiedDate": "2020-08-26T18:26:36.257000+08:00",
"creationDate": "2020-08-26T18:26:36.257000+08:00",
"cloneUrlHttp": "https://git-codecommit.ap-southeast-1.amazonaws.com/v1/repos/sam-app",
"cloneUrlSsh": "ssh://git-codecommit.ap-southeast-1.amazonaws.com/v1/repos/sam-app",
"Arn": "arn:aws:codecommit:ap-southeast-1:XXXXXXXXXXXX:sam-app"
}
}
```
To configurate git credentials
```
git config --global credential.helper '!aws codecommit credential-helper $@'
git config --global credential.UseHttpPath true
git config --global user.name "wingkwong"
git config --global user.email "wingkwong.code@gmail.com"
```
Go to the root directory of your SAM project and run
```
cd ./sam-app
git init
git add .
git commit -m "Initial commit"
```
Setup Git origin
```
git remote add origin
```
Push the code to origin
```
git push -u origin master
```
You should see
```
Counting objects: 17, done.
Delta compression using up to 4 threads.
Compressing objects: 100% (13/13), done.
Writing objects: 100% (17/17), 4.86 MiB | 1.55 MiB/s, done.
Total 17 (delta 0), reused 0 (delta 0)
To https://git-codecommit.ap-southeast-1.amazonaws.com/v1/repos/sam-app
* [new branch] master -> master
Branch 'master' set up to track remote branch 'master' from 'origin'.
```
## Setting up CodePipline
We will use Amazon CDK to provision the pipeline.
### Install CDK
```
npm install -g aws-cdk
```
### Initialize the project
```
cdk init --language typescript
```
### To bulid and deploy
```
npm run build
cdk deploy
```
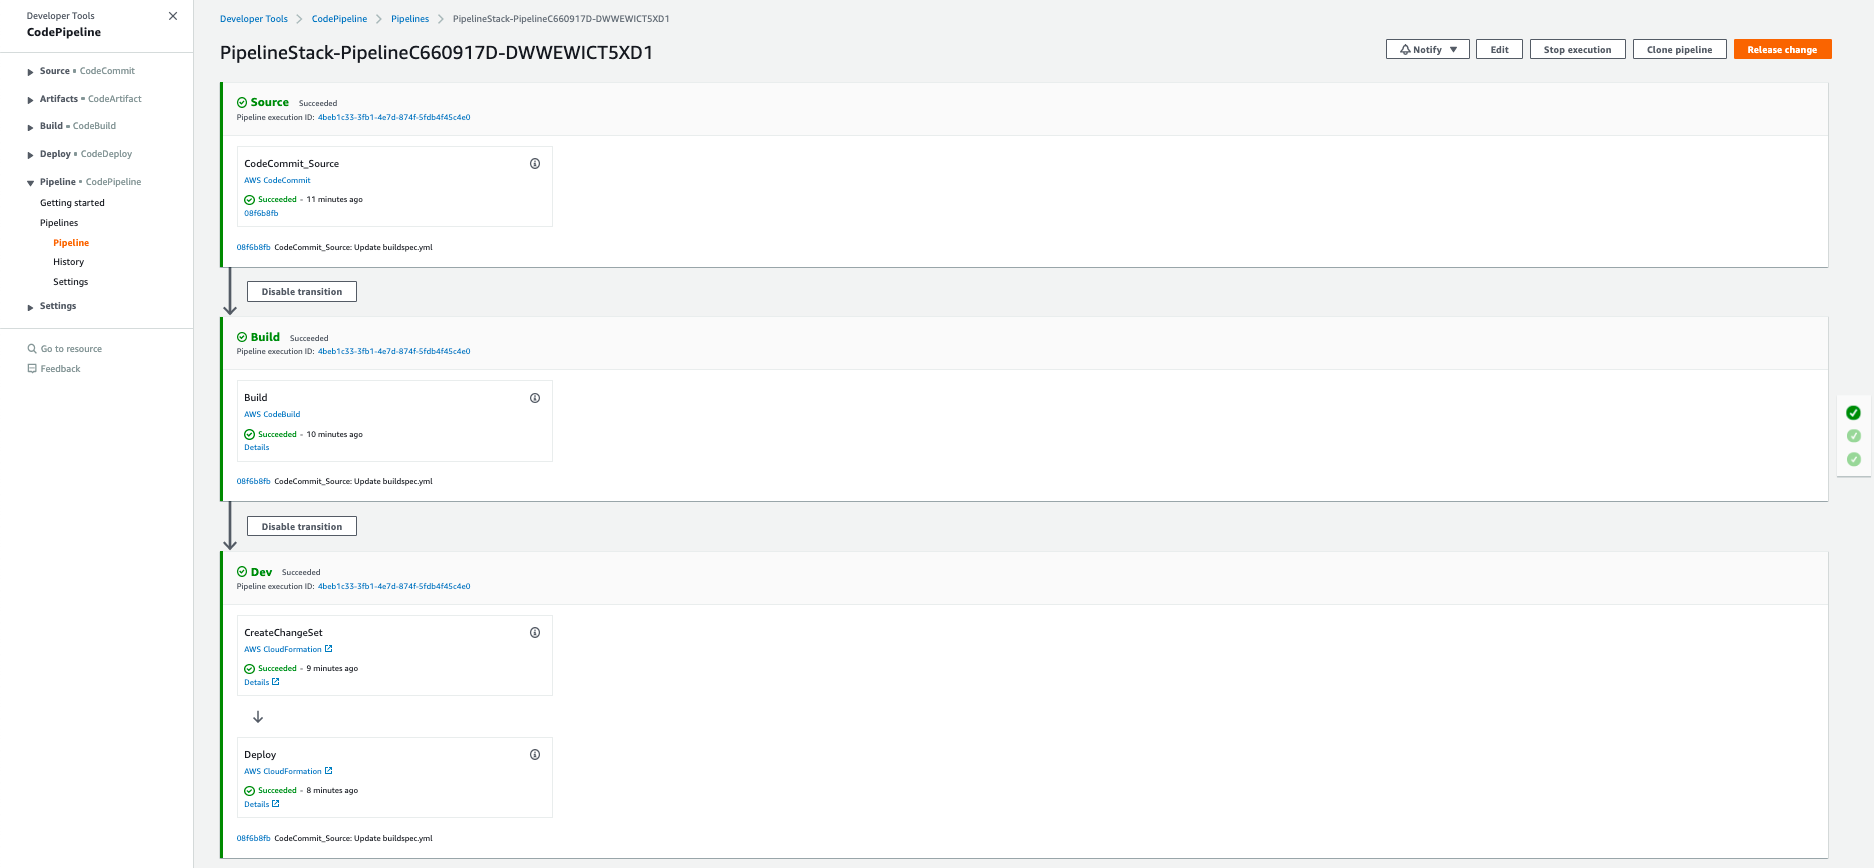
You should see ``PipelineStack`` has been created
Go to AWS Console -> Developer Tools -> CodePipeline -> Pipelines
## Clean up
```
cdk destroy PipelineStack
```
```
Are you sure you want to delete: PipelineStack (y/n)? y
PipelineStack: destroying...
11:21:26 PM | DELETE_IN_PROGRESS | AWS::CloudFormation::Stack | PipelineStack
11:22:34 PM | DELETE_IN_PROGRESS | AWS::IAM::Role | Pipeline/Dev/Creat...PipelineActionRole
11:22:34 PM | DELETE_IN_PROGRESS | AWS::IAM::Role | Pipeline/Build/Bui...PipelineActionRole
11:22:34 PM | DELETE_IN_PROGRESS | AWS::IAM::Role | Build/Role
✅ PipelineStack: destroyed
```

Wednesday, 26 August 2020
Project Euler #001 - Multiples of 3 and 5
If we list all the natural numbers below 10 that are multiples of 3 or 5, we get 3,5,6 and 9. The sum of these multiples is 23.
Find the sum of all the multiples of 3 or 5 below N.
Sample Input
```
2
10
100
```
Sample Output
```
23
2318
```
To sum from 1 to i, it is
```
s = 1 + 2 + 3... + (i - 1) + i
```
if you reverse the order
```
s = 1 + 2 + 3... + (i - 1) + i
s = i + (i - 1) + (i - 2) + ... + 2 + 1
```
summing each value, we got
```
2 * s = (i + 1) + (i + 1) + ...(i + 1) + (i + 1)
```
and there are ``i`` ``(i + 1)`` in above formula
```
2 * s = i * (i + 1)
```
at the end, we got
```
s = i * (i + 1) / 2
```
We can use ``s = i(i + 1) / 2`` to caculate the sum from 1 to ``i``. However, the question just needs us to calculate the sum of the multiples of 3 or 5.
Take 3 as an example
```
s = 3 + 6 + 9 + ... + 3i
s = 3(1 + 2 + 3 + ... + i)
```
We know that ``1 + 2 + 3 + ... + i`` can be calculated using ``s = i * (i + 1) / 2``. Therefore, we now know
```
s = 3 * (1 + 2 + 3 + ... + i)
s = 3 * (i * (i + 1) / 2)
```
where
```
3 * i <= n
i <= n / 3
```
it becomes
```
s = n * ((n / k)((n / k) + 1) / 2)
```
The question states that it only requires the multiples of K below N, that means it does not include N, hence we should substract N from 1.
However, if we sum up multiples of 3 and multiples of 5, we can get duplicate values, i.e. 15 in below example
```
multiples of 3: 3, 6, 9, 15, 18...
multiples of 5: 5, 10, 15, 20,...
```
Hence, we need to subtract the series of their least common multiple (LCM) which is 15. The final answer is
```
S(3) + S(5) - S(15)
```
Final Solution:
```cpp
ll t,i,x;
ll s(ll n,ll k){
x = n / k;
return (k * (x * (x + 1))) / 2;
}
int main()
{
FAST_INP;
cin >> t;
TC(t){
cin >> i;
cout << s(i - 1, 3) + s(i - 1, 5) - s(i - 1, 15) << "\n";
}
return 0;
}
```
Friday, 14 August 2020
Develop, release and operate Container Apps on AWS with the AWS Copilot CLI
Originally Copilot was called Amazon ECS CLI v2.
The AWS Copilot CLI is a tool for developers to create, release and manage production ready containerized applications on Amazon ECS and AWS Fargate. From getting started, pushing to a test environment and releasing to production, Copilot helps you through the entire life of your app development.
In short, you can develop, release and operate Container Apps on AWS with a few commands.
## Prerequisites
Before using Copilot, make sure you have installed AWS command line tool and setup your aws credentials. To do that, you can run ``aws configure`` to perform your setup. The region for this demonstration is ``ap-southeast-1``.
After the configuration setup, you can run the below command to verify
```bash
aws sts get-caller-identity
```
## Install
```
curl -Lo /usr/local/bin/copilot https://github.com/aws/copilot-cli/releases/download/v0.1.0/copilot-darwin-v0.1.0 &&
chmod +x /usr/local/bin/copilot &&
copilot --help
```
or through Homebrew
```
brew install aws/tap/copilot-cli
```
## Getting started
Run
```
copilot
```
to see the commands
```
👩✈️ Launch and manage applications on Amazon ECS and AWS Fargate.
Commands
Getting Started 🌱
init Create a new ECS application.
docs Open the copilot docs.
Develop ✨
app Commands for applications.
Applications are a collection of services and environments.
env Commands for environments.
Environments are deployment stages shared between services.
svc Commands for services.
Services are long-running Amazon ECS services.
Release 🚀
pipeline Commands for pipelines.
Continuous delivery pipelines to release services.
deploy Deploy your service.
Settings ⚙️
version Print the version number.
completion Output shell completion code.
Flags
-h, --help help for copilot
-v, --version version for copilot
Examples
Displays the help menu for the "init" command.
`$ copilot init --help`
```
## Init
Copilot will locate the Dockerfile automatically and ask you several questions. After that, it will create a new application containing your service(s).
A sample Dockerfile
```dockerfile
FROM nginx:alpine
EXPOSE 80
COPY . /usr/share/nginx/html
```
Run
```
copilot init
```
```
Application name: hello-world
Service type: Load Balanced Web Service
Service name: copilot-lb
Dockerfile: ./Dockerfile
Ok great, we'll set up a Load Balanced Web Service named copilot-lb in application hello-world listening on port 80.
✔ Created the infrastructure to manage services under application hello-world.
✔ Wrote the manifest for service copilot-lb at ../copilot-lb/manifest.yml
Your manifest contains configurations like your container size and port (:80).
✔ Created ECR repositories for service copilot-lb.
All right, you're all set for local development.
Deploy: Yes
✔ Created the infrastructure for the test environment.
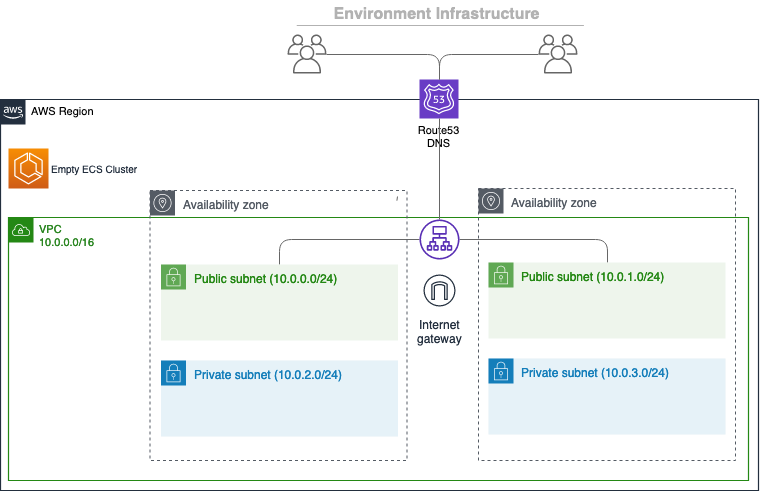
- Virtual private cloud on 2 availability zones to hold your services [Complete]
- Virtual private cloud on 2 availability zones to hold your services [Complete]
- Internet gateway to connect the network to the internet [Complete]
- Public subnets for internet facing services [Complete]
- Private subnets for services that can't be reached from the internet [Complete]
- Routing tables for services to talk with each other [Complete]
- ECS Cluster to hold your services [Complete]
- Application load balancer to distribute traffic [Complete]
✔ Linked account XXXXXXXXXXXX and region ap-southeast-1 to application hello-world.
```
You should be able to see the link at the end.
Click the link and verify that a simple nginx app is up and running
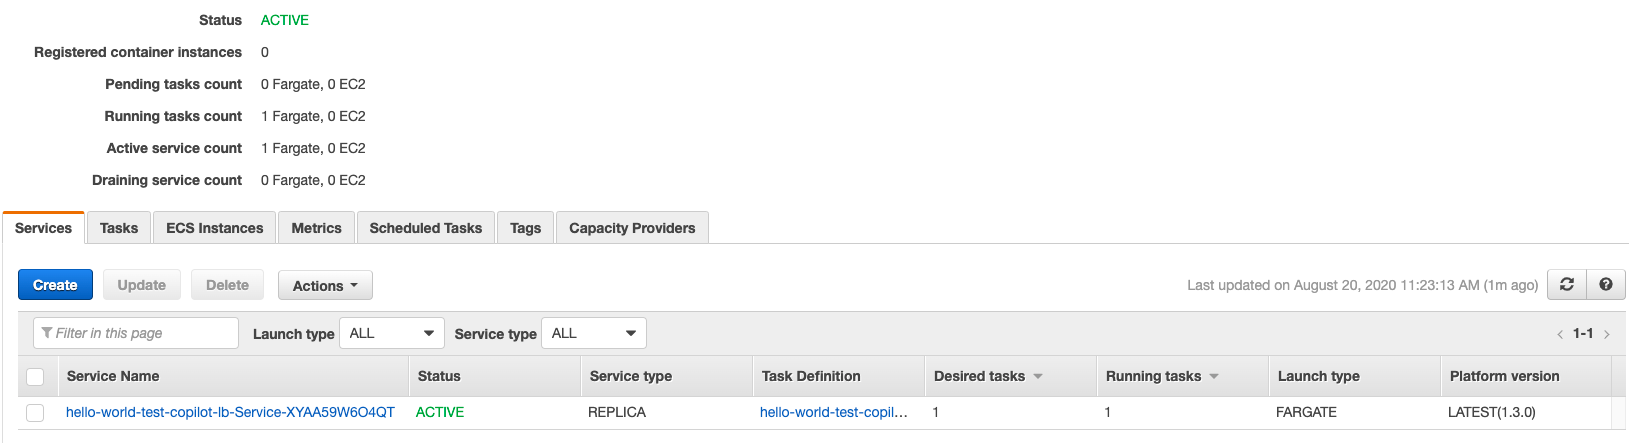
Go to ECS and you should see a cluster has been provisioned
You can also take a look at ECS - Task Definition / ECR / EC2 - Load Balancer
## Logs
Copilot provides ``svc logs`` to allow users to check the service logs more easily. You can stream the logs or display the logs within a specfic timeslot
```
-a, --app string Name of the application.
--end-time string Optional. Only return logs before a specific date (RFC3339).
Defaults to all logs. Only one of end-time / follow may be used.
-e, --env string Name of the environment.
--follow Optional. Specifies if the logs should be streamed.
-h, --help help for logs
--json Optional. Outputs in JSON format.
--limit int Optional. The maximum number of log events returned. (default 10)
-n, --name string Name of the service.
--since duration Optional. Only return logs newer than a relative duration like 5s, 2m, or 3h.
Defaults to all logs. Only one of start-time / since may be used.
--start-time string Optional. Only return logs after a specific date (RFC3339).
Defaults to all logs. Only one of start-time / since may be used.
```
To stream the logs
```
copilot svc logs --follow
```
To display the logs within a specfic timeslot
```
copilot svc logs --start-time 2006-01-02T15:04:05+00:00 --end-time 2006-01-02T15:05:05+00:00
```
## Deploy
The application was deployed to the testing environment, which is a single small container to Fargate. It is only for development purposes.
To deploy in production, run the following command to create a new environment
```
copilot env init
```
Update the manifest file to tell Copilot the application is going to be deployed to production
```
environments:
production:
count: 2
cpu: 1024
memory: 2048
```
Copilot will create the infrastructure fro the production environment
```
What is your environment's name? prod
Which named profile should we use to create prod? default
✔ Created the infrastructure for the prod environment.
- Virtual private cloud on 2 availability zones to hold your services [Complete]
- Virtual private cloud on 2 availability zones to hold your services [Complete]
- Internet gateway to connect the network to the internet [Complete]
- Public subnets for internet facing services [Complete]
- Private subnets for services that can't be reached from the internet [Complete]
- Routing tables for services to talk with each other [Complete]
- ECS Cluster to hold your services [Complete]
- Application load balancer to distribute traffic [Complete]
✔ Linked account XXXXXXXXXXXX and region ap-southeast-1 to application hello-world.
✔ Created environment prod in region ap-southeast-1 under application hello-world.
```
Deploy your service to production
```
copilot svc deploy --env production
```
## Clean up
```
copilot env list
```
I got
```
test
prod
```
Force delete the application with environments "test" and "prod"
```
copilot app delete --yes --env-profiles test=default,prod=prod-profile
```
## Conclusion
Copilot can help you to deploy your service containerized to production with a few commands. What you need is just Copilot and Dockerfile.
Copilot is still in beta. Some services like provisioning storage are not supported yet. (As of 20/08/2020)
## For more
- https://github.com/aws/copilot-cli
Monday, 10 August 2020
Getting Started with Azure Databricks
## Sample Cluster Setup

```json
{
    "num_workers": 5,
    "cluster_name": "Databricks-playground",
    "spark_version": "6.5.x-scala2.11",
    "spark_conf": {
        "spark.dynamicAllocation.enabled": "true",
        "spark.shuffle.compress": "true",
        "spark.shuffle.spill.compress": "true",
        "spark.executor.memory": "7849M",
        "spark.sql.shuffle.partitions": "1024",
        "spark.network.timeout": "600s",
        "spark.executor.instances": "0",
        "spark.driver.memory": "7849M",
        "spark.dynamicAllocation.executorIdleTimeout": "600s"
    },
    "node_type_id": "Standard_F8s",
    "driver_node_type_id": "Standard_F8s",
    "ssh_public_keys": [],
    "custom_tags": {},
    "cluster_log_conf": {
        "dbfs": {
            "destination": "dbfs:/cluster-logs"
        }
    },
    "spark_env_vars": {
        "PYSPARK_PYTHON": "/databricks/python3/bin/python3"
    },
    "autotermination_minutes": 0,
    "init_scripts": []
}
```

## Common commands

List the directory in DBFS

```
%fs ls
```

Create a directory in DBFS

```
%fs mkdirs src
```

Copy files from src to dist in DBFS

```
%fs cp -r dbfs:/src dbfs:/dist
```

## Setup Mount Point for Blob Storage

Using an old driver called WASB

### Create Secret Scope

By default, scopes are created with MANAGE permission for the user who created the scope. If your account does not have the Premium plan (or, for customers who subscribed to Databricks before March 3, 2020, the Operational Security package), you must override that default and explicitly grant the MANAGE permission to “users” (all users) when you create the scope

```
databricks secrets create-scope --scope  --initial-manage-principal users
```

To verify

```
databricks secrets list-scopes
```

### Create Secret
```
databricks secrets put --scope  --key  --string-value
```

The value of  can be retrieved from Storage Account -> Settings -> Access Keys

### Create Mount Point

```python
dbutils.fs.mount(
  source = "wasbs://@.blob.core.windows.net",
  mount_point = "/mnt/",
  extra_configs = {"":dbutils.secrets.get(scope = "", key = "")}
)
```

To verify in Databricks Notebook

```python
%fs dbfs:/mnt/
```

## Setup Mount Point for ADLS Gen 2

Requiring the following items

- ``application-id``: An ID that uniquely identifies the application.
- ``directory-id``: An ID that uniquely identifies the Azure AD instance.
- ``storage-account-name``: The name of the storage account.
- ``service-credential``: A string that the application uses to prove its identity.

### Create Mount Point

```python
configs = {"fs.azure.account.auth.type": "OAuth",
           "fs.azure.account.oauth.provider.type": "org.apache.hadoop.fs.azurebfs.oauth2.ClientCredsTokenProvider",
           "fs.azure.account.oauth2.client.id": "",
           "fs.azure.account.oauth2.client.secret": dbutils.secrets.get(scope="",key=""),
           "fs.azure.account.oauth2.client.endpoint": "https://login.microsoftonline.com//oauth2/token"}

# Optionally, you can add  to the source URI of your mount point.
dbutils.fs.mount(
  source = "abfss://@.dfs.core.windows.net/",
  mount_point = "/mnt/",
  extra_configs = configs)
```

## Performance Tuning

- Use Ganglia to see the metrics and gain insights

- Use Spark 3.0 if your application contians lots of joining logic
    - Adaptive Query Execution to speed up Spark SQL at runtime
    - Ref: https://databricks.com/blog/2020/05/29/adaptive-query-execution-speeding-up-spark-sql-at-runtime.html
    - Simply enable it by setting ``spark.sql.adaptive.enabled`` to ``true``

## Common issues

### No output files written in storage

Probably it is out of memory. Try adjust the hardware settings.

### Clusters settings not apply to jobs

Make sure the cluster is interactive or automated. Interactive one is for notebooks. If you create a job, you should be able to modify the cluster settings in the job creation page.

### Spark conf is not supported via cluster settings for spark-submit task

Self-explanatory

```
{"error_code":"INVALID_PARAMETER_VALUE","message":"Spark conf is not supported via cluster settings for spark-submit task. Please use spark-submit parameters to set spark conf."}
```

### Custom Dependencies cannot be found

Suppose your package is located in ``/dbfs/databricks/driver/jobs/``, add the following code in your entry point.

Python Example:

```python
import sys
sys.path.append("/dbfs/databricks/driver/jobs/")
```


## References:

- [Databricks File System (DBFS)](https://docs.databricks.com/data/databricks-file-system.html)
- [Create a Databricks-backed secret scope](https://docs.databricks.com/security/secrets/secret-scopes.html)
- [Azure Data Lake Storage Gen2](https://docs.microsoft.com/en-us/azure/databricks/data/data-sources/azure/azure-datalake-gen2)
Friday, 5 June 2020
Building Hong Kong Automated Teller Machine (ATM) Locator
## Project Synopsis
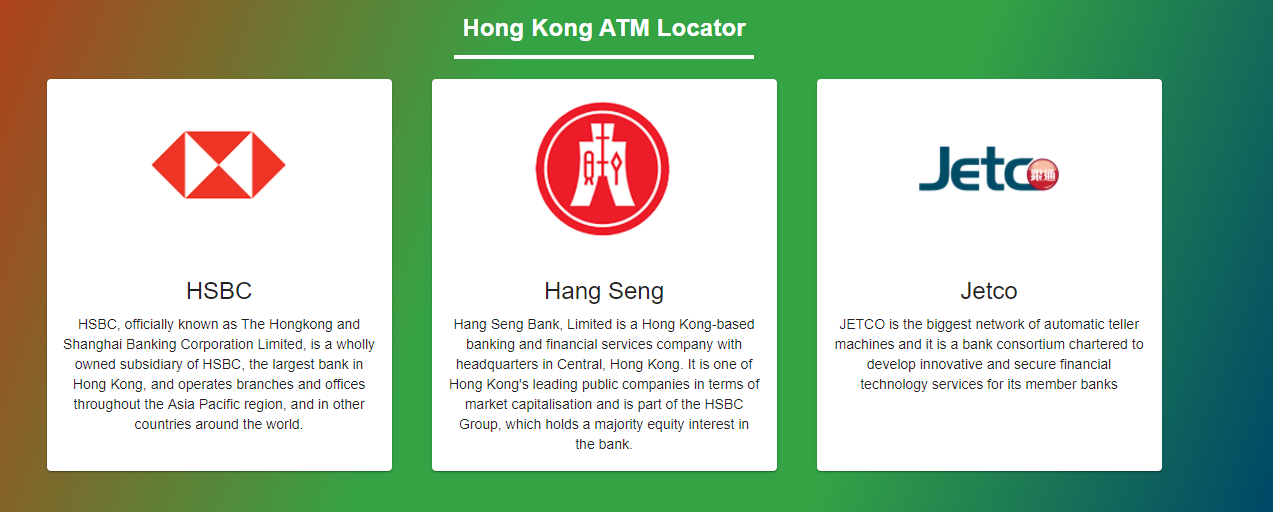
There are three ATM networks in Hong Kong, which are HSBC, Hang Seng Bank and JETCO respectively. ATM data will be retrieved via API Portal from HSBC, Hang Seng Bank and APIX. However, the interoperability is frustrating as the API is implemented at different standard levels. Hence, this project aims to centralise Hong Kong ATM data in a well-defined yet standardised format and display in a web portal for public use.
Hong Kong Monetary Authority (HKMA) has published [Open API Framework for the Hong Kong Banking Sector](https://www.hkma.gov.hk/media/eng/doc/key-information/press-release/2018/20180718e5a2.pdf), mentioning that no standardised open API functions will be provided at the first release.
Paragraph #20
> Throughout the discussion and consultation period, the HKMA recognises the industry’s desire to see a common set of Open APIs for better interoperability. However, a number of international banks operating in Hong Kong have already implemented their group standard for implementing Open APIs at global or regional levels, and have demonstrated elsewhere that requiring banks to adhere to a prescribed set of standardised Open API functions is challenging.
Paragraph #21
> Some opinions from the technology sector also indicate that it would be more desirable for banks to quickly offer Open APIs than to wait for standardised Open APIs that would take time to emerge. Furthermore, it is believed that once an ecosystem has been developed and becomes mature, convergence to standardised Open APIs will likely occur in response to the needs of the market.
## Data Retrieval
At the beginning, I needed to register an account in order to retrieve the data. However, it required me to provide BR number and fill in a lot of stuff. The process was a bit tedious and time-confusing. At the end, I only received the following API info.
- [x] Retrieving ATM data from HSBC and Hang Seng Banks from API Portals
- [ ] Retrieving ATM data from APIX
- [ ] Bank of China (Hong Kong) Limited
- [x] Bank of Communications (Hong Kong) Limited
- [x] Bank of Communications Co., Ltd.
- [x] China CITIC Bank International Limited
- [x] China Construction Bank (Asia) Corporation Limited
- [x] China Merchants Bank Hong Kong Branch
- [ ] Chiyu Banking Corporation Limited
- [x] Chong Hing Bank Limited
- [ ] Citibank (Hong Kong) Limited
- [x] CMB Wing Lung Bank Limited
- [ ] Dah Sing Bank, Limited
- [ ] DBS Bank (Hong Kong) Limited
- [x] Fubon Bank (Hong Kong) Limited
- [x] Industrial and Commercial Bank of China (Asia) Limited
- [ ] Nanyang Commercial Bank Limited
- [x] OCBC Wing Hang Bank Limited
- [ ] Public Bank (Hong Kong) Limited
- [ ] Shanghai Commercial Bank Limited
- [ ] Standard Chartered Bank (Hong Kong) Limited
- [x] The Bank of East Asia, Limited
As I haven't received others' reply and all the required data is not complete, this project is currently archived.
## Hackathon
I presented this project in one of the g0vhk hackathons and I was looking for different contributors.
Technical Contributors:
- Responsible for implementing features and fixing reported bugs
- Preferably with experience with knowledge in Open API and Web Development
Non-technical Contributors:
- Responsible for updating documentation
- Good command of written in English and Chinese
UI/UX Contributors:
- Responsible for refining UI/UX
- Knowledge of UI/UX principles and techniques
At the end, I only met several people but their opinions were valuable.
## Frontend
The frontend part is built with
- ReactJS - Library for building user interfaces
- Material UI - React components that implement Google's Material Design
- React-Leaflet - Interactive OSM map
The listing page shows the selected ATM network in a list view, sorted by the distance. If Location in your browswer is turned off, the default location (22.308, 114.1716) will be used. You may also see this location in my another project [geodesy](https://pub.dev/packages/geodesy/versions/0.3.0). If you google it, it shows Eaton HK where we had hackathons by [g0v.hk](https://www.facebook.com/g0vhk.io) and [The Loop](https://www.facebook.com/groups/loop.dev).

By clicking the button on the top-right side, it switches to a map view.

Clicking the corresponding item navigates to a detail page showing the basic info and the map.

The UI is relatively simple. Below shows how to prepare the data and transform it to the desired format.
## Scrapers
At an early stage of development, ATM data were fetched from corresponding bank websites. See [here](https://github.com/wingkwong/hk-atm-locator/tree/master/archive/scrapers) for the scrapers. Here's some sample data.
```
code,districtName,districtCode,name,latitude,longitude,address,service
_central_western_district,Central & Western District,hong_kong_district,Central District Branch,22.280249,114.160161,"2A Des Voeux Road Central, Hong Kong",ATM_RMB
_central_western_district,Central & Western District,hong_kong_district,Bonham Road Branch,22.2844809,114.1409265,"63 Bonham Road, Hong Kong",ATM_RMB
_central_western_district,Central & Western District,hong_kong_district,Shek Tong Tsui Branch,22.2862301,114.1345169,"534 Queen's Road West, Shek Tong Tsui, Hong Kong",ATM_RMB
_central_western_district,Central & Western District,hong_kong_district,Kennedy Town Branch,22.2835392,114.129382,"Harbour View Garden, 2-2F Catchick Street, Kennedy Town, Hong Kong","ATM_RMB,CASH_DEPOSIT_DUAL_CURRENCY"
_central_western_district,Central & Western District,hong_kong_district,Connaught Road Central Branch,22.282915,114.157785,"13-14 Connaught Road Central, Hong Kong",ATM_RMB
_central_western_district,Central & Western District,hong_kong_district,Caine Road Branch,22.2808553,114.1526749,"57 Caine Road, Hong Kong",ATM_RMB
```
Later on, those data were retrieved from HSBC, Hang Seng API Portals and APIX instead. However, as I couldn't get all the ATM data. Brian Leung shared an idea that scraping the data from JETCO because it provides most of the data I missed. Hence, I wrote a simple Python program to scrape the data. Here's an example.
```
{"xml_msg": {"@query": "region=2,area=1,district=10,transaction=0", "supp_cb": null, "atms": {"atm": [{"@id": "627", "region": "Hong Kong", "area": "Hong Kong", "district": "Pokfulam", "ob_name": "Bank of China (Hong Kong) Limited", "addr": "Podium Of Haking Wong Bldg., University Of Hong Kong, Pok Fu Lam, Hong Kong.", "supp_tran": {"tran_name": ["Cash Withdrawal, Fund Transfer, Balance Enquiry, PIN Change and other basic services", "MPF", "Bill Payment, Credit Card Payment and Charity Donation", "PLUS", "JCB", "CUP", "CIRRUS"]}, "currencies": {"currency": ["HKD", "RMB"]}, "latitude": "22.282941420489305", "longitude": "114.13639426231384"}, {"@id": "628", "region": "Hong Kong", "area": "Hong Kong", "district": "Pokfulam", "ob_name": "Bank of China (Hong Kong) Limited", "addr": "Shop 510, Chi Fu Landmark, Pok Fu Lam, Hong Kong", "supp_tran": {"tran_name": ["Cash Withdrawal, Fund Transfer, Balance Enquiry, PIN Change and other basic services", "MPF", "Bill Payment, Credit Card Payment and Charity Donation", "PLUS", "JCB", "CUP", "CIRRUS", "FISC"]}, "currencies": {"currency": ["HKD", "RMB"]}, "latitude": "22.257842107377694", "longitude": "114.13875728845596"}, {"@id": "215658", "region": "Hong Kong", "area": "Hong Kong", "district": "Pokfulam", "ob_name": "Bank of China (Hong Kong) Limited", "addr": "Shop No.22 at G/F, Wah Fu (I) Shopping Centre, 23 Wah Fu Road, Pokfulam, Hong Kong.", "supp_tran": {"tran_name": ["Cash Withdrawal, Fund Transfer, Balance Enquiry, PIN Change and other basic services", "MPF", "Bill Payment, Credit Card Payment and Charity Donation", "PLUS", "JCB", "CUP", "CIRRUS", "FISC"]}, "currencies": {"currency": ["HKD", "RMB"]}, "latitude": "22.2501635", "longitude": "114.13746650000007"}, {"@id": "228553", "region": "Hong Kong", "area": "Hong Kong", "district": "Pokfulam", "ob_name": "Bank of China (Hong Kong) Limited", "addr": "G/F, Wing A, Main Hospital Building, Queen Mary Hospital, 102 Pokfulam Road, HK", "supp_tran": {"tran_name": ["Cash Withdrawal, Fund Transfer, Balance Enquiry, PIN Change and other basic services", "MPF", "Bill Payment, Credit Card Payment and Charity Donation", "PLUS", "JCB", "CUP", "CIRRUS", "FISC"]}, "currencies": {"currency": ["HKD", "RMB"]}, "latitude": "22.270076", "longitude": "114.131498"}, {"@id": "291814", "region": "Hong Kong", "area": "Hong Kong", "district": "Pokfulam", "ob_name": "The Bank of East Asia, Limited", "addr": "Shop P0030, G/F, Centennial Campus, The University of Hong Kong", "supp_tran": {"tran_name": ["Cash Withdrawal, Fund Transfer, Balance Enquiry, PIN Change and other basic services", "MPF", "Interbank Transfer", "Bill Payment, Credit Card Payment and Charity Donation", "PLUS", "JCB", "CUP", "CIRRUS", "FISC", "Diners Club", "Discover"]}, "currencies": {"currency": ["HKD", "RMB"]}, "latitude": "22.2833372", "longitude": "114.13428799999997"}, {"@id": "291813", "region": "Hong Kong", "area": "Hong Kong", "district": "Pokfulam", "ob_name": "The Bank of East Asia, Limited", "addr": "Shop P0030, G/F, Centennial Campus, The University of Hong Kong", "supp_tran": {"tran_name": ["Cash Withdrawal, Fund Transfer, Balance Enquiry, PIN Change and other basic services", "MPF", "Interbank Transfer", "Bill Payment, Credit Card Payment and Charity Donation", "PLUS", "JCB", "CUP", "CIRRUS", "FISC", "Diners Club", "Discover"]}, "currencies": {"currency": "HKD"}, "latitude": "22.2833372", "longitude": "114.13428799999997"}, {"@id": "162131", "region": "Hong Kong", "area": "Hong Kong", "district": "Pokfulam", "ob_name": "The Bank of East Asia, Limited", "addr": "Outdoor Area of 2/F Chong Yuet Ming Amenities Centre, Main Campus, The University of Hong Kong", "supp_tran": {"tran_name": ["Cash Withdrawal, Fund Transfer, Balance Enquiry, PIN Change and other basic services", "MPF", "Interbank Transfer", "Bill Payment, Credit Card Payment and Charity Donation", "PLUS", "JCB", "CUP", "CIRRUS", "Diners Club", "FISC", "Discover"]}, "currencies": {"currency": "HKD"}, "latitude": "22.28272588988215", "longitude": "114.13904817699892"}, {"@id": "171376", "region": "Hong Kong", "area": "Hong Kong", "district": "Pokfulam", "ob_name": "Industrial and Commercial Bank of China (Asia) Limited", "addr": "HKU ATM2", "supp_tran": {"tran_name": ["Cash Withdrawal, Fund Transfer, Balance Enquiry, PIN Change and other basic services", "Interbank Transfer", "Bill Payment, Credit Card Payment and Charity Donation", "JCB", "CUP", "CIRRUS"]}, "currencies": {"currency": ["HKD", "RMB"]}, "latitude": "22.283728578971324", "longitude": "114.13659663795931"}]}}}
```
Even the data may not be up-to-dated, it is still better than none.
## Data Transformation
I wrote several programs to transform, enrich, and manipulate data from API Portals and produce data in a well-defined yet standardised format. The transformers includes the following scripts:
### prepare_data.js
The script is used to fetch data from API Portals. An example to prepare HSBC data:
```
const prepareHsbcData = async (outputFile) => {
info('Start to prepare the hsbc data');
const res = await request.getAsync({
url: configs.HSBC_API_ENDPOINT,
headers: {
...header,
ClientID: configs.HSBC_CLIENT_ID,
ClientSecret: configs.HSBC_CLIIENT_SECRET,
},
});
remind(`Successfully fetched the hsbc data.Size: ${res.body.length} `);
fs.writeFileSync(outputFile, res.body, 'utf8');
remind(`Successfully store the data to ${outputFile} `);
};
```
### process_data.js
This script is used to transform or enrich the data. For example, data like operating hour displaying as ``24-hours`` needs to be converted back to a standarised format.
```
const createGenericOpeningHours = (openTime, closeTime) => {
const WEEK_DAYS = [
'Monday',
'Tuesday',
'Wednesday',
'Thursday',
'Friday',
'Saturday',
'Sunday'
];
return WEEK_DAYS.map(weekday => ({
OpenDayDescription: weekday,
OpenTime: openTime,
CloseTime: closeTime
}));
}
```
### generate_checksum.js
As we fetch the data periodically, data may be not updated. Hence, this file is to generate the checksum of the processed files. If the checksum is same, it won't copy the data from ``transformer/processed/.json`` to ``web/src/data``
A simple checksum generator using nodeJS built-in crypto.
```
const generateChecksum = (data, md5Path) => {
const checksum = crypto
.createHash('md5')
.update(data, 'utf8')
.digest('hex');
if(shouldWriteChecksum(md5Path, checksum)) {
fs.writeFileSync(md5Path, checksum);
remind(`Finished generating checksum file at ${md5Path}`);
} else {
fs.unlinkSync(md5Path);
}
}
const shouldWriteChecksum = (md5Path, checksum) => {
if(!fs.existsSync(md5Path)) return true;
const checksumInmd5 = fs.readFileSync(md5Path);
return checksum === checksumInmd5 ? false : true;
}
```
### process.js
It is a CLI Program using ``commander``. It is the entry point to call other functions.
```
const program = require('commander');
program
.version('0.1.0');
/**
* Get the address
*/
program
.command('process-address ')
.description('fetch and get the address and save to file')
.action(processAddress);
/**
* Get the data from the API Portal
*/
program
.command('prepare ')
.description('Get the data from the bank')
.action(prepareData);
/**
* Process the raw data
*/
program
.command('process ')
.description('Process the prepared data and output it')
.action(processData);
/**
* Generate the checksum
*/
program
.command('process-checksum ')
.description('Check and write checksum of the processed data')
.action(generateChecksum);
program.parse(process.argv);
// If no arguments we should output the help
if (!program.args.length) program.help();
```
It also uses ``hk-address-parser-lib``, which happens to be one of the projects that I've worked on, to enrich latitude and longitude based on Address Line.
```
async function parseAddress(atm) {
const addressLine = atm.ATMAddress.AddressLine.join(' ');
const records = await AddressParser.parse(addressLine);
if (records.length > 0) {
const { lat, lng } = records[0].coordinate();
atm.ATMAddress.LatitudeDescription = lat + ''; // eslint-disable-line
atm.ATMAddress.LongitudeDescription = lng + ''; // eslint-disable-line
}
}
```
The general flow is shown as below
- Pipe processing Hang Seng data
```bash
./src/process.js prepare hang_seng unprocessed/hang_seng.json && \
./src/process.js process hang_seng unprocessed/hang_seng.json processing/hang_seng.json && \
./src/process.js process-address hang_seng processing/hang_seng.json processed/hang_seng.json
```
- Pipe processing HSBC data
```bash
./src/process.js prepare hsbc unprocessed/hsbc.json && \
./src/process.js process hsbc unprocessed/hsbc.json processing/hsbc.json && \
./src/process.js process-address hsbc processing/hsbc.json processed/hsbc.json
```
- Pipe processing JETCO data
```bash
./src/process.js process jetco unprocessed/jetco/en/ processed/jetco_en.json && \
./src/process.js process jetco unprocessed/jetco/tc/ processed/jetco_tc.json
```
- Generate Checksum files after pipe processing each network
```bash
./src/process.js process-checksum hang_seng processed/hang_seng.json checksum/hang_seng.md5 && \
./src/process.js process-checksum hsbc processed/hsbc.json checksum/hsbc.md5 && \
./src/process.js process-checksum jetco processed/jetco_en.json checksum/jetco_en.md5 && \
./src/process.js process-checksum jetco processed/jetco_tc.json checksum/jetco_tc.md5
```
If there is no change in checksum file, the data file will not be copied and committed.
## CI/CD
I hosted the website on Github Pages only. Thanks to Nandi Wong for setting up Travis CI, the abovementioned process is now automated. Basically it includes jobs to install dependencies and execute corresponding scripts to pull the latest data.
## Conclusion
Even though this project could not make it at the end, I learnt quite a lot and met a lot of brilliant people. Thanks all the contributors throughout these months.
The project can be found in my Github. Here's the [link](https://github.com/wingkwong/hk-atm-locator).
Subscribe to:
Posts (Atom)